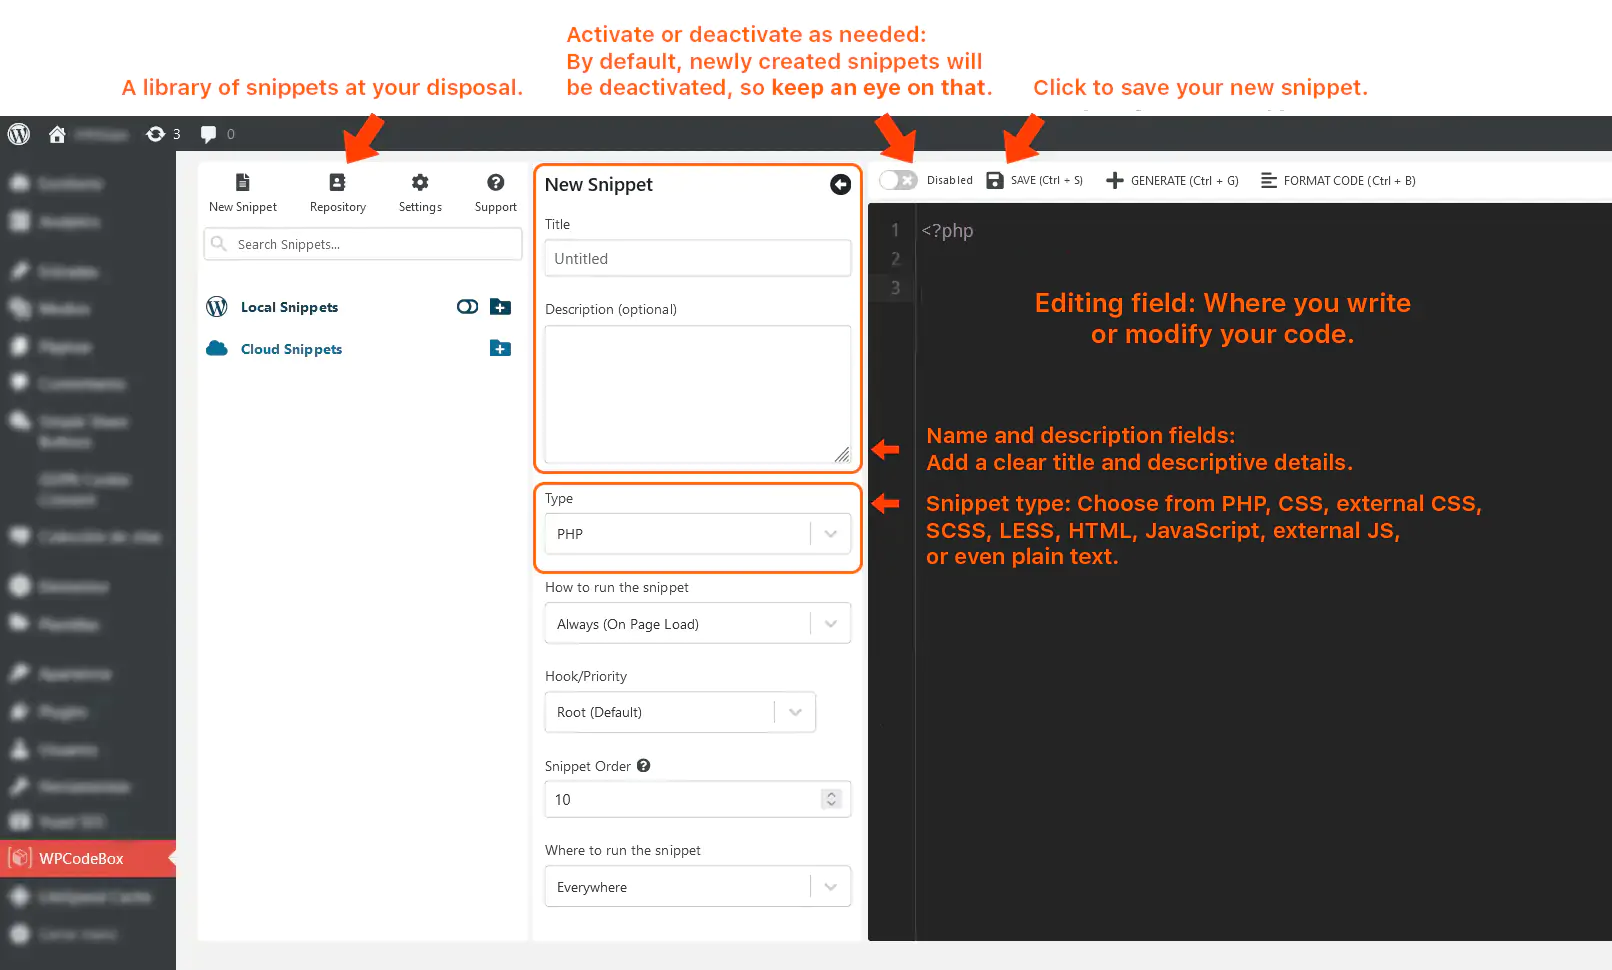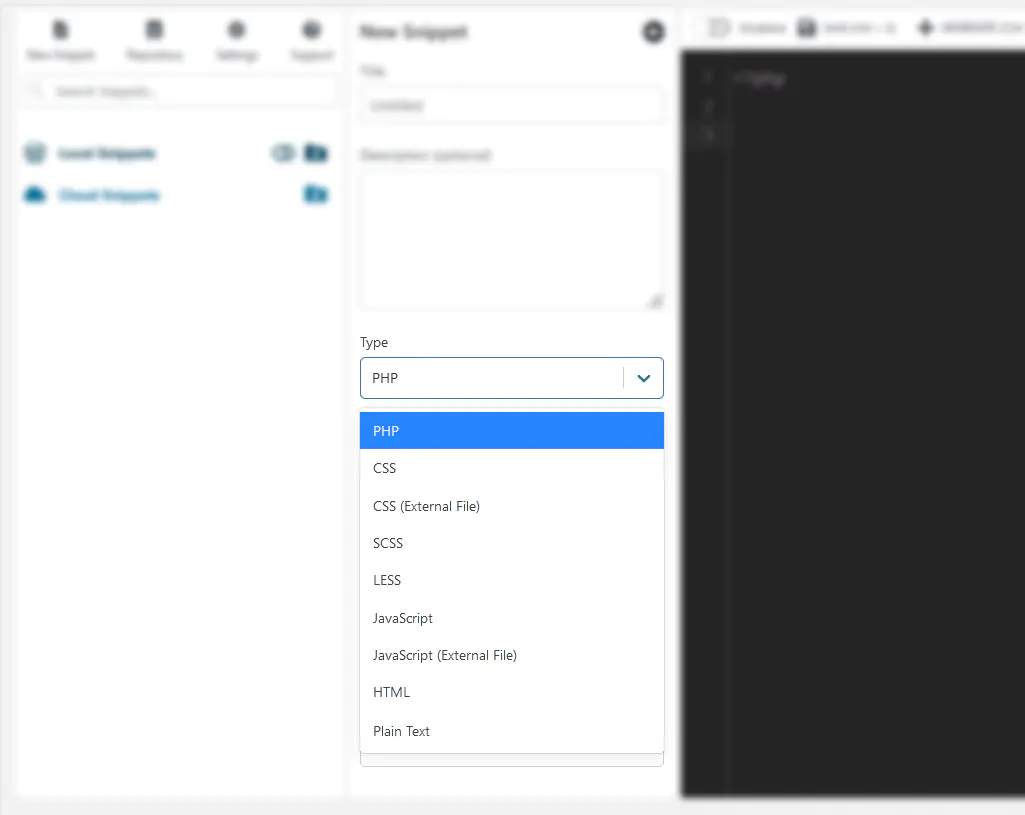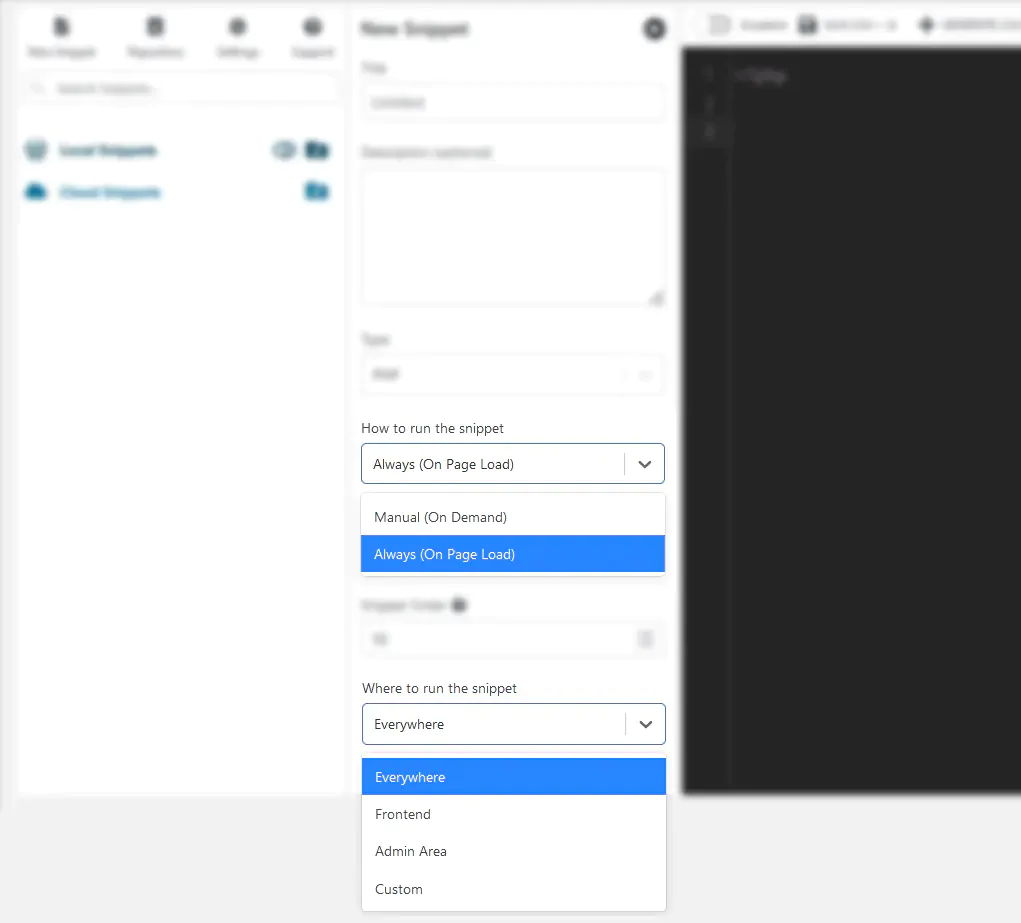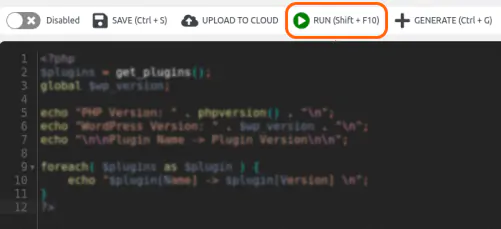
Category: Plugins

  • FluentCommunity

    FluentCommunity

    FluentCommunity is a WordPress plugin that gives you a full platform to build online communities —and even run learning environments— directly inside WordPress. Everything lives in your site, under your control, without relying on external social networks or third-party platforms.

    Up until now, BuddyBoss was the go-to solution for this type of setup. But FluentCommunity arrives as a serious heavy lightweight contender, and in this review we’ll see why there are strong reasons to consider switching.

    → FluentCommunity is included for free in our WordPress maintenance service.

    What is FluentCommunity?

    FluentCommunity is developed by the same team behind FluentBoards, FluentForms, FluentCRM, and FluentBooking (links go to our reviews of each). Because of that, it integrates seamlessly with those tools if you’re already using them.

    For example, with FluentCRM —their email marketing automation plugin— you can instantly build and segment email lists based on your community members with a single click.

    With FluentCommunity you can create member communities, manage courses, and foster engagement, all while keeping your WordPress site running fast. It combines familiar social-network features (think a minimal Facebook-style layer) with LMS capabilities (Learning Management System) so members can interact, share resources, and learn… all in one place.

    Key Features

    • User Profiles: Members can personalize their profiles, share info, interests, and recent activity.
    • Unlimited Groups: Create as many “Spaces” (community groups) as needed.
    • Discussion Threads: Ideal for structured conversations and topic-based engagement.
    • Mentions, Hashtags & Polls: Built-in tools to encourage interaction and participation.
    • Private Messaging: One-to-one communication directly between members.
    • Real-Time Chat: A live chat room for instant, synchronous discussions.
    • Content Sharing: Post text updates, images, videos, and shared files.
    • Notifications: Alerts keep members aware of replies, mentions, group activity, and messages.
    • Member & Group Directories: Easily browse community members, groups, and courses.
    • Engagement Tools: Reactions, leaderboards, GIFs, and emojis to boost community activity.
    • Dark / Light Mode: Interface theme options based on user preference.

    Installation & Setup

    After downloading the .zip file, go to your WordPress Plugins dashboard and upload it as usual. Once activated, the system will prompt you to install the required Core Plugin, and from there you can begin configuring spaces, profiles, and permissions.

    Once that step is complete, you’ll be taken to the community creation screen. Here, you’ll choose a name for your community and define the URL path where the space will live on your site.

    Yes, we can choose a preset template to jump-start our project, which is very convenient. Next, we’ll go over the strengths and key characteristics of each template.

    Basic

    Basic is a minimalist template designed to help you get started quickly with the essentials. It includes core sections such as forums, blog posts, and a simple homepage layout.

    This template is ideal if you want to launch your community without getting overwhelmed by customization options. In other words, it’s easy to set up and works great for general-purpose communities or projects that are still in the early stages of development.

    The Basic template is a solid choice for modest communities or projects whose scope is still taking shape.

    Course

    As the name suggests, the Course template is designed specifically for building and managing online learning environments. It includes tools for creating lessons, organizing modules, and delivering remote classes.

    Course also provides built-in student progress tracking and assessment features. It works seamlessly with course-related discussion forums, Q&A spaces, private areas for enrolled students, and exclusive modules restricted to certain cohorts.

    This template is ideal for virtual academies, instructors, and teachers who want to combine education with community-driven engagement tools.

    Product

    The Product template focuses on promoting and supporting physical (and digital) products. It includes areas for reviews, technical discussions, and user feedback.

    Its layout is designed to encourage interaction between users, makers, artisans, and product creators. It also comes with tools for running polls, gathering feedback, and managing user suggestions.

    The Product template is a great fit for businesses and brands looking to build a community around their offerings. It’s especially useful for SaaS companies, tech products, and user communities where product loyalty and peer interaction play a key role.

    Blank

    This is your blank canvas — a completely flexible starting point for those who want full creative control.

    Blank includes no predefined structure, allowing you to build your community layout and content flow from scratch. You can integrate any features mentioned previously, but customization requires more effort. For that reason, this template is best for experienced site builders or projects seeking a unique brand identity or specialized functionality.

    Our Pick

    For this review, we’ll go with Course to illustrate how FluentCommunity can be used to run a creative writing workshop (or any narrative-focused learning community).

    Next, in the final step, we’ll configure who has access to the portal we’re creating, along with a few email-related settings.

    As we can see, we can change the default setting that allows anyone to access the portal, set a contact email for alerts, and optionally send emails via SMTP using FluentSMTP (recommended).

    Once we save these settings, we’ll be taken to the Settings Dashboard, which presents six large options:

    • Portal Settings: General setup for your community.
    • Appearance: Visual customization and styling.
    • Advanced Settings: Additional configuration options.
    • Course Management: Tools for organizing and running courses.
    • Documentation: Access to FluentCommunity’s official guides (highly recommended).
    • Portal URL: Change the URL path where your community is located.

    Inside Portal Settings, you’ll find all the options needed to shape your community’s structure, personality, and functionality.

    The sections are organized in a right-side menu that groups settings according to their scope and impact.

    In General, you’ll find the most basic options, such as uploading a logo, changing the community name, and customizing the login page.

    In Customizations, you can adjust visual elements, including enabling Dark Mode.

    In Managers, you can assign additional administrators and manage existing ones. The first time you enter, the list will be empty, but you’ll see the + Add Manager button to invite members.

    Email Settings allows you to configure the sender name, email address, and email footer. These settings are used for sending notifications and automated messages from FluentCommunity.

    Features & Addons lets you enable extended functionality through modules, such as leaderboards, member badges, structured course lessons, animated GIFs via Giphy, emojis, and media location settings.

    In Manage Topics, you can create and organize content categories, allowing members to filter posts using the topic navigation bar inside Spaces.

    Space Groups is where you organize Spaces into groups to keep your community structure clear and manageable.

    In Menu Settings, you can customize your navigation menus, including the sidebar and top navigation. Here you can enable, disable, or rearrange items depending on how you want members to interact with the portal.

    Privacy Settings lets you configure access permissions for Spaces and specific pages based on user roles.

    Finally, Manage Courses is where you create courses and learning modules for your members.

    Why might FluentCommunity be the best option for building communities?

    First, its code is highly optimized. It not only avoids slowing down your WordPress site, but the portal itself runs extremely fast. In comparison, BuddyBoss feels heavy.

    Performance differences are measurable. At the time of writing, the main FluentCommunity plugin ZIP file is only a few megabytes, and the Pro addon is just under 3MB (2.96MB). In contrast, BuddyBoss is 15.5MB, its Pro addon adds another 7.1MB, and it’s tied to a theme that adds another 13.5MB.

    But it’s not just about file size. FluentCommunity is more flexible. It does not rely on a specific theme the way BuddyBoss does. Technically, BuddyBoss can run with any theme, but without the official one, the result often looks incomplete and less professional. FluentCommunity avoids this issue entirely, allowing you to focus on building a powerful community without unnecessary constraints.

    Also, FluentCommunity is not trying to “do everything.” For most site owners, the built-in features will be more than enough. It is built from the ground up to be lighter, and it does not require dedicated servers or more resources than standard hosting.

    What could FluentCommunity improve?

    While we strongly recommend the plugin, FluentCommunity would benefit from more styling options to better match the branding and color identity of each site.

    Similarly, at this stage, there is still a noticeable visual jump between the main site and the portal. It would be valuable for FluentCommunity to inherit more elements from the active theme, such as layout blocks or reusable design components.

    There is also room for improvement in LMS flexibility. The built-in course system works well, but it may feel too limited for projects requiring advanced or highly customized learning experiences.

    Conclusion

    FluentCommunity signals that BuddyBoss, the leading plugin until now, will need to rethink its approach.

    FluentCommunity is extremely lightweight, installs cleanly, and provides everything needed to build communities in WordPress for most typical use cases.

    Considering the track record of the Fluent suite and how consistently these plugins evolve, it’s easy to imagine FluentCommunity becoming the new #1 in this space sooner rather than later.

    Thanks for reading, and feel free to share your thoughts in the comments.

  • Cart Abandonment Recovery PRO

    Cart Abandonment Recovery PRO

    Cart Abandonment Recovery Pro is a WooCommerce plugin designed to recover “lost” shopping carts in your online store. Developed by the same team behind the successful CartFlows (the funnel builder focused on maximizing conversions), this tool helps you win back shoppers and turn abandoned carts into revenue. Automated, flexible, and built to deliver measurable results.

    WooCommerce Cart Abandonment Recovery PRO is included for free in our WordPress maintenance service.

    In Search of Abandoned Carts

    Everything seems to be going well: we’re driving traffic, investing time, effort, and budget to attract qualified visitors to our online store. But at the crucial moment—when they should be completing their purchase—many users leave. And each abandoned cart (to state the obvious) is money slipping away.

    These users browsed our products, made decisions adding items to the cart, went all the way to checkout —yet, for some reason, they leave before paying, leaving everything behind. But we know they were interested.

    By default, we don’t know who abandoned the cart because WooCommerce doesn’t capture the details of users who don’t finish checkout. Without a name or email address, there’s no way to follow up (What happened with your order? Did something go wrong? How can we help? Did you forget your wallet in the other pants?).

    To make matters worse, recovering those sales depends on speed. Data shows that most recoveries happen within the first hour after abandonment. If we don’t reach out within that window, the sale is almost always lost.

    Another foundational problem: many plugins don’t talk to each other. And that lack of integration —at best partial— creates more friction. Plugins overlap, break, or fail to sync with our email or CRM tools. The result? Data scattered everywhere, and no automation where we need it most: recovering the sale.

    Cart Abandonment Recovery Solves This

    Cart Abandonment Recovery automates what would be impossible manually: it identifies every abandoned cart, stores the shopper’s information, and follows up with a smart sequence of personalized emails designed to recover the purchase.

    With just one click, we can decide when the first reminder is sent, include automatically expiring coupon codes, and restore the abandoned cart, all running quietly in the background without any manual intervention, yet producing visible results. According to the developers, it can recover up to 45% of incomplete checkouts.

    As expected, the plugin integrates seamlessly with WooCommerce and our email marketing tools, preventing duplication, errors, and conflicts. Every action is tracked, every opportunity is measurable, and every recovered sale appears in clear, up-to-date reports.

    With Cart Abandonment Recovery, an abandoned cart becomes a second chance.

    Benefits of Cart Abandonment Recovery Pro for WooCommerce

    Email capture: During the checkout process, the plugin automatically collects users’ email addresses—even before the payment is completed. This allows us to immediately reconnect with potential customers if the process is interrupted.

    Unique Checkout Links: Each customer receives a personalized, one-click payment link that takes them directly back to their abandoned checkout. No passwords, no extra steps: just click and pick up exactly where they left off.

    Customizable Email Templates: The plugin includes ready-to-use email templates that are fully customizable. We can adapt them to match our brand, tone, and visual style, maintaining consistency and reinforcing trust throughout the communication.

    GDPR Compliance: The entire workflow is fully aligned with GDPR requirements, including clear privacy notices and consent messaging displayed at checkout.

    Performance Tracking: From the dashboard, we can monitor performance in real time: recovery rate, revenue generated, reduction in abandonment, and conversions driven by the automation sequences. This data allows us to fine-tune strategies with precision.

    Webhook & CRM Integration: For more advanced workflows, Cart Abandonment Recovery offers webhook support and compatibility with CRMs like ActiveCampaign and HubSpot, making multichannel data syncing and campaign management seamless.

    And if we want to go a step further, the Funnel Builder lets us create upsells, downsells, and post-purchase flows that maximize the value of each customer —connecting cart recovery to a broader growth strategy.

    Why We Choose Cart Abandonment Recovery

    Our goal is simple: every abandoned cart should have a real chance to become a successful sale. To achieve that, Cart Abandonment Recovery covers all the essentials: unlimited recovery emails, pre-designed templates, send scheduling, shortcodes, and basic coupon automation. With this alone, a store can start recovering revenue on day one with no manual effort required.

    But if we want exceptional results in stores with variety or high volume, the Pro version makes all the difference. It offers advanced rules (exclude products from discounts, condition coupons by subtotal, skip emails based on order logic), product-level reporting, and email-level analytics (sent, opened, clicked, unsubscribed), plus webhooks and a roadmap for SMS/WhatsApp and Zapier.

    In practical terms: more control, better segmentation, and decisions based on real data.

    Final Thoughts

    Recovering a cart isn’t just about sending an email. It’s about understanding when the customer dropped off and giving them a meaningful reason to return. With Cart Abandonment Recovery, we turn WooCommerce’s default silence into a proactive conversation. In a web environment where every click counts, having automation, data, and brand consistency working together is what determines whether a sale is lost… or won on the second chance.

    And remember: every recovered cart isn’t just an extra sale, but the beginning of a stronger customer relationship.

    Thanks for reading. We hope you found this guide useful.
    Wishing you success in your e-commerce journey. Feel free to share your thoughts in the comments below.

  • Advanced Database Cleaner Pro

    Advanced Database Cleaner Pro

    Database Cleaning for the Demanding User

    This plugin is an absolute must-have if you want to keep your WordPress database clean and optimized. Advanced Database Cleaner scans all data tables, hunting down and eliminating accumulated digital “junk.” In other words, it gets rid of unnecessary data that piles up over time —like post revisions, drafts, spam comments, orphaned options, unused tables, and more.

    It’s worth noting that plugins or components we once installed, then deactivated and deleted, often leave behind their own tables and data, silently taking up space and slowing down our site. Advanced Database Cleaner sweeps away all that excess, reducing the database size and significantly improving efficiency when accessing tables.

    Installation

    Simply search for the plugin in the WordPress plugin repository, as shown in the screenshot below.

    Installing advanced database cleaner

    Once installed and activated, we’ll find its access in our WordPress Dashboard.

    Clean database wordpress

    It’s important to note that the free version of this plugin does not allow for cleaning specific tasks and tables individually. To unlock this level of precision, you’ll need to purchase the Pro version. The advantage of targeted cleaning is that you can preserve certain data (for instance, from an inactive or deleted plugin that you might want to use again in the future).

    Below, we outline the features included in the free version, followed by the additional benefits of the Pro version.

    Free Version Features

    Post Table Cleanup: Removes old post and page revisions, auto-saved drafts, and trashed posts. This helps reduce the size of your WordPress database.

    Expired Transient Cleanup: Eliminates expired transients (temporary options) that no longer have a purpose in your database.

    View & Manage Tables: Displays detailed information on all database tables (row count, sizes, etc.), allowing you to optimize, repair, empty, or delete tables when necessary.

    Database Overview: Provides a clear snapshot of unused or orphaned elements that should be cleaned to keep your database optimized.

    Comment Table Cleanup: Deletes pending, spam, trashed comments, pingbacks, and trackbacks, reducing the number of rows in the WordPress comments table.

    View Orphaned Elements: Lets you preview orphaned data before cleaning, ensuring that no valuable information is lost.

    View & Manage Options: Displays a list of all WordPress options along with their values, sizes, and auto-load settings. You can modify or remove options as needed.

    Automation: No need to run the plugin manually! You can schedule automatic cleaning and optimization tasks at custom intervals.

    Orphaned Metadata Cleanup: Removes orphaned post metadata, comment metadata, user metadata, term metadata, and orphaned relationships.

    Preserve Recent Data: Allows you to exclude data from the last X days, ensuring that only older, unnecessary data is cleaned.

    View & Manage Cron Jobs: Displays active scheduled tasks (cron jobs) along with their details (arguments, next execution, etc.), letting you remove unnecessary scheduled tasks to further speed up your WordPress site.

    Database Size Reduction: By eliminating unused and orphaned data, your database becomes lighter and faster. A smaller database also means quicker backups, as the files being copied are smaller.

    Additional Features in the PRO Version

    Before we dive into the extra tools offered by the PRO version, we want to highlight something important: if you need more advanced features beyond what the free version provides, we highly recommend Database Cleaner Pro by Meowapps. In fact, we include it as part of our Managed WordPress Service.

    Now, let’s take a look at the six exclusive features that make the PRO version stand out:

    Detection & Removal of Orphaned Options – Over time, your WordPress database’s wp_options table can become cluttered with orphaned options. This hidden buildup slows down your site’s performance. Cleaning up orphaned options is a powerful way to speed things up, and the PRO version does it automatically.

    Detection & Removal of Orphaned Tables – Similar to orphaned options, some database tables remain even after uninstalling plugins or themes. These unused tables take up space and can impact performance. The PRO version scans for and removes these orphaned tables, helping your site run more efficiently.

    Detection & Removal of Orphaned CRON Jobs – When you uninstall a plugin or theme, some scheduled CRON tasks might remain active, even though the functions they call no longer exist. These lingering CRON jobs can cause unnecessary database load and errors. The PRO version detects and eliminates them.

    Categorized Scanning & Editing – This feature allows you to scan specific elements or your entire database to determine which plugin or theme they belong to. You can also modify values as needed, ensuring a cleaner and more organized database.

    Advanced Search & Filtering – Easily search and filter options, tables, and CRON jobs based on custom criteria such as name, creator, value, and more. This makes it easier to pinpoint exactly what you need.

    Expert Assistance – The PRO version includes personalized technical support, helping you get the most out of the plugin. Whether you need guidance before executing actions or want to optimize your database further, expert advice is just a message away.

    Final Thoughts

    There are plenty of database cleaning plugins out there, but very few actually show you exactly what’s being cleaned. The detailed insights provided by this plugin allow us to understand and prevent performance issues before they become a problem.

    The scheduled task manager is another game-changer, enabling automated cleanups so we don’t have to constantly monitor our database’s health.

    As for customer support, it’s nothing short of exceptional. The developer’s passion for their product is evident, and their eagerness to help makes troubleshooting a breeze.

    In conclusion, this plugin is ultra-lightweight, ultra-efficient, and ultra-complete. However, if for any reason the free version doesn’t meet your expectations, we highly recommend upgrading to Database Cleaner Pro.

    We hope this review has been helpful! Feel free to share your thoughts or ask questions in the comments. Wishing you success, and thanks for reading!

  • Rethumbify: review

    Rethumbify: review

    Despite their small size, thumbnails can have a significant impact on site performance, making them worthy of special attention. This is where Rethumbify comes into play: a specialized tool for thumbnail optimization, designed to enhance user experience. In this brief review, we’ll explain why we recommend it.

    Rethumbify: Optimizing your Thumbnails

    This WordPress plugin is perfect for achieving optimal results with virtually no effort. As shown in the screenshot below, all it takes is the click of a button to let the plugin get to work.

    Fine-Tuning Thumbnail Regeneration with Rethumbify

    Before clicking on “Start Regeneration,” you can customize the thumbnail recreation process to suit your needs. For instance, you can enable the option to regenerate only the featured images of your posts.

    Additionally, you can create one or more rules to define which types of content will be targeted for regeneration.

    Always remember to hit the Save Changes button to ensure your settings are preserved.

    Once everything is configured to your liking, you’re ready to begin the process. It’s worth noting that keeping the plugin updated ensures access to the latest and most efficient compression algorithms. Depending on the growth of your site’s content, running the regeneration process every three months can be a good practice.

    Conclusion

    As we’ve seen, this is a powerful yet ultra-minimalistic plugin. It’s easier to use than a game of tic-tac-toe. However, the benefits of having optimized thumbnails with the correct file sizes are immense. It significantly reduces the load on your server while delivering lightweight images to your users, saving them valuable loading time.

    Wishing you success in your endeavors, and thank you for reading!

  • Smart Image Resize Pro

    Smart Image Resize Pro

    What Is Smart Image Resize?

    Smart Image Resize is a WordPress plugin designed to work seamlessly with WooCommerce. Its main function is to optimize the visual presentation of your products by standardizing all images, saving you valuable time. With Smart Image Resize, your product photos will automatically become uniform in size, eliminating the need to crop or resize them manually.

    The plugin can be used right out of the box with no complex configuration. Its Lite version offers features like:

    • Removing unwanted white spaces around products.
    • Customizing background colors.
    • Compressing thumbnails to significantly improve page loading speeds.
    • Managing which images need resizing.
    • Processing up to 150 images.

    While the 150-image limit may be insufficient for most stores, it provides an excellent way to test the plugin and evaluate its results. If the Lite version performs as promised, upgrading to the PRO version becomes a must. The PRO version removes all image limits, converts images to .JPG format to reduce file sizes (a crucial feature for handling larger, heavier file types like .PNG or .BMP), and unlocks additional features to further enhance your store.

    But even better than that, Smart Image Resize Pro can convert all your images (including .JPG files) to the modern WebP format —a feature I highly recommend—for significantly faster page loading speeds. Additionally, the PRO version includes a (beta) feature for adding watermarks, which is ideal for protecting your photos from theft. For example, you can overlay your store’s logo as a watermark. The plugin processes each image and, if desired, also applies the selected watermark automatically.

    As is often the case, PRO users also enjoy priority support (money talks, after all).

    Smart Image Resize Dashboard

    In keeping with the user-friendly trend of modern plugins, the Smart Image Resize dashboard is clear, precise, and refreshingly straightforward. As you can see, the options are “basic” and laid out in an intuitive way.

    Smart image resize settings

    Available Options Are

    Enable Resizing
    Always keep this ON (otherwise, you won’t benefit from automatic image adjustments).

    Images
    By default, Product Images is selected, which makes sense as it’s the primary focus and purpose of this plugin. Additionally, you can check Category Images to apply the same features to product category images.

    Trim Whitespace
    Enable this option to remove excessive white space around your product photos.

    Background Color
    When removing transparency from .PNG files, the default background color is white. Here, you can choose a different color if desired.

    Add Watermark
    As mentioned earlier, the plugin allows you to add a watermark or logo to your images.

    Optimization
    This controls the level of compression applied to your images. Higher compression results in smaller file sizes but can also lead to blurriness or pixelation. The default compression is set at 5%, and we recommend not exceeding 10%, as image quality is critical for boosting sales in an online store.

    Convert to JPEG
    This option converts uncompressed formats like .PNG to the classic optimized .JPG format. It’s generally recommended to enable this unless you need product images with transparency, which is rarely necessary in most cases.

    Enable WebP
    We strongly recommend enabling this feature for the reasons outlined earlier:

    • WebP reduces file sizes by up to 90% compared to .PNG without losing quality.
    • It also offers better compression than .JPG while maintaining image quality.

    Additionally, the plugin ensures compatibility by serving .JPG and .PNG images to browsers that don’t support WebP (a rare case, often due to outdated devices).

    Advanced
    Here, you can choose to apply the plugin’s functionalities to thumbnails and various standard WooCommerce image sizes. By default, all sizes are selected, and we recommend keeping it that way to achieve optimal image uniformity.

    Don’t forget to save your changes!

    Regenerate Thumbnails Tab

    This tab provides the option to install another plugin developed by the same creators to handle thumbnail regeneration.

    Smart image resize thumbnails settings

    Conclusion

    Smart Image Resize is as practical as it is powerful. It saves us countless tedious hours of organizing our store’s images. If your goal is to tidy up product photos, remove excessive white space, reduce file sizes, and crop all images to the same dimensions, this plugin has you covered. And as a bonus, it can even add a watermark to protect your public materials. If this plugin were human, we’d definitely give it a high five!

    For a single site, the PRO version of Smart Image Resize costs USD23.40 at the time of writing. While there is a free “lite” version available, it has a processing limit of just 150 image files, making it suitable only for stores with a very small inventory.

    This brings us to the end of our guide and review of Smart Image Resize, a plugin we highly recommend for optimizing your WooCommerce store’s images with almost no effort on your part.

    We’d love to hear your thoughts! Feel free to share your impressions in the comments below. Best of luck with your business ventures, and thank you for reading!

  • FiboSearch

    FiboSearch

    It’s incredibly lightweight, looks stunning, and works as fast as it should (otherwise, it wouldn’t be real-time). We loved it so much that we’ve included it FREE in our WordPress Maintenance service.
    Discover its features in this article!

    What is FiboSearch?

    FiboSearch is a plugin designed to enable real-time searches in our WooCommerce store (for now, since we know that a future update will make it available for other online ecommerce platforms as well).

    The clip below clearly illustrates how it works.

    As shown in the video clip, FiboSearch delivers live results as letters are typed, making the buying process easier (and more enticing). Results are refined instantly with each additional letter or word, narrowing down options like a funnel to the most accurate match(es).

    FiboSearch’s response time for generating results (and refining them as users type) averages 0.15 seconds for up to 100 items in its free version. For larger product catalogs, upgrading to the PRO version is mandatory. The paid plan grants a response time of just 0.2 seconds, even for stores with over 100,000 items.

    Why do we recommend FiboSearch over similar plugins?

    We’ve listed its main features, specifying when we refer to the paid PRO version:

    • Aesthetically pleasing: Modern and minimalist design.
    • Speed: Enhances the ability to retrieve items from an inventory with immediacy, boosting sales (for stores with over a hundred items, the free version may feel slow; in such cases, the PRO version is recommended.)
    • Easy setup: Designed for quick and straightforward configuration.
    • Mobile-optimized: Built to look and work great on smaller screens, like tablets and smartphones.
    • Expanded data display: On desktops, hovering over live search results instantly reveals additional product details.
    • Compatibility: Fully integrates with popular page builders like Elementor.
    • Technical support: The PRO version includes fast, precise technical support.
    • Ultra-fast response time: Under 0.2 seconds in the PRO version.

    This mode activates when a user clicks on the search bar (or the magnifying glass icon). Once activated, the entire screen transitions to display only the search module, covering the full width and height of the screen (this is similar to Google’s full-screen search mode for mobile devices.)

    Why do we recommend the PRO version?

    In addition to immediate technical support, regular updates, and search speeds under 0.2 seconds — even for stores with thousands of items — the PRO version offers the following key benefits:

    • Brand-based search.
    • Custom field search.
    • Category search (e.g., “toys”).
    • Tag search.
    • Attribute search (e.g., “blue”).
    • SKU variation search.
    • Results for blog posts and pages.
    • Multilingual support (via TranslatePress, WPML, and Polylang).

    Conclusion

    FiboSearch is a powerful plugin for real-time search interaction, currently designed exclusively for WooCommerce stores (though this will soon expand to other ecommerce platforms). It’s programmed to streamline and simplify the user experience, enabling them to find products quickly and accurately. Additionally, it allows shoppers to add items to their cart directly from the search results box, a significant advantage for increasing conversions.

    This plugin is a must-have for any established eCommerce store (or one in development). FiboSearch improves the user experience for small, medium, and large online stores, regardless of the product catalog size (however, the PRO plan is essential for catalogs exceeding a hundred items). Its mobile functionality is well-designed, offering full-screen search capabilities to maximize usability on smaller devices.

    FiboSearch is an essential addition if we aim to deliver a fast search experience and facilitate the purchasing process in our store.

    Thank you for reading. Wishing you all success!

  • Bricks 2.0 news

    Bricks 2.0 news

    The new version of Bricks has been released, laying the groundwork for creating professional websites for 2025 and beyond. This update brings features chosen by the community, which received over 30,000 votes in total.

    Bricks is included as part of our plugin package with WordPress Plus.

    Builder capabilities

    Originally, Bricks offered only three types of access permissions for its users: “Full Access,” “Edit Content,” and “No Access.” While this was sufficient in the early stages of Bricks, with the availability of new tools, an evolution is now necessary. Version 2.0 addresses this access dilemma with the release of “Builder Capabilities.”

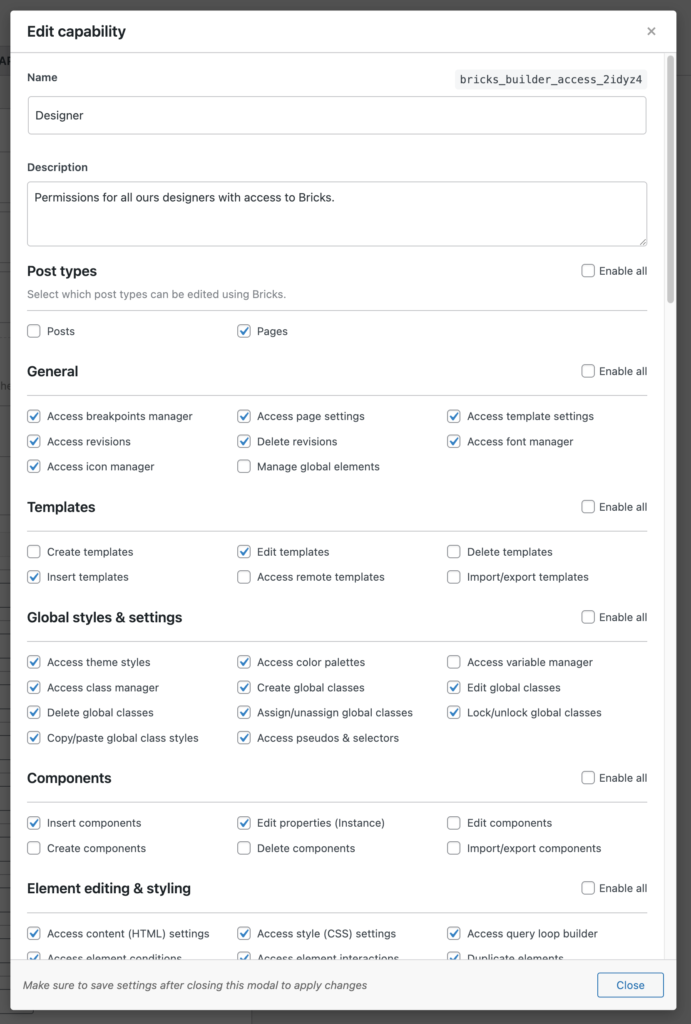
    Now, in the WordPress admin panel, you can define custom permissions for each user or role. To do this, go to “Bricks > Settings > Builder Access.”

    Bricks 2 alpha acceso

    This new feature allows you to define more than 50 individual permissions for the following areas:

    Post Types: Select which post types can be edited with Bricks.
    General: Access specific Bricks features (Icon Manager, Font Manager, Breakpoint Manager, etc.).
    Templates: Define template editing functions.
    Global Styles and Settings: Access theme styles, color palettes, global class and variable manager, etc.
    Components: Define component editing functions.
    Element Editing and Styling: Access query loops, content and/or style settings, etc.
    Edit Elements: Set element editing permissions.
    Add Elements: Set permissions for adding elements.

    Element Manager

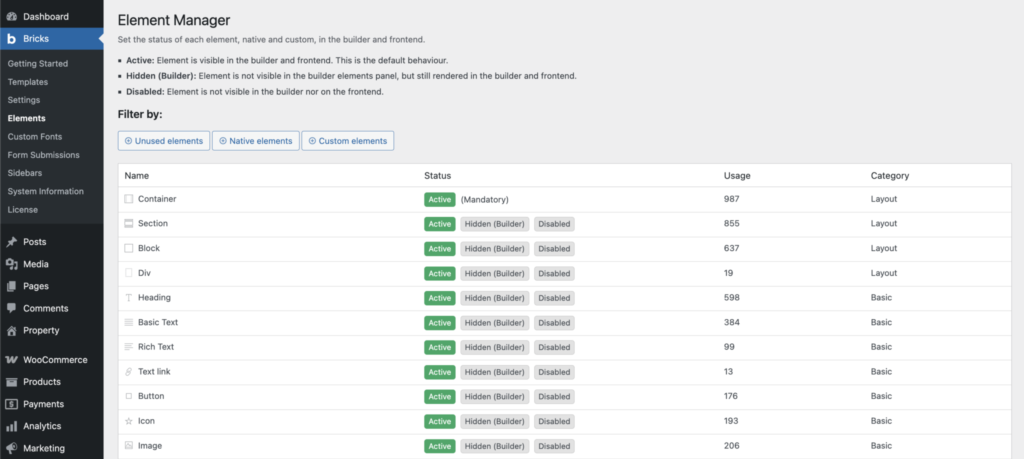
    This new tool allows you to limit the number of Bricks elements available on your website. Since it’s unlikely you’ll ever need to use all 110+ native elements, you can now disable any you want, whether to tidy up the builder, improve performance, or more.

    In the WordPress admin, these options can be found under “Bricks > Elements” and can be set to one of the following modes:

    Active: The element is visible in the builder and the frontend. This is the default behavior.
    Hidden (Builder): The element is not visible in the builder’s elements panel, but is displayed in both. Elements can also be added via import, copy and paste, etc. This option only clears the elements panel; it does not disable the element.
    Disabled: A disabled element does not load in either the builder or the frontend.

    Bricks 2 alpha enable elements

    Elements can be filtered by:

    • Unused elements
    • Native elements
    • Custom elements

    This feature precedes the previously mentioned “Builder Capabilities” feature, so if we disable an element here, it will not be available to any user.

    Builder UI: Revamped

    The interface has been improved with higher contrast and improved readability. The control groups and the structure panel have a refreshed look, and the theme styles panel has been cleaned up, with all individual elements nested under the “Elements” group. The preload screen is now truly dark, and the pseudo-class UI has found a new home outside of the builder toolbar.

    Font Manager (In the builder)

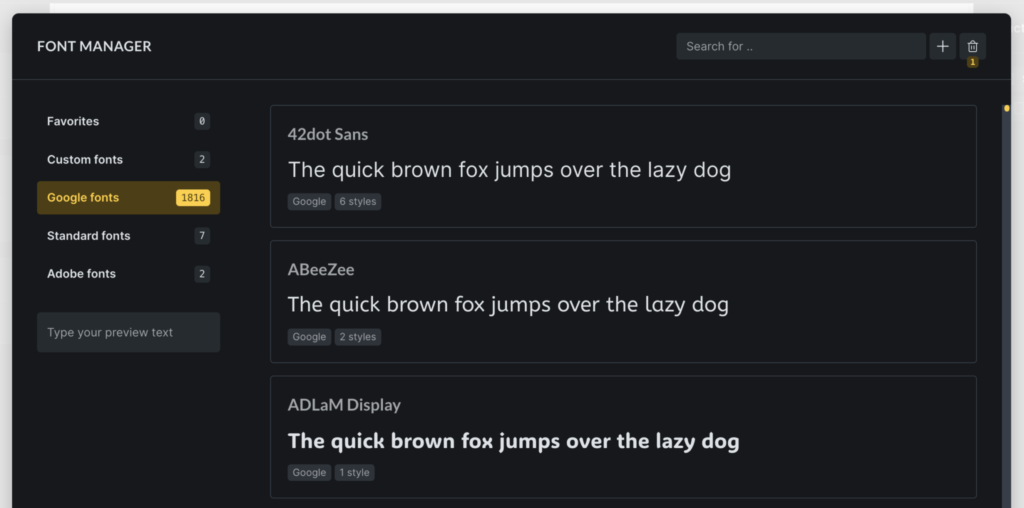
    The new Font Manager is accessible from the WordPress admin panel by going to “Settings > Font Manager” or by clicking the gear icon on any font dashboard, allowing for professional-quality font addition and management. Some of the new features include:

    • Create custom fonts by quickly uploading all font variation files in one step.
    • Browse and download any Google Font with a single click to host locally (GDPR compliant).
    • Mark individual fonts as favorites to narrow down your font family selection in the builder.
    • Move fonts to the trash without immediately deleting them.
    Bricks 2 alpha font manager

    Icon Manager (In the builder)

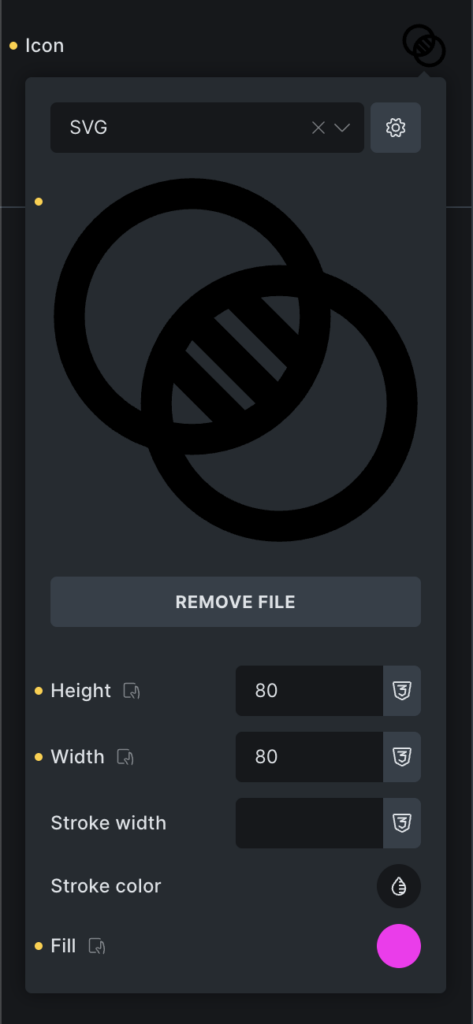
    The new Icon Manager 2.0 allows you to create and manage your own icon sets. This setting can be accessed from Settings > Icon Manager by clicking the Options button.

    Features:

    • Create custom icon sets (upload your own SVG files).
    • Use these icons in any icon control and SVG element.
    • Adjust the height, width, stroke color, and fill of your icons.
    • Disable any icon set, even built-in ones (previously configured icons will be displayed and rendered).
    Bricks 2 alpha styles svg

    SVG Styles

    Prior to version 2.0, icon styles were only applicable to the design’s base size.

    This limitation has now been removed, and you can now define SVG icon styles (height, width, stroke width, stroke color, fill) for any resolution or global class.

    Joint editing of elements

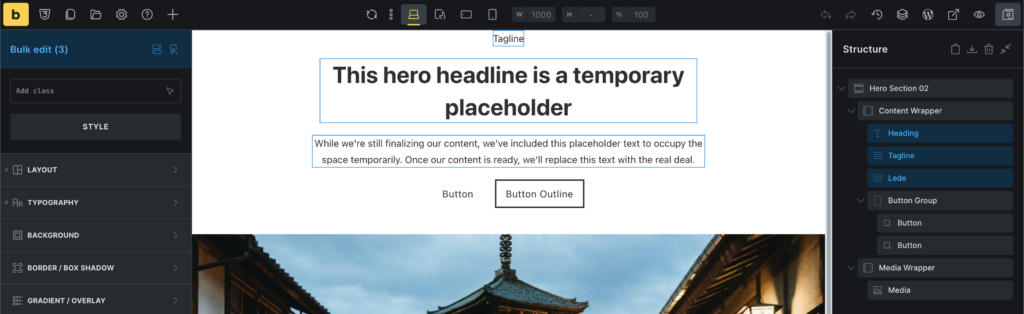
    This is a massive change to improve your workflow. Bricks now allows you to select multiple elements to edit at once. To do this, hold down CMD/CTRL and click on the elements you want to edit in the workspace or in the structure panel. You can also select a series of elements between the first and last selected by holding down the SHIFT key.

    Supported bulk editing actions

    The options for editing together depend on the selected elements. If all the selected elements are the same, for example, if we select three headings, joint editing can be done in the Style and Content tabs. If the elements are different, only the Styles tab will be available.

    Bricks 2 alpha bulk edit

    Supported Bulk Editing Actions

    In addition to editing elements together, it’s possible to move them at the same time if they’re within the same parent element. It’s also possible to duplicate, delete, and wrap selected elements. Finally, you can assign new classes to groups of selected elements. Pre-assigned classes won’t be displayed, as each element can and likely has different default classes assigned.

    Bricks 2 alpha unwrap

    Context menu: Unwrap

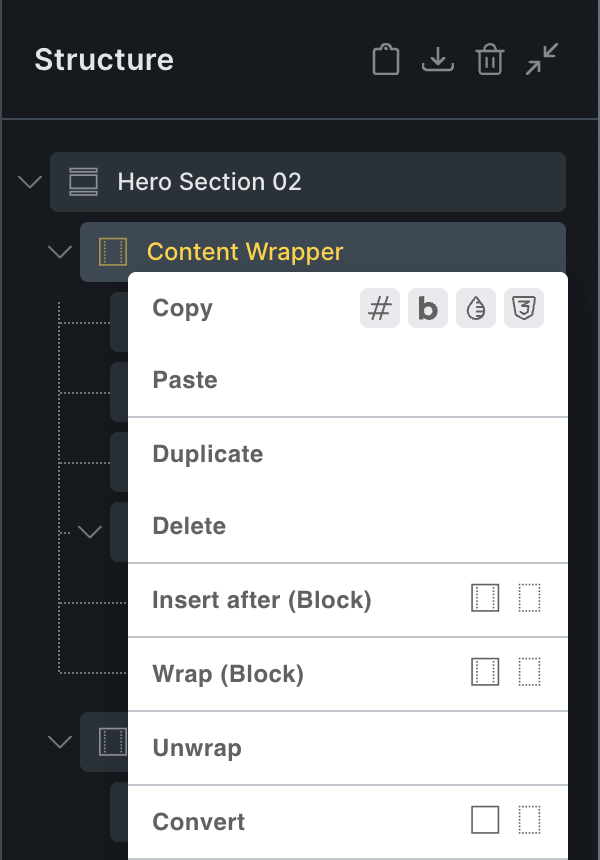
    Now in Bricks 2.0 you can select any element in the page structure and right-click on it and use the new “Unwrap” action to remove the selected element and move all its nested elements into place.

    Bricks 2 alpha builder access

    Visual CSS Grid Builder

    Finally, we want to mention another great tool that Bricks 2.0 brings us. While it’s been possible to create CSS grid layouts in Bricks for some time now using simple text input, it was never as easy or enjoyable an experience as it should have been.

    If you weren’t familiar with the rules for creating CSS grids, this process became a tedious exercise in trial and error.

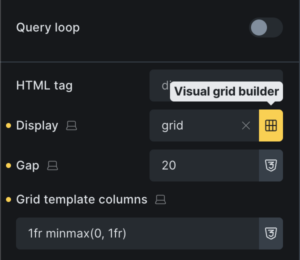
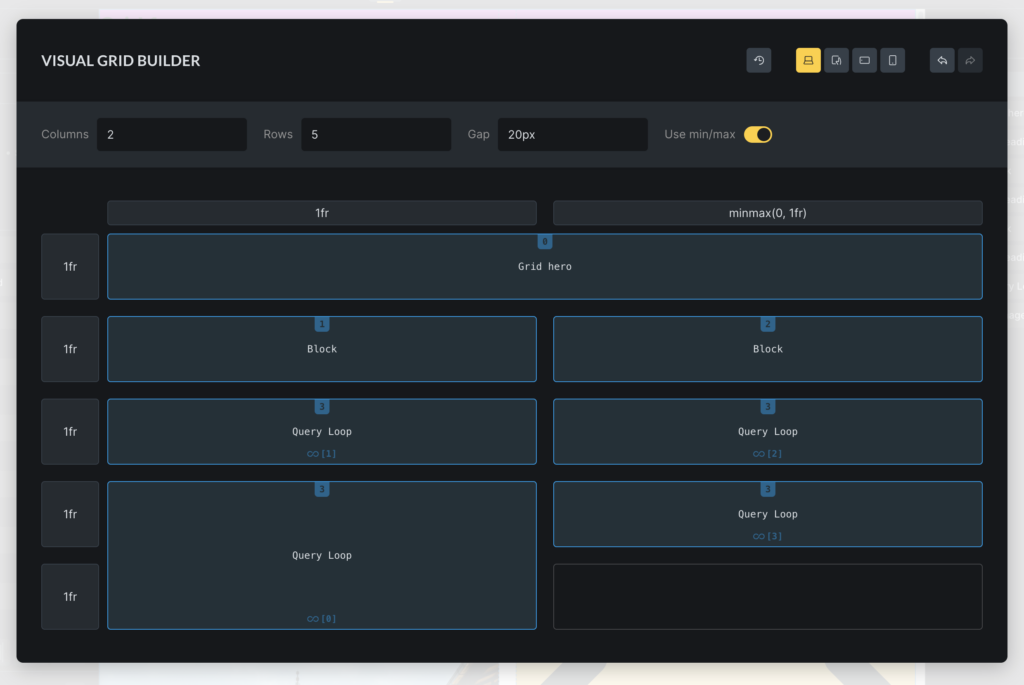
    The new “Visual CSS Grid Builder” makes this process more user-friendly. To access this feature, you’ll find the “grid” icon next to the “Display” control if the display value is “Grid.” Clicking this icon will open the full-screen CSS grid editor, where you can edit and modify the grid layout to your liking, without having to write any code.

    Visual Grid Builder Interface

    Once this interface is open, you’ll clearly see a representation of the currently selected grid. This allows you to easily adjust the number of columns, rows, and the gap between them.

    If you want to adjust the size of an individual element, simply interact with the cursor by dragging one of its corners until you achieve the desired result. If you want to move an item, simply drag and drop it wherever you like.

    Bricks 2 alpha visual editor grid

    For more information about this complex tool, Bricks has published an article dedicated exclusively to the features it offers.

    Final conclusions

    Bricks is a lightweight visual builder with a lot of potential. Its influence and available tools are such that we’ve even noticed Elementor preparing to incorporate some of them, such as the use of classes, in future versions.

    Although still in its alpha version, we recommend keeping Bricks under your radar and giving it a try, at least in a testing environment, to understand its potential and know how to choose the right builder for your next project.

  • What’s New in Elementor for Q2 2025

    What’s New in Elementor for Q2 2025

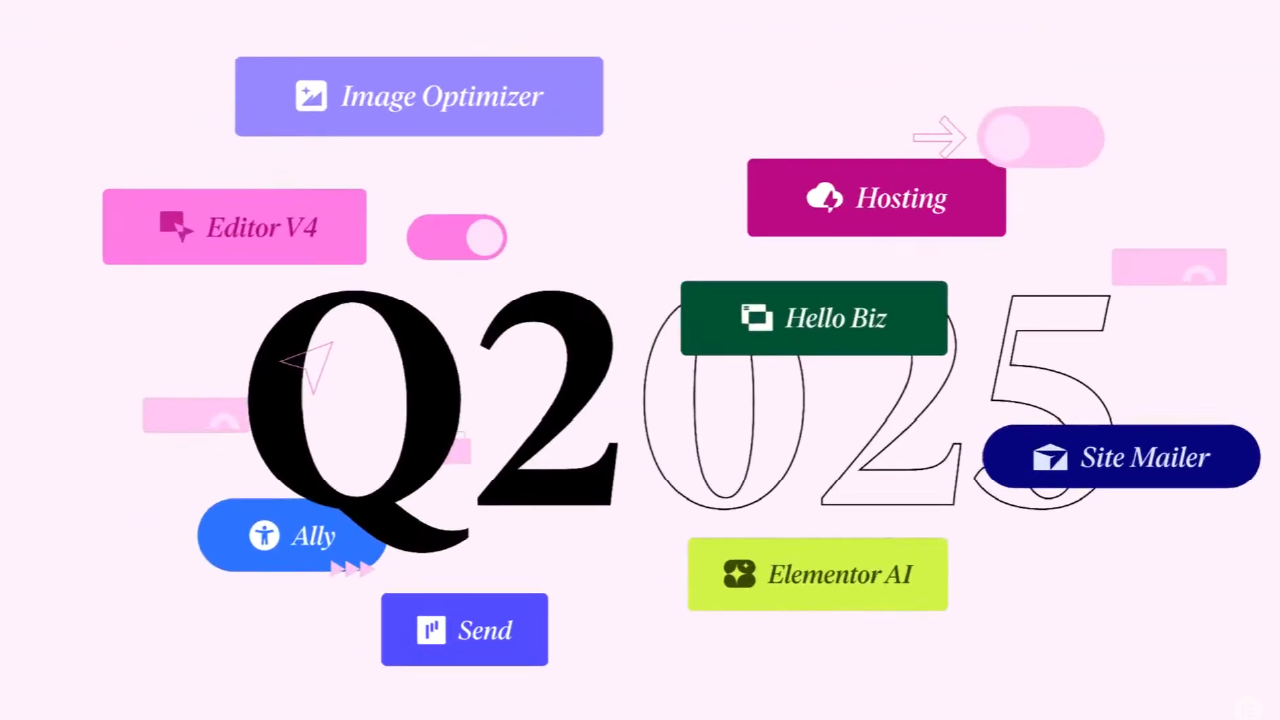
    Elementor’s latest online event brings us an extensive list of improvements and updates to Elementor AI, Site Planner, briefs, sitemaps, wireframes, and more.

    AI Notetaker

    This Site Planner feature will help make client discovery calls run smoothly and lay the groundwork for your website to transcribe the conversation and generate a structured project brief. Support for Zoom and Google Meet calls is coming soon.

    Site Planner will be more accessible to other languages, including those that are written from left to right or vice versa. Once you start typing in a language, Site Planner will respond in that same language and generate your project brief, sitemap, wireframe, and entire sitekit this way.

    Site Planner Improvements

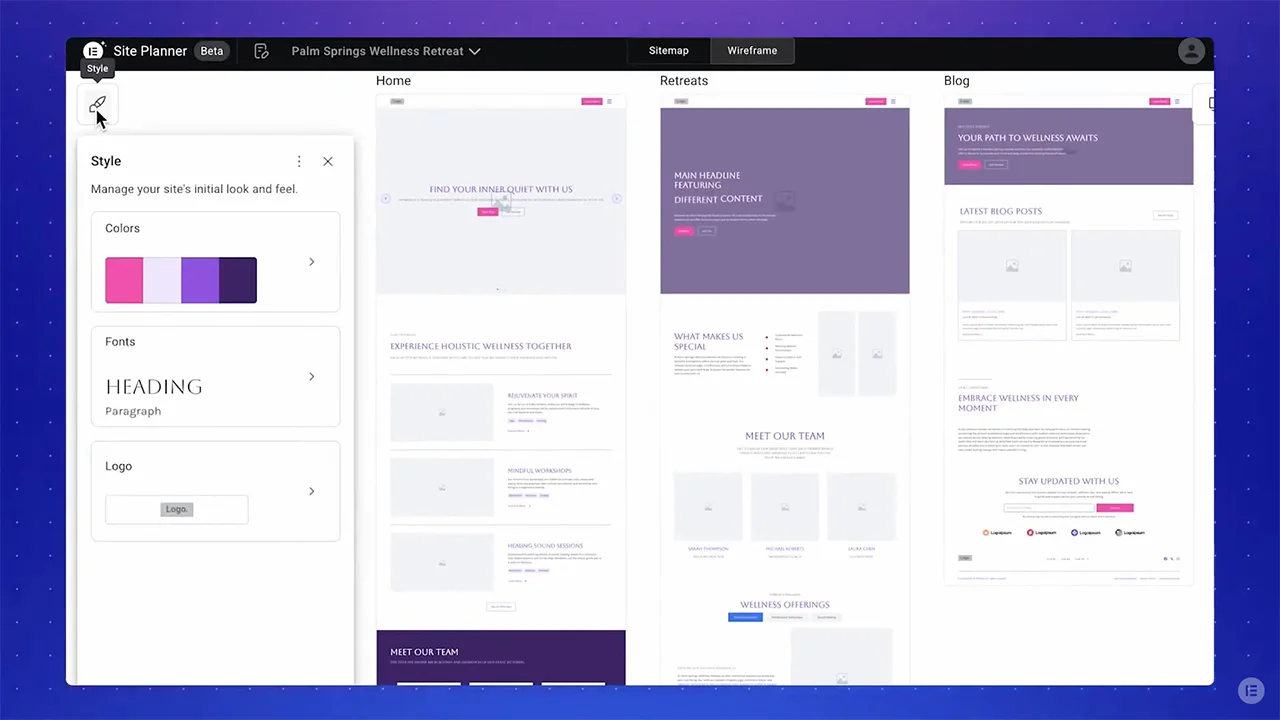
    Styling options for the early stages of design are coming soon. You can now add styling tweaks like fonts, color palettes, and logos within the wireframe.

    Elementor q2 site planner

    Clicking the “Style” button in the wireframe tab will take you to an interface welcoming you with a predefined color palette, generated by AI based on your brief, considering the industry, tone, or any brand preferences mentioned in the meeting with the client. You can then adjust any other settings by customizing the palette with the color picker or HEX codes, choosing fonts, or even uploading your brand logo.

    These changes are updated in real time, allowing your client to receive clear feedback and understand your vision from the earliest stages of the project, thus accelerating the design process. All these adjustments will be transferred to Elementor with its global styles, so you won’t have to start from scratch when creating your website. After completing this process, you can easily share the project with your client.

    The wireframe tool will incorporate new features. Elementor will offer the ability to move pre-designed blocks or describe design decisions with the ability to easily undo and redo changes. This will make iterations smoother and faster. This way, Site Planner offers a better integration experience with Elementor.

    Next quarter, Site Planner will support more complex websites with greater wireframe customization. Elementor will also soon support logo creation with the AI-powered Logo Maker.

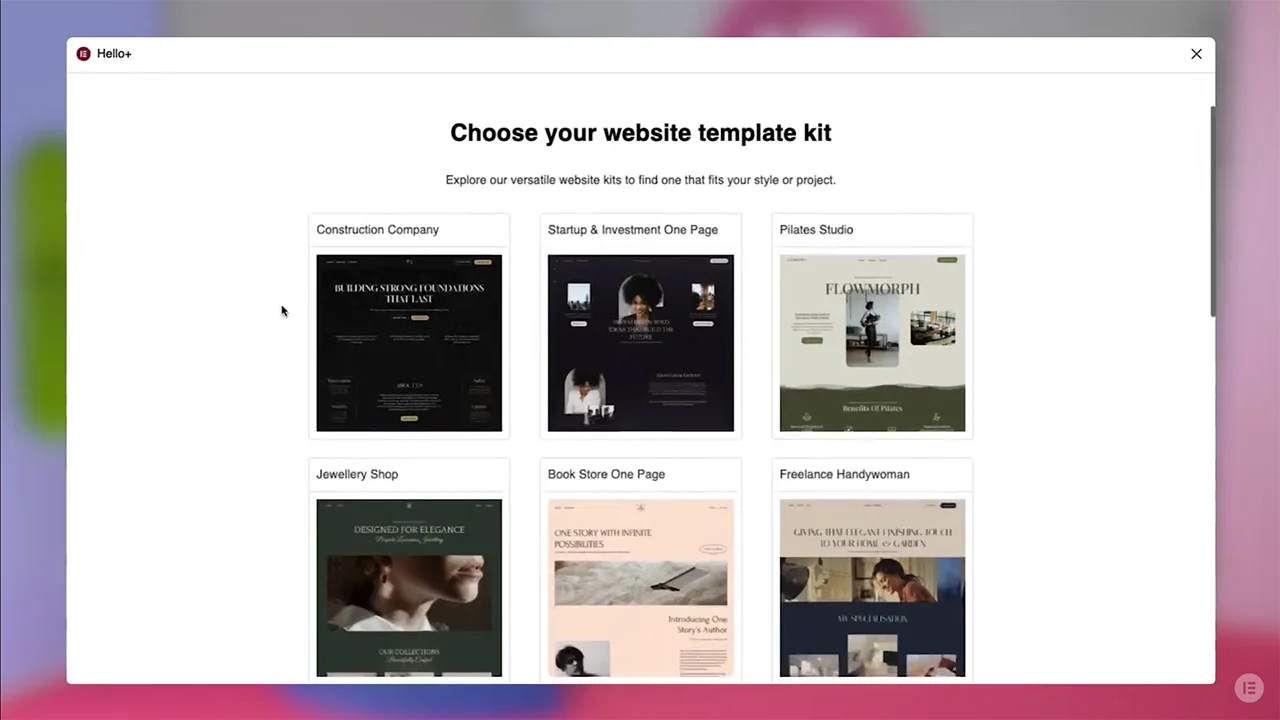
    Hello Biz

    Hello Biz is a lightweight, free WordPress theme launched by Elementor earlier this year for business websites. This theme will help users create professional business websites quickly and flexibly.

    Because Elementor understands that performance is key to staying competitive, Hello Biz offers pre-designed templates, content-focused “Hello Plus” widgets, and a dedicated home screen to guide you through the website setup.

    Elementor q2 hellobiz web template

    Contact widget

    This is an all-in-one widget, ready to offer contact information, social media links, and Google Maps location, all in a single tool. It offers three flexible design styles that will help you achieve better results when applying it to contact pages or even footers. The main advantage of using this widget is that you can edit all elements without having to navigate through layers.

    Visual layout presets

    A new feature for the Hello Plus widgets is the visual layout presets. This will allow you to choose between different ways to show your content, exclusively in the Hello Plus widget. This enhancement is currently available in the “Flex Hero”, “CTA”, “Contact” and “Header” widgets. In the upcoming months this feature will also be available for the “Form light” and “Footer” widgets.

    This presets will allow you to seemlessly switch your layouts without losing your content, providing you flexibility and efficiency in your design workflow. Unlock numerous layout combinations with each preset activating specific alignment options under the style tab.

    Looking to improve this features, Elementor has implemented two significant tool enhancements. One for the “Form light” widget with form submissions feature. This Elementor Pro feature allows you to receive all messages from the contact form in your “Elementor > Submissions” tab. This way you will centralize all form entries within a dedicated space ensuring efficient management of visitor interactions. The other enhancement consists on having dynamic tags available accross Hello Plus widgets. Having this feature available will ensure you can incorporate dynamic content facilitating the development of more advanced and personalized websites.

    Editor v4

    Elementor q2 editorv4

    The new version of the Elementor editor, announced three months ago, not only improves styles but also features to further empower professional web creators and pave the way for more advanced features in the future.

    Three months later, it’s time to announce that the alpha version of the v4 editor is just around the corner. If you’d like to try out some of the upcoming features, they’ll be available in the next update, version 3.29. It’s highly recommended to use these new tools on test sites for the time being.

    CSS Oriented design system

    Editor v4 completely revolutionizes how styling works in Elementor. Instead of element-specific styling, Elementor introduces a structured, scalable, and performance-focused approach designed for site-wide consistency. You’ll have full control over variables, classes, and states.

    Elementor q2 css system

    Atomic elements

    A component-based tool that allows you to group multiple reusable elements and create variants of them. This tool allows you to manage complex designs consistently.

    Elementor q2 atomic elements

    Improved performance

    Editor V4 claims to be faster than it’s predecesors. With the focus set on improving performance, this new version of the builder will load much faster. Some of the speed will come from shifting to a class-based approach but unnecesary wrappers will be removed aswell. This will help generate cleaner outputs.

    Although the alpha version still runs alongside V3, improvements will be noticeable but the full performance difference will be trully impactful once V4 gets to run on it’s own.

    Elementor q2 improved performance

    User experience

    The user interface has been revamped and modernized, reimagining the editor experience, making it more fluid and intuitive. The design tab has been updated, unifying the style tab, inline editing, multi-selection, and fully responsive customization.

    Elementor q2 user experience

    Editor v4 alpha

    This alpha version of the new builder will offer the “Unified Style Tab,” “Classes,” “States,” and “Fully Responsive Styling” features. Elementor states that this is just the beginning and that there will be much more to experience in subsequent versions of Editor v4.

    Unlike previous versions, v4 will only offer two tabs with the same styling options for each widget. Now, all elements share a single, consistent interface for design controls. This makes working with different widgets faster and more intuitive, as the styling options will remain the same. This consistency in the interface is the foundation of a scalable, professional-quality design system, which will support future features like the variables and atomic components mentioned above.

    Elementor q2 alphav4 editor

    If you want to try the alpha version of the v4 editor, you’ll need to access a new tab in the Elementor settings menu in your WordPress dashboard called “Editor v4.” Simply click the “Activate the new experience” button, and after a few confirmation steps, you’ll be ready to go.

    To sign up for early access to the alpha version, scan the QR code below or visit elementor.com/editor-v4.

    Elementor q2 alphav4 early access

    To launch the alpha version, Elementor claims to have dedicated teams already working on the next phases of Editor v4. Future versions will offer new features, starting with “Variables,” a new generation of global variables that will simplify the process by allowing you to define and manage fonts, colors, and sizes globally. With a single update, your entire site will instantly adapt with perfect consistency.

    Elementor q2 variables

    Later this year, Elementor Editor v4 will introduce atomic components, drag-and-drop improvements, a new user interface, and more. This includes a cloud-based template library that will allow you to save, manage, access, and share design elements across projects and users—whether sections, containers, or entire pages with all their content, styling, media, and attachments. This is intended to improve efficiency when working across multiple projects.

    Site Mailer

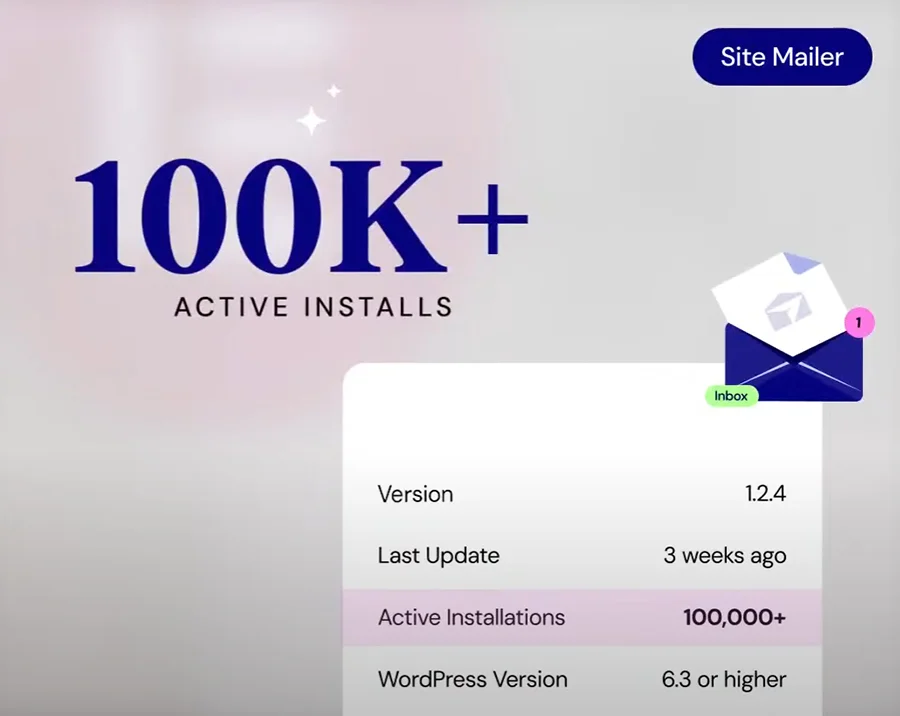
    With over 100,000 active installations, Site Mailer uses a modern, API-based approach instead of an outdated SMTP to dramatically improve email deliverability. This tool ensures that emails reach their destination, whether they’re form submissions, order confirmations, or customer communications. Site administrators can also monitor email deliveries and troubleshoot issues, giving them greater control and confidence.

    Elementor q2 site mailer

    Image optimizer

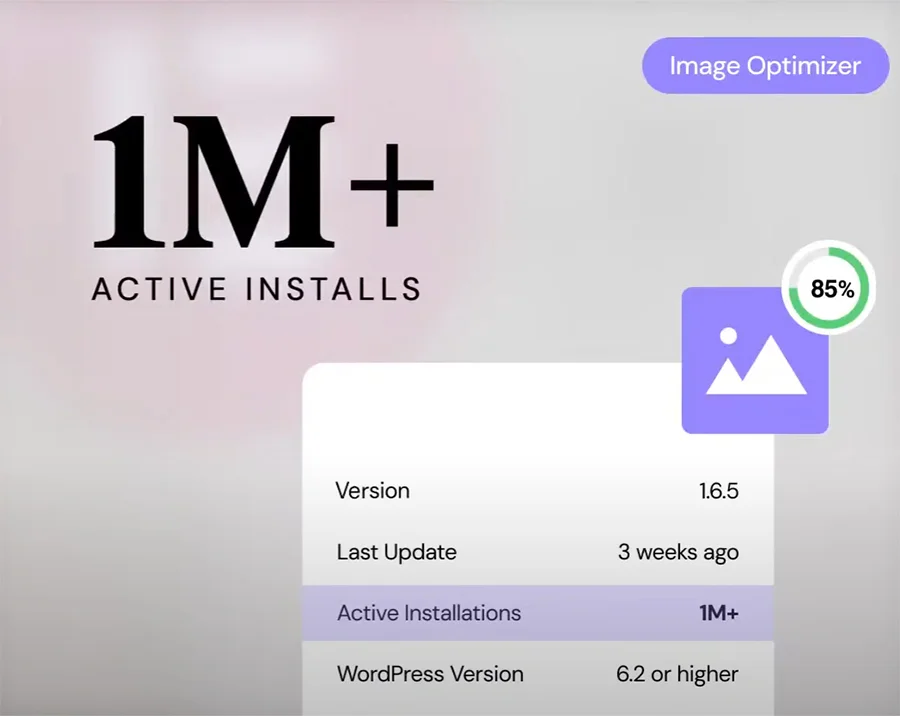
    The Image Optimizer has over a million installs. It automatically compresses and displays images in cutting-edge formats. This improves loading times and performance without sacrificing quality. Since performance influences a website’s ranking, this feature will help you optimize your SEO strategies.

    Elementor q2 image optimizer

    Greater accessibility with Ally

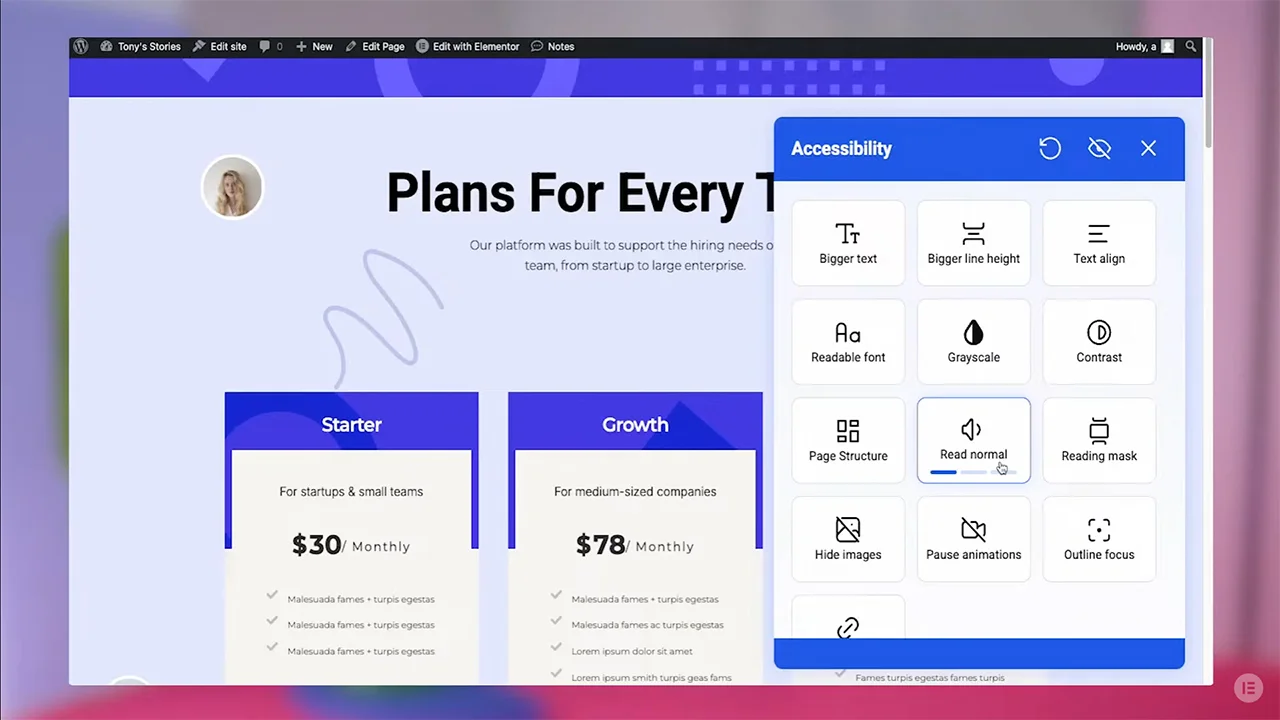
    Accessibility isn’t just a legal requirement. This Elementor accessibility plugin will help you create more inclusive websites without added complexity. The essential tools to get started are available now with the launch of Ally’s first phase. You can now add a usability widget to your website that gives visitors control over visual settings. You can also create a custom accessibility statement, as required by law in many countries.

    Elementor q2 ally accesibility

    Three useful new features have recently been added to Ally:

    Screen reader

    A native multilingual tool integrated into the widget. Users can choose between fast, normal, or slow reading speeds to have website content read aloud without the need for external tools.

    Elementor q2 screen reader

    Analitycs

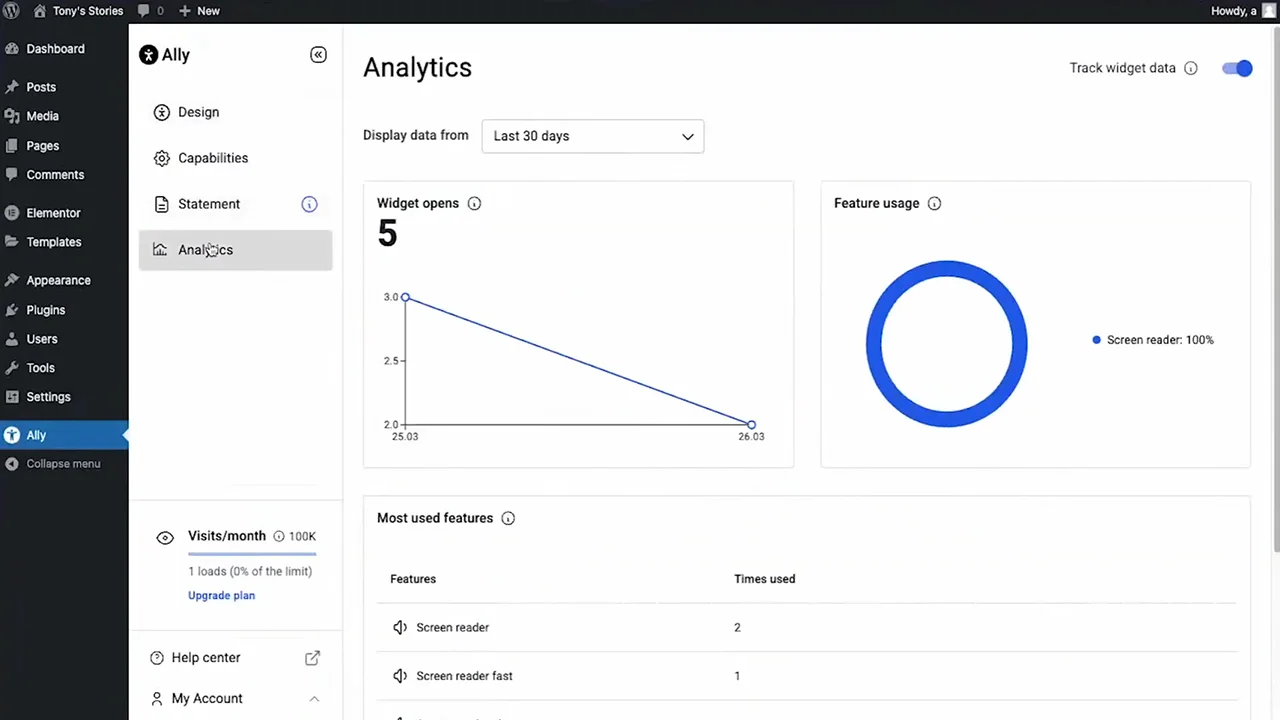
    This tool provides access to interactive dashboards to track visitor interactions with the accessibility widget.

    Elementor q2 analytics

    White label

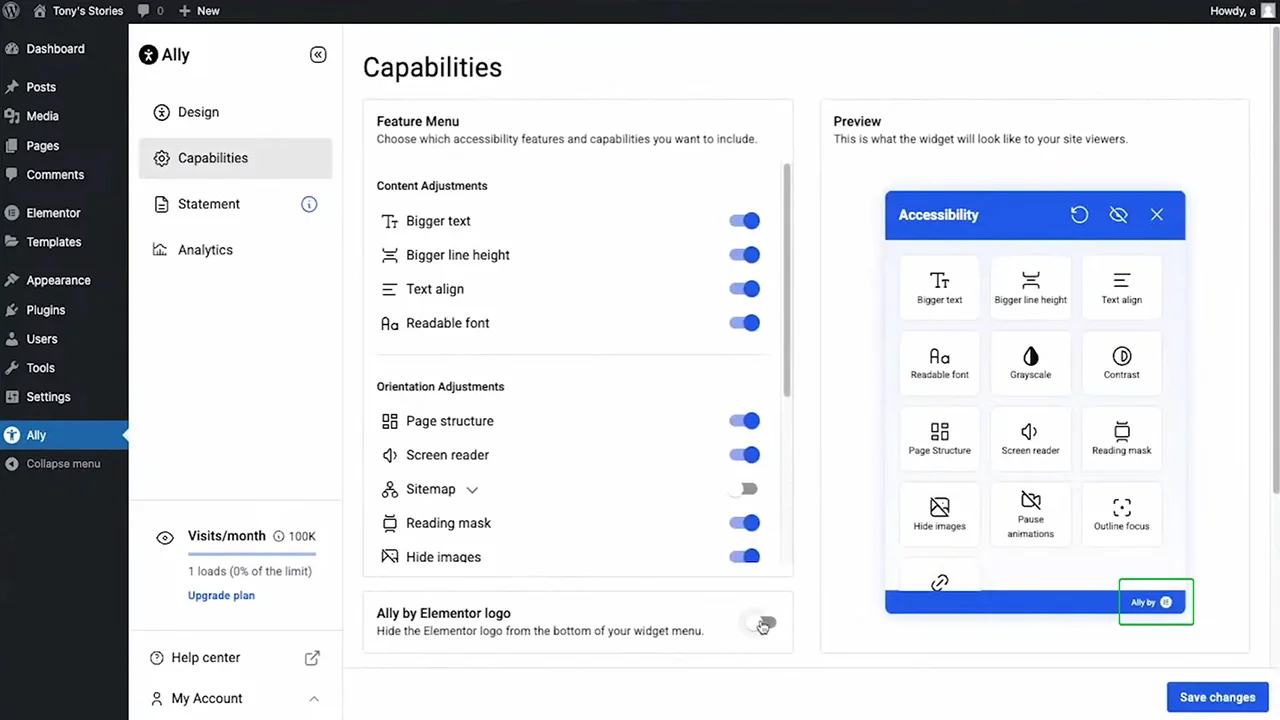
    This option will allow you to remove the Ally branding that displays by default in the widget, allowing you to fully integrate it with your website’s design.

    Elementor q2 white label

    Site scanner

    This automated tool, coming soon, scans your entire website to identify accessibility issues. It includes an intuitive step-by-step guide that will explain how to resolve them.

    Elementor q2 scanner

    Send

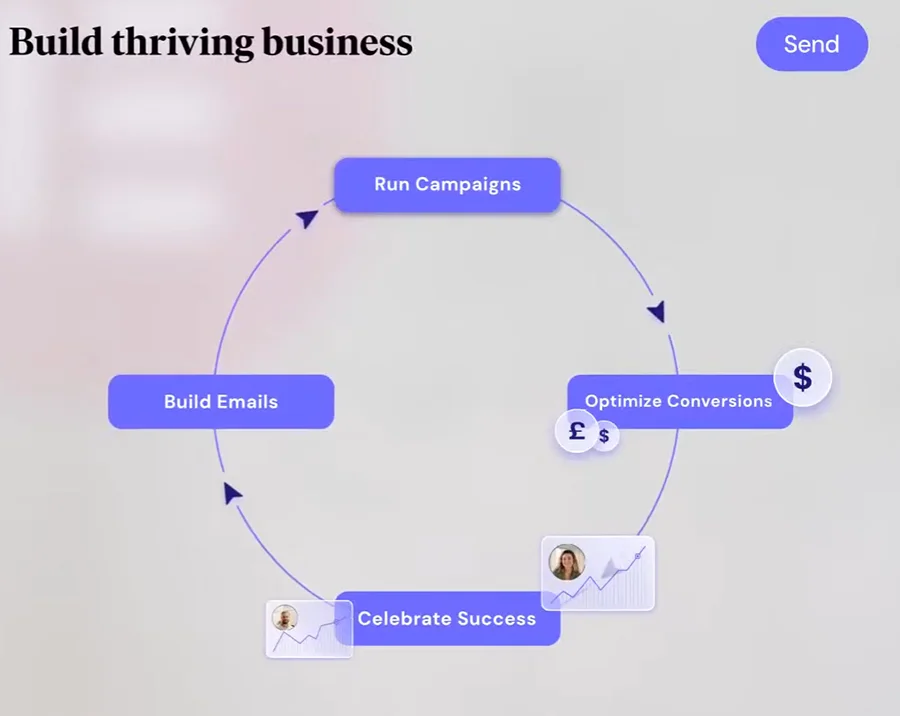
    In the last two weeks of March, Send officially entered beta. This plugin is now available for download from the WordPress repository. It’s more than just a marketing tool for WordPress and works seamlessly with WooCommerce and non-commercial websites.

    Elementor q2 send

    Integrations

    There will be several updates to Send in the upcoming months. The first improvement will expand integrations with more form plugins to optimize data capture and speed up automations.

    Integrations with Connect Form 7, WPForms, Ninja Forms, and Gravity Forms will be added based on feedback from early access users.

    Elementor q2 send integration

    Personalization

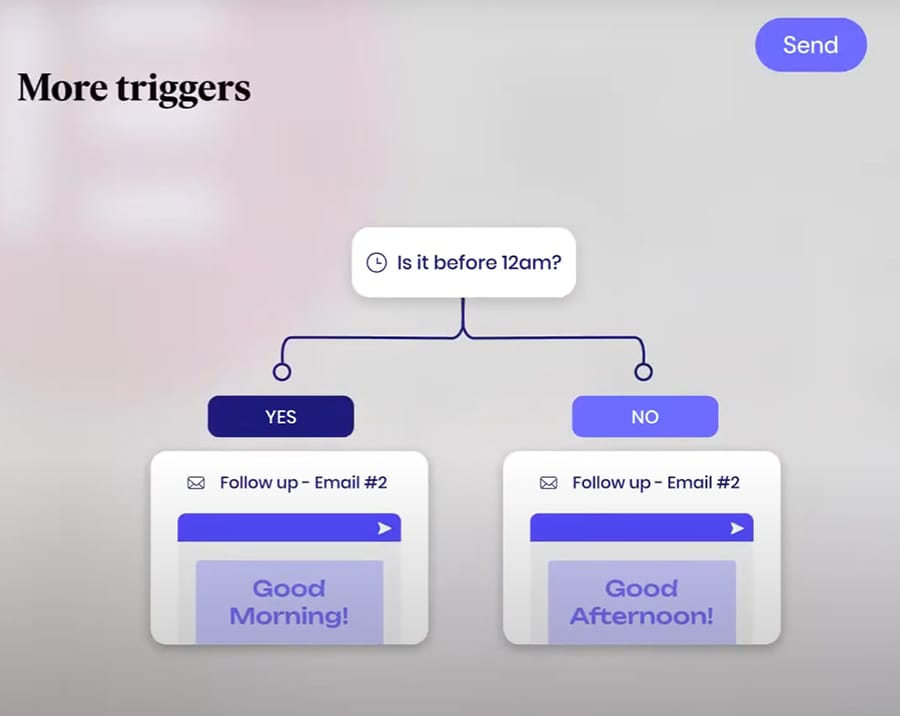
    Send will soon be adding smarter, more granular features for workflows and broadcasts, so your messages reach the right people at the right time. Instead of sending the same message to everyone, you’ll send messages to the right audience at the right time.

    Elementor q2 conditions

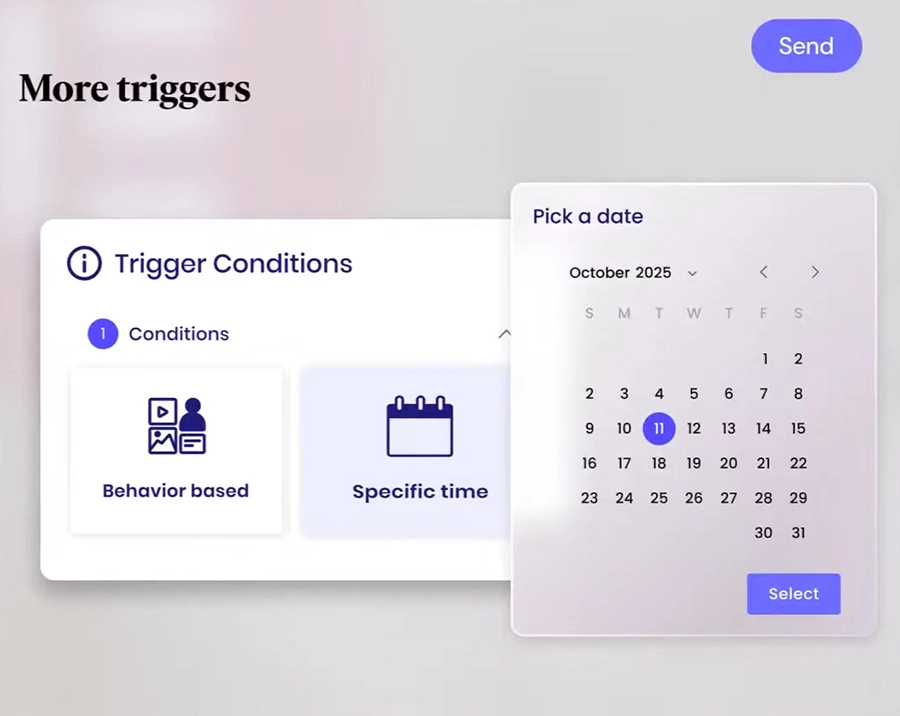
    This new level of personalization will be achieved with advanced triggers and dynamic content widgets. From real-time cart activity to specific product views and customer behavior, users will be able to segment more precisely and engage with customers on a deeper level. Send will also enable post-purchase follow-ups, limited-time offers, and cart reminders, enabling highly relevant emails that convert better, reaching the right person at the right time based on their location, availability, or even their date of birth.

    Elementor q2 send more conditions

    Brand Brush

    Another revolutionary feature is coming soon. “Brand Brush” will allow you to instantly apply your branding to every email and resource with a single click. Send will automatically pull your branding style directly from the website you just created.

    This one-click tool will allow you to instantly import your fonts, color palette, logo, and more, automatically applying them to every email you send.

    Elementor q2 brand brush

    New appearance

    Finally, a completely new visual interface will be introduced for the Send app, combining an intuitive design with a more elegant and modern experience.

    Elementor q2 new interface

    This new look will allow users to work faster, stay creative, and accomplish more with less effort. Every detail will be considered so you can move faster and enjoy the process.

    All of these improvements will make Send not only powerful but also a pleasure to use. This new level, based on user feedback, will help define the future of marketing automation in WordPress.

    Final conclusions

    Elementor appears to be establishing a broad and organized set of goals to improve WordPress website creation and management. The upcoming months will undoubtedly bring new ways to create websites. We hope these new features will integrate seamlessly with the ones we already have available, improving our experience as designers/developers and allowing us to deliver better results to our clients.

    Editor V4 promises a better creation experience for web design. At Fastweb, we hope these tools will allow us to create better experiences for those who rely on us.

  • Fluent Support: review

    Fluent Support: review

    Introduction

    Fluent Support is a powerful yet easy-to-use support plugin. It is designed to be managed and operated from a single-page application (SPA), built with VueJS and REST API to ensure both remarkable speed and 100% compatibility with WordPress.

    Fluent Support integrates seamlessly with WooCommerce, Easy Digital Downloads, LearnDash, LifterLMS, and several other popular plugins. It is the perfect tool for handling customer inquiries, shared inboxes, and managing both support staff and clients. Its reach? Whether you run a small business or a large digital agency, Fluent Support is built for everyone. Several specialized blogs have hailed it as the best ticketing system on the market, which is why we felt it deserved a thorough review.

    Features

    Fluent Support was created to simplify ticket management. Administrators and support staff can filter and sort tickets based on selectable variables to prioritize each case. You can track progress and monitor how many tickets are awaiting resolution.

    Highlights:

    • Comprehensive customer support portal, right from the WordPress Dashboard.
    • Enterprise-level inbox to manage multiple business accounts.
    • Custom ticket fields.
    • Seamless integration with Fluent Forms.
    • Customizable email notifications.
    • Permission and role management for agents and support staff.
    • Workflow automation, ticket tagging, and bulk ticket actions.
    • Advanced ticket search, filtering, and sorting.
    • Support for multiple attachments.
    • Pre-saved response templates.
    • Email piping via Amazon AWS Lambda.
    • Customers can create and reply to tickets directly from their email inbox.
    • Create tickets on behalf of specific customers.
    • Detailed reporting and activity logs.
    • Connect with messaging services like Telegram, Slack, and Discord.
    • Data is not stored on third-party servers (self-hosted solution).

    How It Works

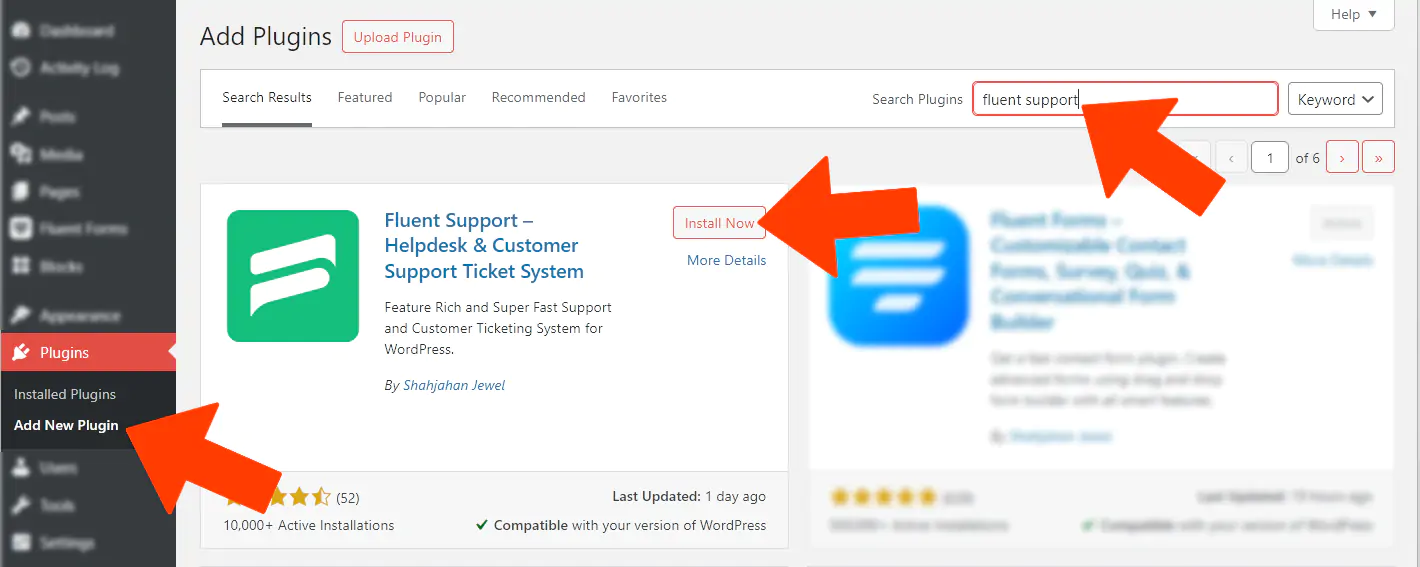
    You can find the free version of the plugin in the WordPress repository. The free version has limitations, such as the number of tickets you can manage. For professional businesses, we recommend the paid version. If you’re a client of our Managed WordPress service, you already have the PRO version included at no additional cost.

    Fluentsupport plugin

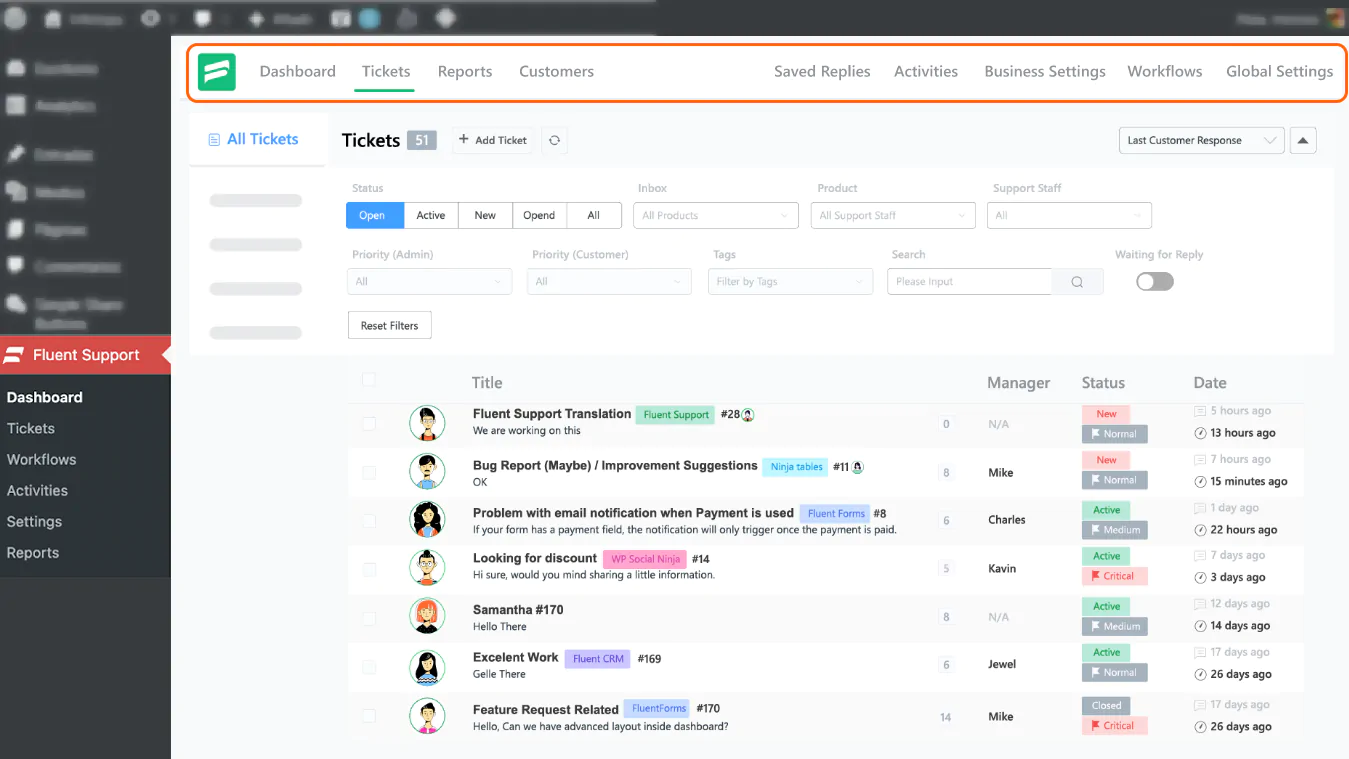
    Once activated, you can access the ticket dashboard from Fluent Support’s Dashboard section. Tickets are managed through the Tickets tab.

    Fluent support screenshot 1

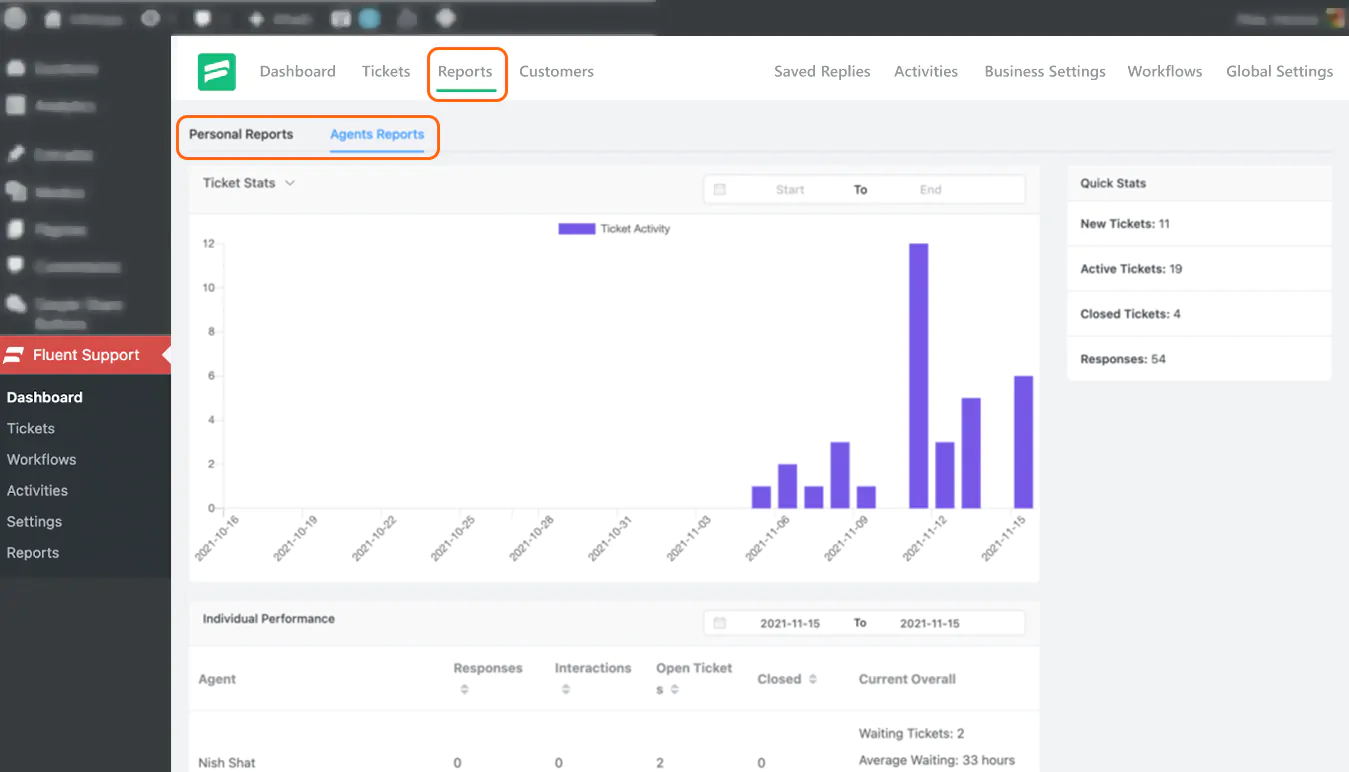
    Ticket activity statistics and their statuses are displayed in the Reports section. The collected data is presented as graphs. As shown in the screenshot below, there are separate tabs for personal reports and agent reports.

    Fluent support screenshot 2

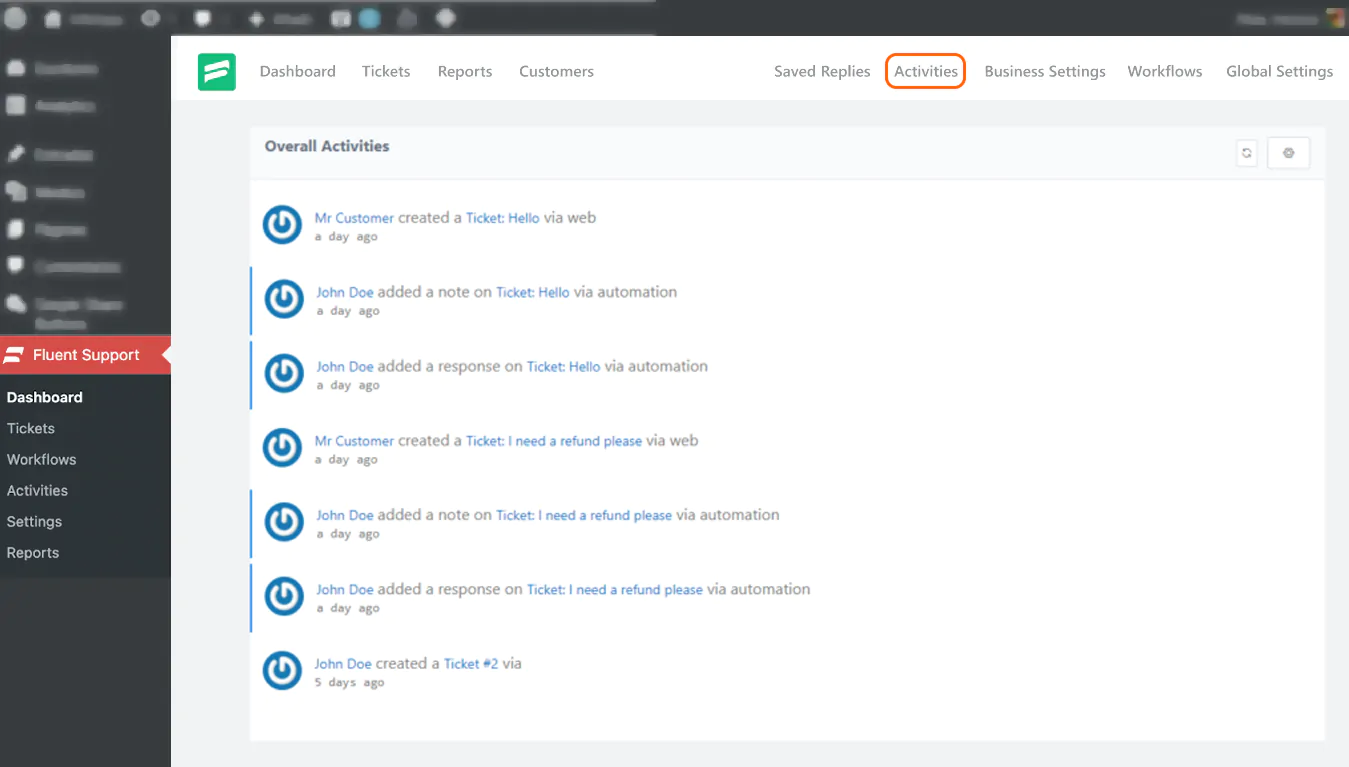
    The Activities tab allows you to track general ticket-related activities performed by your support agents. Here, you’ll find a timeline detailing who created, responded to, or closed each ticket.

    Fluent support screenshot 3

    To speed up your workflow, you can create saved responses through the Saved Replies section.

    Fluent support screenshot 3

    The highlighted blue button in the screenshot lets you “store” new responses in your repository.

    Fluent support screenshot 4

    Automated Workflow

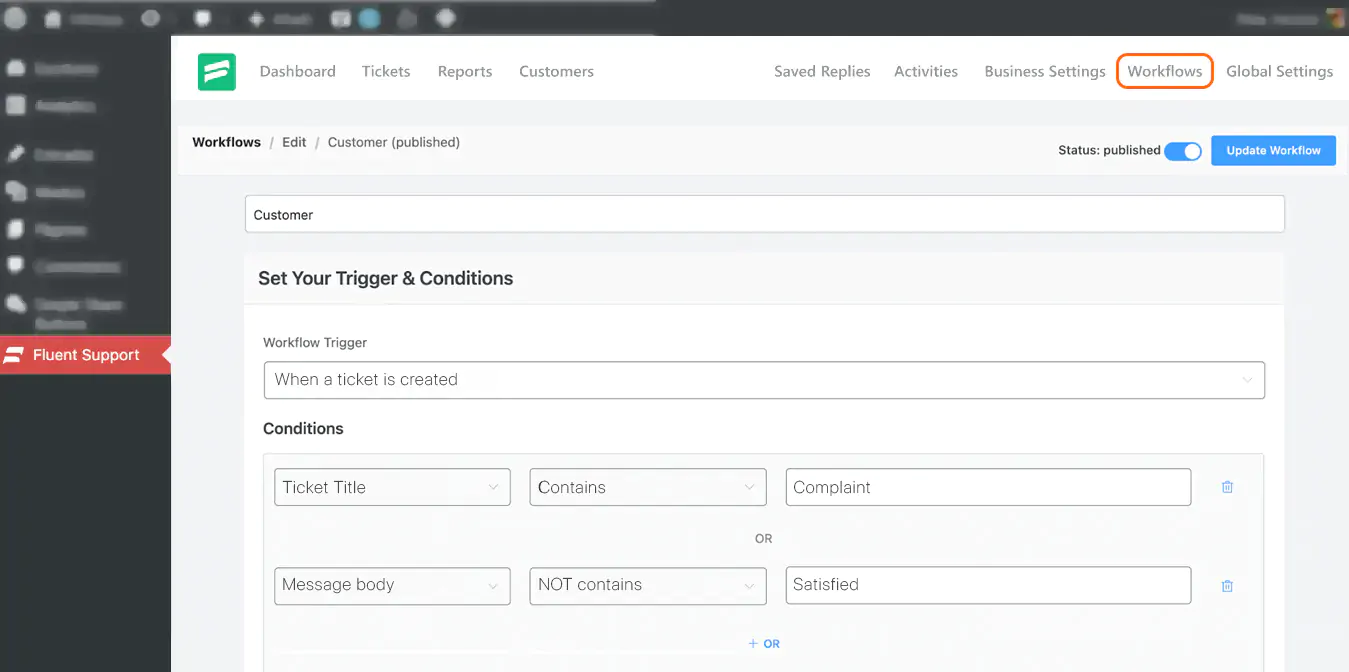
    One of Fluent Support’s advantages is the ability to automate responses to customer actions, including those related to tickets. This automation streamlines our work, requiring only a few conditions and triggers to be set up.

    Fluent support screenshot 5

    By selecting from dropdown menus and filling in the required fields, you can quickly establish custom conditions.

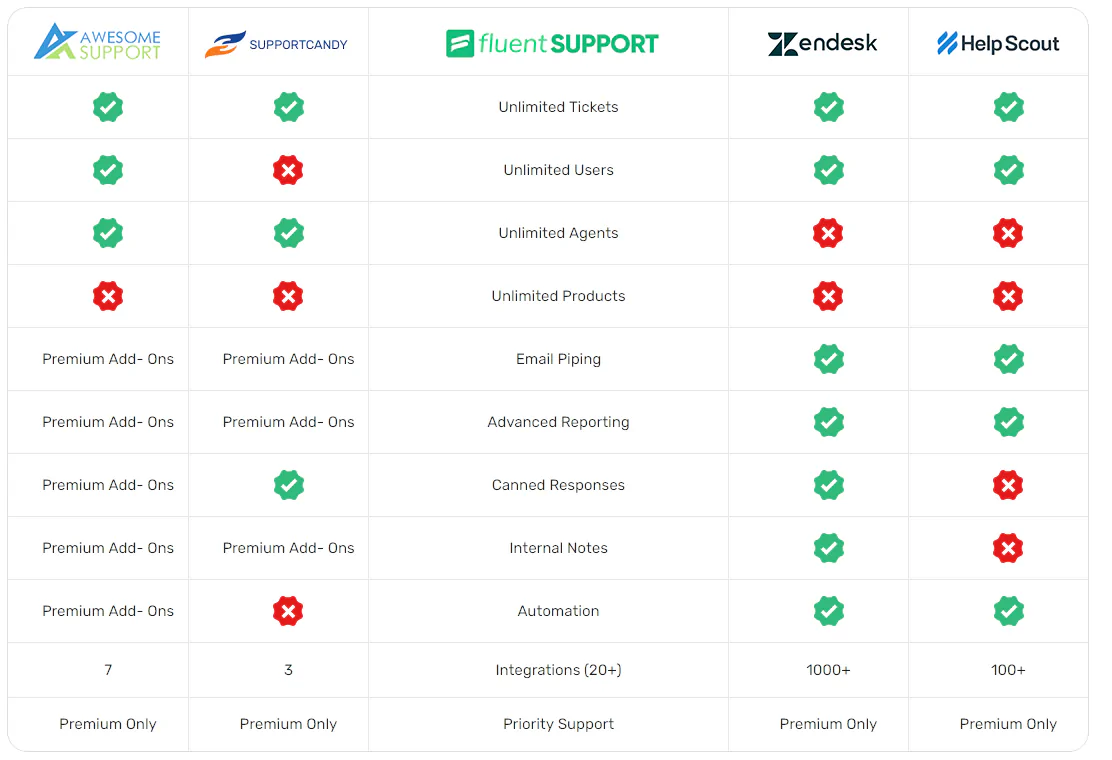
    Comparison: Fluent Support vs. HelpScout, Awesome Support, TotalDesk, and WSDesk

    With several strong competitors on the market, we thought it would be useful to create a comparison table outlining the features available (or missing) in each plugin’s PRO version.

    Fluent support versus comparison

    For more details on how to use Fluent Support, we recommend checking out the full online guide.

    Conclusion

    Whether you run a small business or a large company, a solid support system is essential for handling customer inquiries effectively. Fluent Support is an undeniable ally, offering unlimited tickets, unlimited agents, email-to-ticket conversion, and support via Telegram or Slack—all key advantages.

    Additionally, features like bulk actions, saved response templates, and real-time activity logs make it an exceptionally comprehensive plugin. Best of all, everything operates from a single, intuitive control panel.

    When combined with Fluent CRM and Fluent Forms, Fluent Support becomes the ultimate software for managing customers and support requests without any recurring costs. All of these components are included for free in our Managed WordPress service.
    Have questions, feedback, or experiences to share? Drop a comment below—we read and reply to every message. Thanks for reading, and best of luck!

  • Perfmatters: review

    Perfmatters: review

    Perfmatters accelerate wordpress all in one

    Perfmatters: Simplicity at Its Core

    Perfmatters was built to be easy and practical. Forget about manually editing functions.php. The plugin uses a simple on/off toggle system—just one click to activate or deactivate optimizations.

    Why is this plugin so effective? Essentially, it allows us to disable scripts that may be unnecessary. Removing scripts that load on our site without serving any real function is an excellent way to speed up WordPress.

    For instance, by default, WordPress loads emoji scripts on every page and post. But if we’re not using emojis, why let that script consume resources and slow down our site? With Perfmatters, we can simply disable it, reducing the total number of HTTP requests sent to our hosting server. The result? A smaller, faster webpage.

    Database Cleanup Made Easy

    A true all-in-one optimization tool wouldn’t be complete without a database cleaner… and Perfmatters delivers. It removes post revisions, auto-drafts, spam comments, and other transient data that take up unnecessary space.

    Orphaned data fragments can slow down our website. With Perfmatters, we can clean these up effortlessly and even set limits to prevent future clutter. The plugin ensures our database remains fast and efficient.

    Instant On/Off Controls

    Perfmatters scripts manager

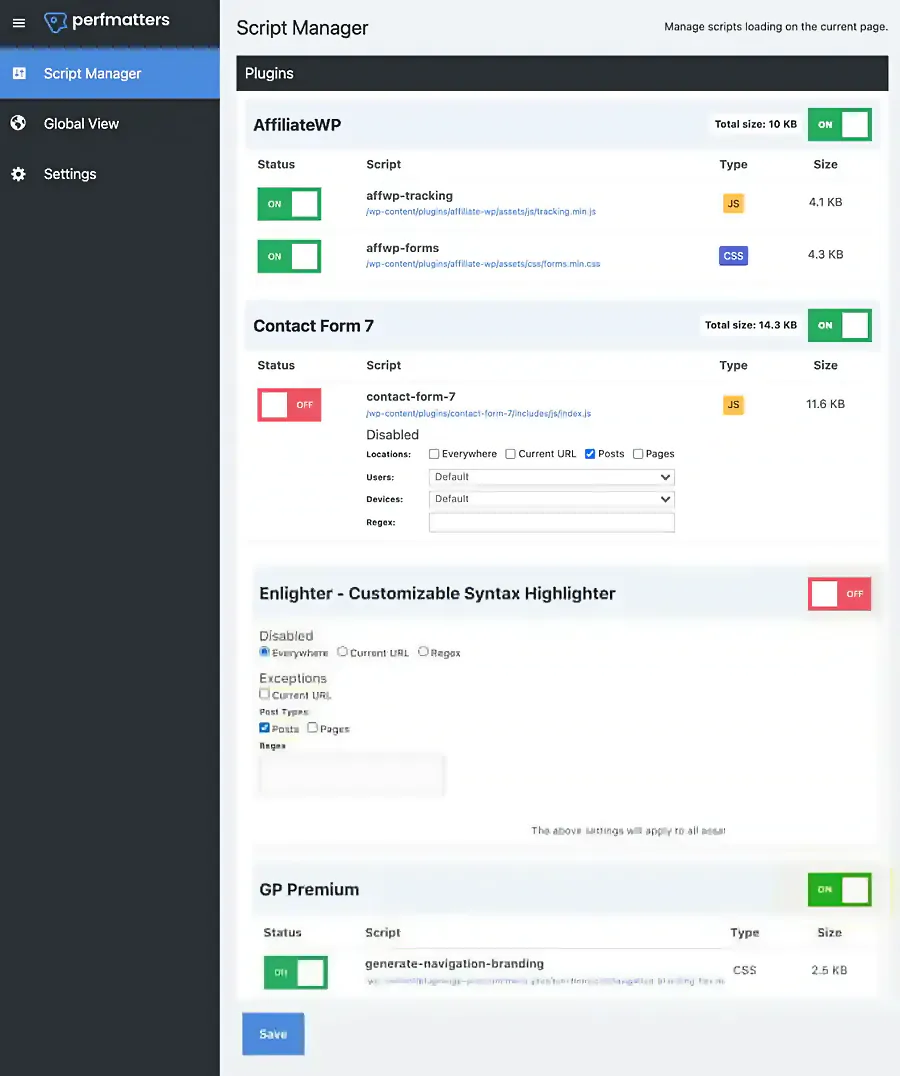
    As shown in the screenshot above, most Perfmatters features can be enabled or disabled with a single click. Beyond that, the plugin allows us to control where scripts run—by posts, pages, specific URLs, or even by device type.

    A practical example: Contact Form scripts should only load on the contact page, not across the entire site. With Perfmatters, we have precise control over this.

    Quick Wins: Speed Up WordPress in Minutes

    Here are some best practices we recommend for accelerating your WordPress site using Perfmatters:

    • Disable unnecessary scripts and assets. Examples include emojis, embeds, and dashicons.
    • Limit post revisions. Restrict the number of revisions WordPress stores to prevent database bloat.
    • Adjust the autosave interval. Reduce the frequency of autosaves to avoid constant “there is a newer saved version” alerts.
    • Optimize or disable the Heartbeat API. The WordPress Heartbeat API can consume significant CPU resources and generate excessive AJAX calls. Perfmatters lets us fine-tune or completely disable it to ease server load.
    • Disable comments and comment URLs. If we don’t run a blog—or if our comment section is a spam magnet—we can disable comments entirely or remove comment links to prevent backlink abuse.
    • Deactivate Google Maps where unnecessary. Google Maps scripts are notorious for causing performance issues. With Perfmatters, we can disable them site-wide or load them only on pages where maps are needed.
    • Disable WooCommerce cart fragments (AJAX). The wc-ajax=get_refreshed_fragments request can slow down WooCommerce sites. Disabling this feature dramatically improves load times.
    • Control social sharing buttons. Social sharing plugins should only load where they’re needed—typically on blog posts. Perfmatters makes it easy to disable these scripts everywhere else.
    • Disable Google Fonts. Loading fonts from external sources like Google Fonts can delay page rendering. We recommend using your theme’s native fonts to enhance performance.

    Lazy Loading for Images

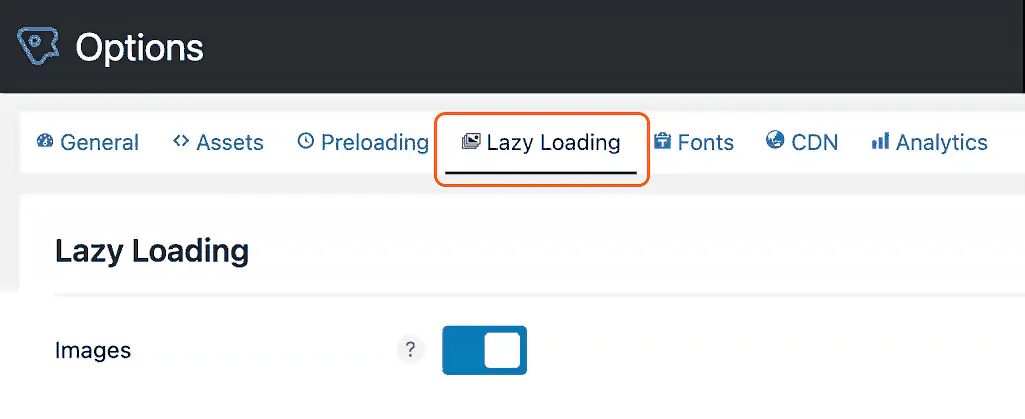
    A now-standard feature included in many optimization plugins—and Perfmatters is no exception. Lazy loading delays the download of images, videos, or iframes until users scroll down the page (i.e., these elements only load when they come into the viewport and become visible).

    For posts and pages with a lot of media, this feature is essential. It reduces the number of server requests that would otherwise happen all at once—often unnecessarily (for instance, when a user finds the information they need without scrolling further).

    Extensive tests show that lazy loading can reduce page load times by an average of 33%.

    Here are some of the lazy-loading features that Perfmatters provides:

    • Delay the loading of images, including background images, iframes, and video content (such as YouTube, Vimeo embeds, etc.).
    • Replace video iframes with preview thumbnails and an SVG play icon, loading the video only when the user clicks on it. This is the fastest way to handle YouTube embeds.
    • Support for WebP images, ensuring that even modern image formats benefit from lazy loading.
    • DOM monitoring for improved compatibility with infinite scrolling.
    • Outperforms WordPress’ native lazy loading, offering faster and more reliable results.
    Perfmatters lazy loading

    Move the WordPress Login Page

    As we all know, the default URL to access the WordPress dashboard is /wp-admin/.

    And it’s not just us who know it—bots and hackers do too. They routinely attempt to access sites through this common entry point. By simply changing the login page URL, we can effectively block many of these malicious attempts.

    But beyond security, moving the login page URL also improves site performance by reducing the number of bots crawling common paths and consuming server resources.

    To change the login page URL in Perfmatters, simply go to:
    General → Login URL and enter a custom folder name of your choice.

    Change wordpress login url

    CDN Rewrite

    A CDN (Content Delivery Network) accelerates WordPress by storing and delivering your website’s content from multiple servers worldwide. This means that users download content from the server closest to their geographic location, reducing latency and improving load times.

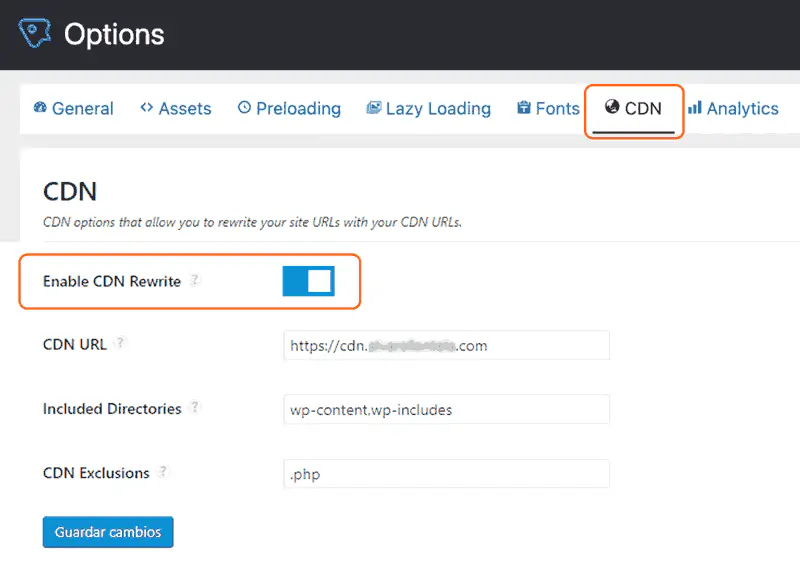
    Perfmatters seamlessly integrates with CDN services, allowing us to connect and rewrite URLs for static assets (such as images, scripts, and stylesheets) and ensure they are served efficiently from the nearest location.

    Whether you’re using a popular CDN like Cloudflare, BunnyCDN, or KeyCDN, Perfmatters makes it easy to enhance global content delivery and improve the user experience.

    Perfmatters cdn
    • Automatic Asset Rewrite: Once we enter our CDN URL, all assets—images, scripts, and other static files—are automatically rewritten to be served from the CDN.
    • Selective Directory Inclusion: We can choose which WordPress directories to include in the CDN rewrite process.
    • File Type Exclusion: It’s possible to exclude specific file types from being redirected. We can even target assets with query strings for finer control.

    Host Google Analytics Locally

    This feature is crucial if we aim to achieve higher scores on GTmetrix and PageSpeed Insights. One of the most impactful SEO optimizations involves handling the Google Analytics script.

    Why? Because by default, the script is requested from Google’s servers, creating additional DNS lookups and cache warnings. Ironically, Google’s own script often triggers the “Leverage browser caching” alert due to its short cache expiration time.

    By hosting Google Analytics locally, we speed up our site by reducing external requests and taking complete control over cache settings. When served from our own server or CDN, the script benefits from longer cache lifespans and fewer DNS lookups.

    Local google analytics

    Google Analytics Features in Perfmatters:

    • Choice of Script Type: We can select from five script versions:
      • analytics.js (17 KB) – Standard version.
      • gtag.js – Global site tag for advanced tracking.
      • gtag.js v4 – Latest version for enhanced tracking.
      • Minimal (1.5 KB) – Lightweight version for faster loading.
      • Inline Minimal – The smallest version, embedded directly in the HTML.
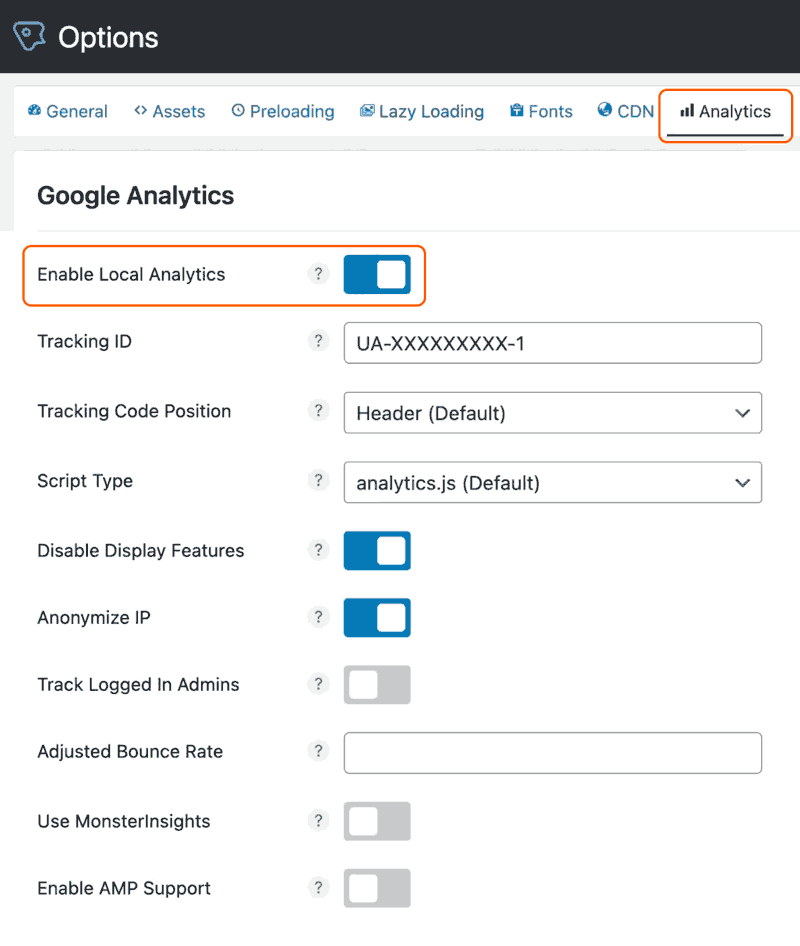
    • Script Placement: We decide whether to load the script in the header (for faster tracking) or the footer (for better page speed).
    • IP Anonymization: We can anonymize IP addresses to comply with GDPR and other data privacy regulations.
    • Admin Tracking Control: We have the option to exclude logged-in administrators from Google Analytics tracking.
    • Disable Display Features: By turning off display features, we prevent secondary HTTP requests, improving performance.
    • Adjust Bounce Rate: Perfmatters allows us to fine-tune bounce rate calculations, which is especially useful for content-heavy sites. For instance, a visitor who spends a couple of minutes reading an article but doesn’t click another link will be accounted for accurately.
    • MonsterInsights Integration: Perfmatters integrates with MonsterInsights for advanced analytics while still leveraging local script hosting for improved speed.

    By hosting Google Analytics locally, we ensure better performance, accurate analytics, and complete control over tracking behavior.

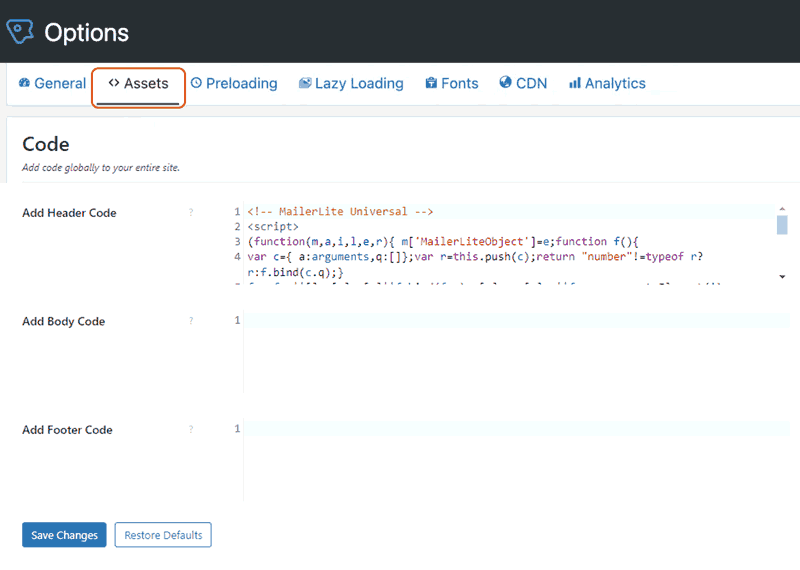
    • Direct Output on the Front-End: Perfmatters allows us to print inline CSS using <style> tags and inline JavaScript using <script> tags directly on the front-end.
    • External File Loading: We can load custom JS or CSS files as needed.
    • Precise Code Placement:
      • Code added to the header is inserted within the <head>...</head> section.
      • Code added to the body appears right below the opening <body> tag.
      • Code added to the footer is printed above the closing </body> tag.
    Add code header footer

    Resource Preloading

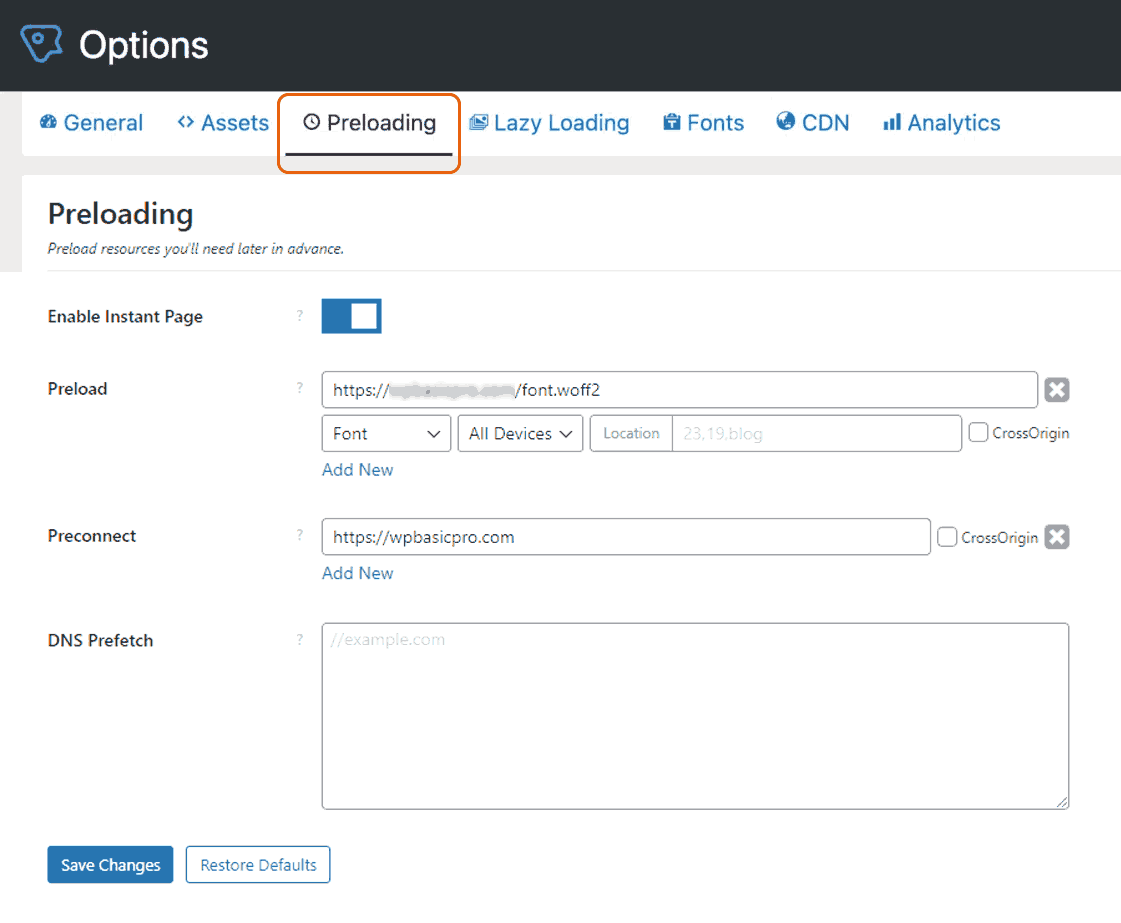
    Using the rel attribute for preloading can significantly improve page load times in WordPress. In fact, Google explicitly recommends using preloading techniques to optimize critical resources. With Perfmatters, we can easily apply these rel attributes across the entire site or target specific pages and devices (desktop or mobile).

    Perfmatters preloading
    • Instant Page: This feature uses link prefetching to load URLs in the background when a user hovers over a link—delivering near-instant page loads.
    • Preload Critical Resources: We can specify essential assets (such as fonts, CSS, or JavaScript) for immediate loading. This helps eliminate “render-blocking resource” warnings commonly flagged by performance tools.
    • DNS Prefetch: This option resolves domain names in the background before a user clicks a link, reducing latency and improving page load speeds.
    • Preconnect: This feature establishes early connections to external servers before a request is made. It reduces round-trip delays and speeds up the loading process by preparing the connection in advance.

    With these advanced preloading capabilities, Perfmatters allows us to fine-tune how and when resources are loaded—ensuring a faster, smoother user experience.

    Delaying and Deferring JavaScript

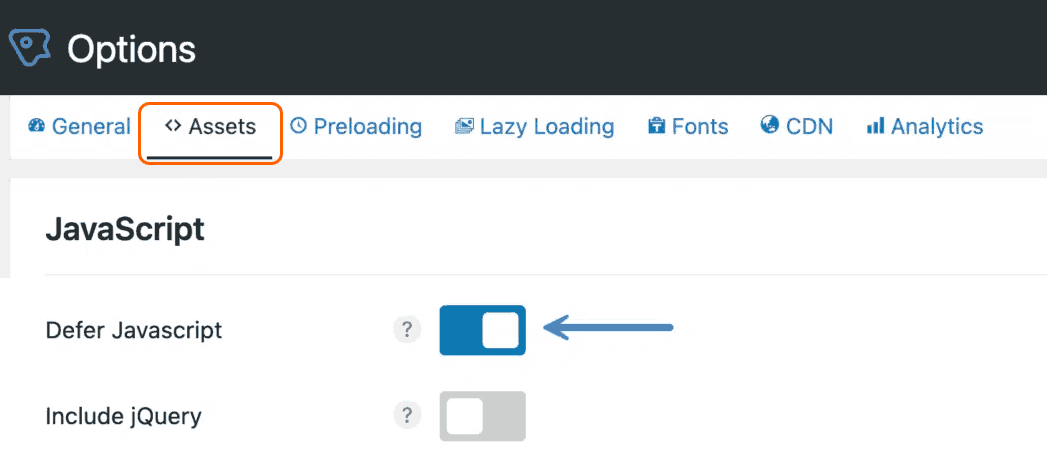
    Another common Google PageSpeed warning is “Remove render-blocking resources,” often caused by JavaScript. Google itself recommends deferring such scripts until user interaction occurs.

    Perfmatters defer delay javascript

    In the Assets section, you’ll find the option to activate this feature and customize it to your needs:Add a defer attribute to all JavaScript files, loading them only after other content has rendered.
    ● Delay inline JavaScript.
    ● Option to delay the core jQuery script.
    ● Exclude specific JavaScript files by name, path, or string.
    ● Exclude JavaScript files from being deferred on a per-post/page basis.
    ● Delay JavaScript until user interaction (scrolling, mouse movement, etc.)—ideal for WooCommerce cart fragments and third-party scripts like Google Tag Manager, Google Analytics, Facebook Pixel, Google AdSense, and others.
    ● Set a timeout to load scripts after a defined time period.

    WordPress Multisite Support

    If you manage multiple sites using WordPress Multisite, consider the unlimited license. This plan supports WordPress Multisite configurations, allowing you to apply your primary site’s settings across your entire network.

    Perfmatters Pricing

    Perfmatters offers three annual pricing plans:

    ● $29.95/year for a single site.
    ● $59.95/year for up to three sites.
    ● $124.95/year for unlimited sites (free with our managed WordPress plan).

    You can find full details on the official Perfmatters website.

    Conclusion

    After thoroughly testing Perfmatters and experiencing its wide range of optimizations in a single plugin, we concluded it deserves a permanent place in our Managed WordPress service alongside our other premium plugins. Perfmatters is an essential tool for anyone serious about optimizing their website’s performance.

    The plugin is easy to configure and customize, and its price is more than justified by the extensive improvements it offers. Perhaps the only downside is the lack of a lifetime license option—all plans are annual.

    Questions or comments? Let us know below—we read and respond to every message. Thanks for reading, and best of luck optimizing your site!

  • WP Time Capsule

    WP Time Capsule

    Wp time capsule banner

    Welcome, Incremental Backups

    The traditional method of backing up a WordPress site involves copying all the site’s files, including the database. This method is blind to the actual changes made, which are often significant but small compared to the total site size.

    Backing up the entire site every time we make a change is slow, cumbersome, and takes a toll on our server and cloud storage space. The smarter alternative is incremental backups.

    Backups on Your Schedule

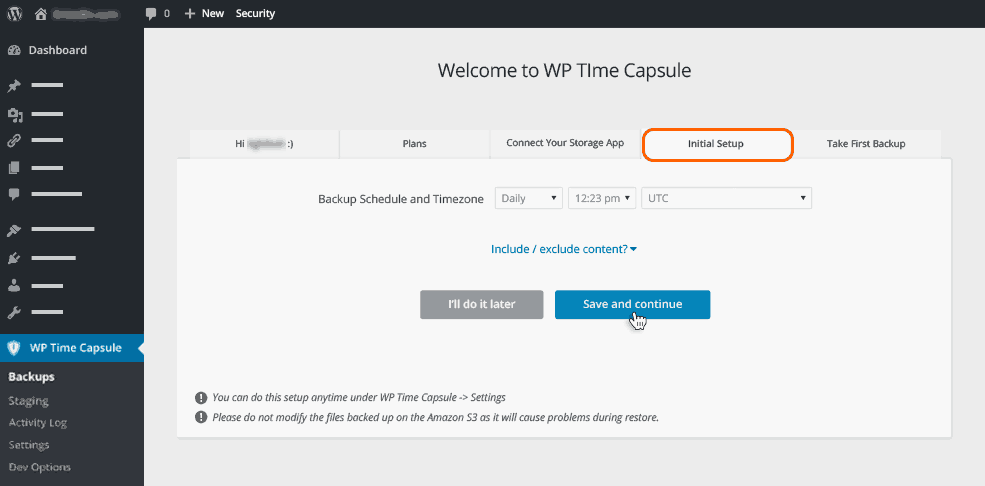
    WP Time Capsule allows us to schedule backups at any interval we choose: every two hours, eight hours, twenty-four hours, or whenever we please. In fact, it’s even possible to activate real-time backups, though this is probably unnecessary for most websites. Additionally, we can manually trigger a backup anytime we need it with a single click.

    Wp time capsule settings

    The screenshot above shows how to set the backup frequency through the initial setup tab.

    Store Backups in the Cloud

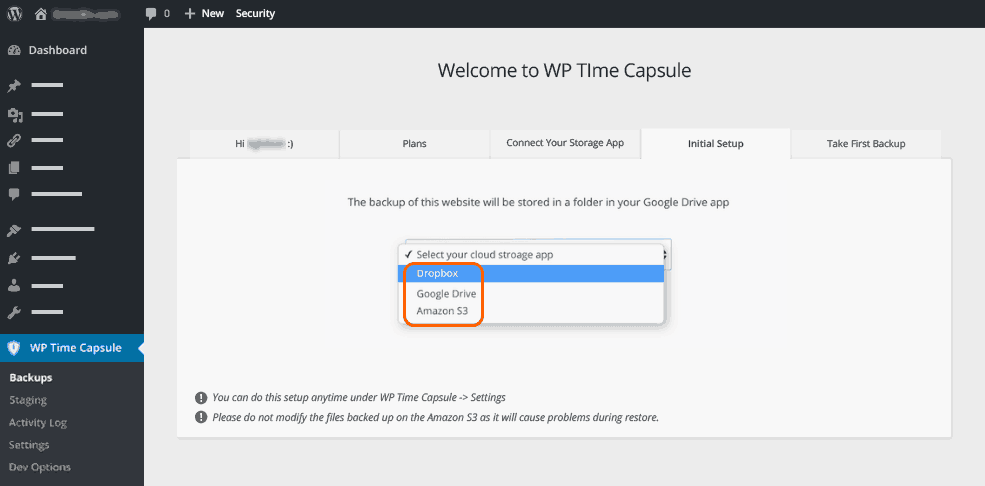
    WP Time Capsule respects our privacy, and the ability to choose where our backups are stored is a step in the right direction. The plugin lets us decide between Dropbox, Google Drive, and Amazon S3 for storing our site’s files and database.

    Wp time capsule cloud backup

    It’s worth noting that backups are encrypted for added security.

    One-Click Restore

    Restoring from a backup is a breeze: we can recover our site from any chosen point with a single click. This makes WP Time Capsule incredibly versatile. Want to restore a specific file? You can. Just the database? Absolutely. The entire site? Of course. Plus, restoration is possible even if our site is down or completely deleted.

    Wp time capsule restore

    Staging Environment

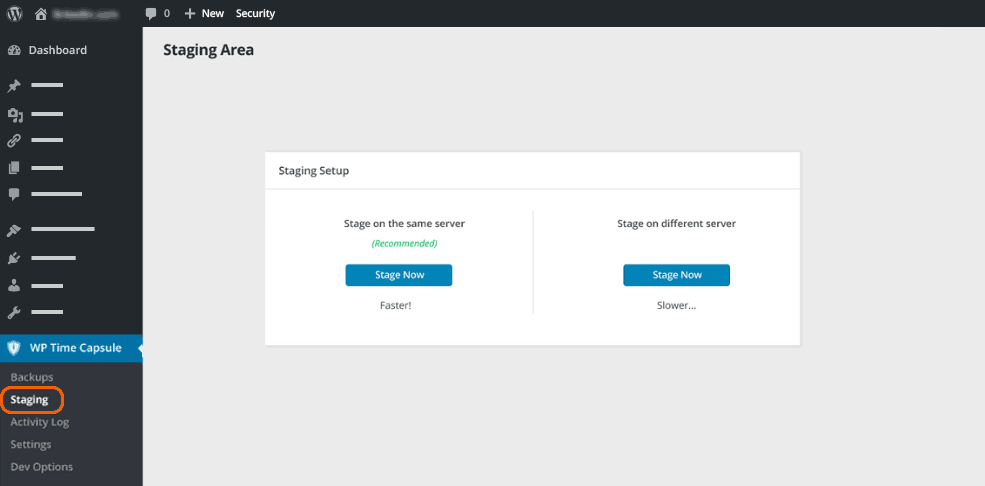
    The plugin also allows us to create a live staging environment, letting us test updates or changes without the fear of breaking the live site. WP Time Capsule encourages us to experiment—whether it’s changing themes, installing new plugins, tweaking site files, or adjusting settings. Once everything is working perfectly, we can push the changes to the live site. And if we’re still unsure, the plugin conveniently asks if we’d like to create a backup beforehand.

    Wp time capsule staging

    WP Time Capsule isn’t just a backup tool—it’s peace of mind, letting us safeguard our work while giving us the freedom to explore and innovate.

    Automatic Backup Before Updates

    WP Time Capsule automatically creates a backup before any update, whether manually approved or performed automatically. This means we can let our site update itself, knowing the plugin will create a backup first. As we can see, this is yet another powerful way to ensure peace of mind—there’s always a fresh backup ready.

    Wp time capsule configuration

    Included with FastWeb WordPress Maintenance Plan

    At FastWeb, we aim to provide the best WordPress tools with our plans, which is why WP Time Capsule is included in our Managed WordPress service.

    Final Thoughts

    WP Time Capsule is a professional plugin that delivers exactly what it promises—without gimmicks or complications. It’s easy to use, powerful, and flexible. Its staging feature adds extra convenience, combining two essential functionalities into one tool. It complies with GDPR regulations, securely transfers files to and from the cloud, and encrypts backups for enhanced security.

    Its ability to monitor changes and create backups before automatic WordPress updates makes it a true guardian of our site. Additionally, its customer support boasts a five-star rating, a testament to their prompt and efficient assistance.

    If we truly care about our website’s security, WP Time Capsule is a plugin worth serious consideration.

  • Advanced Scripts Plugin

    Advanced Scripts Plugin

    Wp advanced scripts plugin
    Developed by Clean Plugins

    Features of Advanced Scripts Plugin

    This component is presented as “the best script manager on the market. In addition to PHP, CSS, and JavaScript, you can also write SCSS and LESS code, use custom hooks, and do it all through a superior interface.” Let’s see if it lives up to its promise.

    Its five key advantages are:

    1. No more need to use shortcodes.
    2. No more need for components to customize functions.php.
    3. No more need for additional components to handle CSS and JavaScript.
    4. No need for an SCSS/LESS compiler.
    5. Finally, you can uninstall any plugin used to modify the Header/Footer.

    Administrative Interface

    Advanced scripts screenshot 1

    As shown in the screenshot above, we can easily choose the type of code we want to create.

    It also allows us to load assets directly from a URL. This is incredibly useful when using JavaScript libraries via CDN. In this case, all we need to do is paste the URL—simple as that. Another major advantage is the ability to manage all external scripts on our website with ease.

    Once an external script is added to this plugin, we can activate or deactivate it with a single click from the back end. This drastically simplifies debugging processes.

    When adding any type of script, we can decide when it will load on the page. For those of us constantly working to improve site speed, this is a game-changer. It’s also incredibly useful if we want to limit scripts to specific areas of the site. We can even call code manually from wherever we need it or use custom hooks.

    Advanced scripts screenshot 2

    As shown in the screenshot below, we can easily choose the type of code we want to create, and the appropriate styles and format will be applied automatically.

    Advanced scripts screenshot 3

    When writing code, Advanced Scripts Plugin conveniently assists us with pop-up windows.

    Advanced scripts screenshot 4

    It also allows us to load assets directly from a URL. This is incredibly useful when using JavaScript libraries via CDN. In this case, all we need to do is paste the URL—simple as that.

    Another major advantage is the ability to manage all external scripts on our website with ease.

    Once an external script is added to this plugin, we can activate or deactivate it with a single click from the back end. This drastically simplifies debugging processes.

    When adding any type of script, we can decide when it will load on the page. For those of us constantly working to improve site speed, this is a game-changer. It’s also incredibly useful if we want to limit scripts to specific areas of the site. We can even call code manually from wherever we need it or use custom hooks.

    Safe Mode

    The last feature we want to highlight is the addition of Safe Mode. If you make a mistake using the Code Snippets plugin, you know it can take your site offline. The usual remedy involves manually disabling the plugin via FTP.

    Advanced Scripts detects any PHP errors and warns us before applying them to the site. This prevents site crashes caused by an omission or a mistyped character.

    In short, you won’t experience any site-breaking issues. Here’s what Safe Mode looks like when it detects an error:

    Advanced scripts screenshot 5

    Conclusion

    The plugin delivers on its promises—no fine print. Moreover, it features a beautifully crafted interface: the panel is excellently designed for all users, from beginners to advanced developers. It’s intuitive, easy to use, and visually appealing.

    This component isn’t free; pricing starts at $20 for a single site, with lifetime access.

    There is also a $29.99 plan for up to five sites, and finally, an unlimited plan that allows you to use Advanced Scripts on any number of sites, forever.

    You can find more details on their official website.

    Feel free to leave your questions in our contact form. We’re here to help. Best of luck, and thank you for reading!

  • SEOPress PRO review

    SEOPress PRO review

    Look no further: the best SEO plugin for WordPress is SEOPress. From its FREE basic option to the professional version*, SEOPress offers all the features you need to rank higher in search engines—all in a single plugin. It includes metadata management, breadcrumbs, redirects, schema markup, sitemaps, a broken link checker, and other essential tools to strengthen communication between your site and search engines.

    All the features you need
    to be FIRST on Google

    With over 300,000 active SEOPress installations worldwide,
    its effectiveness in SEO is undeniable.

    SEOPress Main Features

    The remarkable SEOPress plugin for WordPress offers powerful features in both its free and paid versions. To help you choose the best option for your needs, we’ve compiled a comparison of the benefits each version provides.

    The free version includes:

    • Easy-to-follow installation wizard
    • Access to title and meta description settings
    • XML sitemap generation
    • HTML sitemap generation
    • Content analysis tool
    • Google Knowledge Graph integration
    • Google Analytics connection
    • Metadata management for Twitter Cards

    SEOPress PRO unlocks even more advanced -yet necessary- features, such as:

    • Google Insights integration
    • Broken link monitoring
    • Backlink tracking
    • Video sitemap generation
    • In-depth Google Analytics statistics
    • URL redirection management
    • Google structured data (schema) implementation
    • Google Page Speed analysis
    • WooCommerce optimization tools
    • Google News sitemap generation
    • 404 error logging

    SEOPress General Features

    Titles and Meta Descriptions

    Seopress screenshot

    Titles and meta descriptions are, in fact, the tip of the iceberg in the SEO ocean. These are considered the most essential elements for ranking a website and require a strategic approach to manage them effectively.

    With SEOPress, you can easily manage both titles and meta descriptions to optimize how search engines like Google interpret your content. Once you craft compelling and well-optimized metadata, you gain better control over how your website appears in search results.

    Additionally, SEOPress offers access to variables that enhance the quality of your titles, making them more appealing to users. This increases the chances of capturing their attention, driving more traffic, and ultimately converting visitors into satisfied users.

    Sitemaps

    Sitemaps are crucial for helping search engines understand the structure of a website. They also guide both users and search engine bots, ensuring they reach the content they’re looking for efficiently.

    With SEOPress, creating sitemaps is easy and further enhances your SEO performance —an essential factor, as Google rewards websites with clear and accurate sitemaps.

    This WordPress plugin makes sitemap generation as simple as navigating through its menu, a feature that sets SEOPress apart from other SEO plugins.

    Google Knowledge Graph

    With SEOPress, you can create a custom Google Knowledge Graph for your website. This is the information box that appears in search results when someone looks up a registered brand or a public figure. It provides a brief overview and links to relevant content directly from Google’s search page.

    Content Analysis

    The content analysis tool in SEOPress makes it easier to optimize your content for better search engine performance. If you already have written content, this tool helps you refine it to meet the best SEO practices.

    Seopress screenshot 2

    By using the content analysis feature, you can identify errors and areas for improvement, allowing you to adjust your content accordingly. Each piece of content is evaluated, with a detailed report showing what meets SEO standards and what still needs attention.

    404 Monitoring

    Broken links can severely impact a website’s performance, and SEOPress addresses this issue with its 404 monitoring feature. This tool quickly identifies any 404 errors on your website (deleted or missing URLs).

    By resolving these errors, you provide users with a smoother browsing experience while avoiding negative rankings from search engines. This proactive monitoring helps ensure your site remains user-friendly and optimized.

    While similar to the 404 monitoring feature, the broken link checker in SEOPress works on a more detailed level. It scans every link on your website and identifies broken ones, allowing you to address them quickly.

    Once the scan is complete, you can either fix broken links individually or remove them altogether, improving the user experience and maintaining your site’s integrity.

    Google Local Business

    If you have a physical store or offer local services, local search optimization is essential for your website. With SEOPress, you can leverage tools like Google Maps and configure key business details, including:

    • Your brand, business, or company name
    • Physical location
    • Website URL
    • Contact information

    These elements are crucial for local search visibility, helping you connect with more users in your area and enhancing your online presence.

    Google Analytics

    Google Analytics is one of the most powerful tools for tracking and analyzing website performance. With SEOPress, you can easily link your Google Analytics account directly to the WordPress dashboard, providing seamless access to vital site metrics.

    This integration allows you to monitor site traffic, user behavior, and other analytics while managing your SEO settings from a single platform.

    SEOPress vs. Yoast SEO: A Comparison

    Seopress versus yoast seo

    As the most widely used SEO plugin for WordPress, Yoast SEO provides robust features and an intuitive setup process. With that in mind, we can directly compare the key features of SEOPress and Yoast SEO, highlighting how each plugin stands out.

    Price Comparison

    While both plugins offer free versions, they also provide PRO versions with additional features. SEOPress costs USD49/year, while Yoast SEO charges USD99. It’s a huge difference, considering Yoast costs exactly twice as much.

    Domain Usage

    SEOPress allows installation on unlimited domains without additional fees. In contrast, Yoast SEO requires a separate license for each domain, making it a pricier option for managing multiple websites.

    Keyword Optimization

    SEOPress includes a content analysis tool that helps identify and optimize primary and related keywords. Yoast SEO, on the other hand, allows free optimization for a single keyword, with advanced features reserved for the paid version.

    Metadata Management

    Both SEOPress and Yoast SEO offer comprehensive metadata management tools, allowing you to customize titles, meta descriptions, and social previews effectively. In this regard, both plugins are equally efficient.

    Social Media Integration

    Seopress screenshot 3

    Although neither plugin offers direct social media sharing, both provide social media previews to ensure your posts display correctly on platforms like Facebook and Twitter.

    Technical SEO Features

    Both SEOPress and Yoast SEO handle essential technical SEO tasks, such as creating XML sitemaps, which help Google index your website more efficiently.

    Content Analysis

    Each plugin offers a unique content analysis approach, with features tailored to their specific methodology. Both ensure your content meets SEO best practices while providing actionable insights for improvement.

    Support and Updates

    When it comes to support and updates, the two plugins differ:

    • Yoast SEO’s free version offers limited support but frequent updates. Their PRO version includes better customer service.
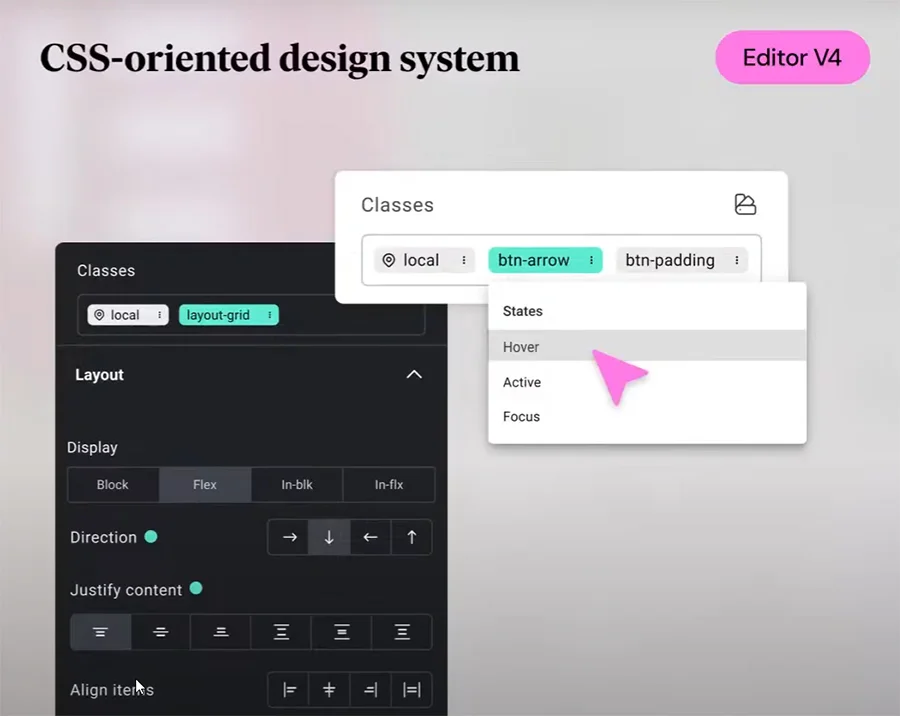
    • SEOPress provides regular updates (without a fixed release schedule) and superior support for PRO users.

    SEOPress PRO Features

    • Import SEO metadata from a CSV file
    • Export SEO metadata to a CSV file
    • Import Redirects from a CSV file
    • Create Video Sitemap
    • Google Structured Data Types
    • Custom schemas (advanced)
    • Google Local Business
    • Google Suggest
    • Dublin Core (Manage website metadata)
    • Redirections
    • Robots.txt (Control access for web crawlers)
    • htaccess (page access control)
    • Breadcrumbs (navigational path)
    • Google Analytics Stats in Dashboard
    • Google Analytics Enhanced Ecommerce
    • Google Page Speed
    • WooCommerce Integration
    • Easy Digital Downloads (EDD) Integration
    • Google News Sitemap
    • 404 (missing page error) monitoring
    • Broken link checker
    • Manage default WordPress RSS
    • URL Rewriting
    • White Label from WP admin
    Seopress pro screenshot

    Conclusion

    When it comes to optimizing your WordPress site, SEOPress is, without a doubt, the best SEO plugin available.

    Compared to other SEO plugins, SEOPress offers more advanced features in its free version —features that competitors typically lock behind a paywall. Even when you upgrade to the PRO version, SEOPress continues to outshine the competition by providing unique tools like backlink monitoring, white-label capabilities, CSV metadata import, Google suggestions, and more. Many other SEO plugins have yet to introduce these functionalities, giving SEOPress a clear edge.

    And its cheaper than the competition. If you’re looking for a cost-effective, powerful, and easy-to-use SEO plugin, SEOPress is the clear winner.

  • WP Grid Builder

    WP Grid Builder

    Gridbuilder Logo

    WP Grid Builder: Stylish Presentations

    Grid layouts offer an appealing way to display and filter content on our website. This is both desirable and necessary to provide users with a clean and elegant experience. Take, for instance, something like this:

    Wordpress Grid Example 1

    And another example follows:

    Wordpress Grid Example 2

    The Essence of WP Grid Builder

    This is the very reason WP Grid Builder exists: a carefully crafted plugin that allows us to quickly create advanced grid layouts in WordPress through an intuitive, easy-to-use interface. Out of the box, the plugin comes packed with optimal features designed for both beginners and developers alike.

    For those who are new to web development, WP Grid Builder offers a practical solution to create flexible, filterable grid layouts without needing any programming knowledge. However, if we have some development skills —or if we’re professional web designers— the grid builder spoils us with numerous actions and functions that will keep us glued to our seats for hours.

    WP Grid Builder works seamlessly with all WordPress themes and integrates flawlessly with most popular plugins (such as WooCommerce). Additionally, it includes extra add-ons that expand its capabilities, offering even more functionality and flexibility for our grids and search filters (commonly referred to as “facets”).

    Features of WP Grid Builder

    WP Grid Builder brings all the essential tools to create professional-grade grid layouts. Unlike its competitors, this plugin proves highly practical when designing an online store, portfolio site, blog, or any other type of website.

    Here are some of its standout features:

    • Seamless integration with WooCommerce, Easy Digital Downloads, SearchWP, Relevanssi, Polylang, WPML, Advanced Custom Fields, and Gutenberg.
    • 100% responsive for mobile devices, with touch support for lightbox and carousel.
    • SEO-optimized: WP Grid Builder adheres to W3C standards and follows the latest SEO best practices.
    • Blazing-fast performance, thanks to custom AJAX endpoints.
    • Advanced filtering system, allowing content to be sorted by taxonomy terms (including custom ones), post fields, or custom fields efficiently.
    • Over 15 types of facets, including radio buttons, checkboxes, sliders, selectors, ratings, load more buttons, reset buttons, and more—allowing users to refine search results as they please.
    • Import/export functionality to easily transfer WP Grid Builder settings to another site.
    • Built-in lightbox.
    • Drag-and-drop grid builder.
    • Over 20 pre-designed grid cards, fully customizable. Additionally, we can create our own grid tiles from scratch.
    • 900+ Google Fonts.
    • 250+ lightweight SVG icons to decorate grid tiles as desired.
    • Social media sharing support, enabling direct sharing from grids.
    • Support for multiple post formats, including images, videos (with embeds from platforms like YouTube), galleries, and audio.
    • Three+ grid layouts, including Masonry, Justified, and Metro.
    • Lazy loading to improve page load speed.
    • 20+ loading animations to reduce perceived wait times for users.
    • RTL (Right-to-Left) support for languages that read from right to left.
    • A highly intuitive admin panel.
    • And much more.

    As we can see, WP Grid Builder provides a comprehensive set of tools and features to customize and optimize grid layouts, enhancing both the aesthetics and functionality of any website.

    Installing WP Grid Builder

    At the time of writing, this plugin does not offer a free version. Therefore, to use it, we must purchase at least the single-site plan, which costs $49 per year. Once purchased, we can download the .zip file and upload it via the Plugins section in our WordPress dashboard.

    Wp Grid Builder Installation

    Next:

    Wp Grid Builder Upload

    After this step, we can activate it using the corresponding button.

    Wordpress grid activation

    Here, we can enter the key (which we should have received via email after purchase) to activate the license.

    Wp grid builder license

    Using WP Grid Builder

    Next, we’ll go step by step through creating our first grid in a practical Grid Builder guide with screenshots.

    Let’s start by creating a new grid by clicking on the options shown in the screenshot below:

    Creating new grid
    Note: You can also import a demo (using the central “Import Demos” button) for a quick layout setup.

    Clicking the “Add New” button will take us to the following screen.

    Query

    Wp all import pro screenshot 3

    As shown in the screenshot above, we have three types of sources to fetch content from (unless we’ve added other content types, such as when installing WooCommerce):

    • Content: We can retrieve content from posts, pages, the media library, or any other custom post type.
    • Terms: This option allows us to fetch content based on categories, tags, or any other custom taxonomy terms.
    • Users: We can retrieve content from specific WordPress users.

    Below these options, we can set the number of items per page (default is 10).

    Further down, we can define how results are sorted (by default, by creation date) and add additional sorting rules via the “Add Order” option.

    Finally, we can refine additional settings, such as including or excluding specific authors or posts.

    Always remember to click the SAVE button to apply changes.

    Layout

    Wp all import pro screenshot 4

    Here, we’ll explore the design options, meaning how our grid will look—its visual personality in the eyes of our users.

    The first thing we can choose is the layout type: Masonry, Metro, or Justified. This is an important decision, as each option produces a distinctly different result. Let’s take a closer look:

    Masonry

    The Masonry grid layout arranges elements in a brick-like structure (similar to how bricks are stacked in a wall). This design allows elements of different heights to fit tightly together without leaving blank spaces.

    There is no fixed row height in Masonry, as element heights can vary. Items are placed in the next available position in the shortest column, creating a structured yet visually balanced appearance. This layout is ideal for image galleries and portfolios where images have different proportions.

    Example: Pinterest uses a Masonry grid layout.

    Metro

    The Metro layout is inspired by the design style popularized by the Windows 8 user interface. It consists of blocks of varying sizes and shapes that fit within a grid—a mix of large and small elements that create a more dynamic composition.

    Although elements follow a strict grid structure, some blocks can span multiple columns or rows depending on their size. This design is often chosen for modern, visually engaging layouts that appeal to specific types of content.

    Justified

    The Justified grid layout arranges elements in rows of equal height, aligning the left and right edges of each row. It’s a popular choice for photography and image galleries.

    Each row maintains the same height, and the elements adjust in width to completely fill the space without gaps. This creates a clean, organized, and evenly aligned appearance.

    Example: Flickr uses a Justified grid layout for its photo galleries.

    After selecting the presentation style, we can also enable Full Width, allowing the grid to span the entire screen from left to right, displaying the results across all available space.

    Behavior Options

    Now, let’s explore the Behavior options. These settings control how cards are arranged and displayed within a grid. Below are the three available options:

    Horizontal Order

    This option arranges the cards from left to right instead of top to bottom. It’s useful for designs where content should flow horizontally before moving to the next row.

    Best for: Carousels or horizontal galleries where content needs to be explored laterally.

    Fit into Rows

    This setting organizes cards into rows that progress vertically, meaning they align one below the other. This makes the grid easy to read and navigate, ensuring a structured display.

    Best for: Image galleries and portfolios that require a clean, consistent presentation of visual elements.

    Equal Height Columns

    This option ensures that all columns within a row have the same height, creating a neat, balanced look. It’s particularly useful for grids that require uniform column heights to enhance readability and visual appeal.

    Best for: Designs where consistent column height improves aesthetics and readability.

    Sizing Options

    Finally, using the Sizing settings, we can customize the grid’s size based on screen width (e.g., adjusting for mobile devices). This allows for further personalization according to our preferences.

    Now, let’s move on to the next configuration tab: Carousel.

    Wp all import pro screenshot 5

    The first option is critical —if we intend to transform our grid content into sliding images, we must enable it.

    This feature allows the grid layout to display content horizontally and scrollably. Instead of showing all content on screen at once, the carousel enables users to navigate through the grid horizontally, either by swiping or clicking navigation buttons.

    It’s a dynamic, interactive way to present content —especially considering that screen space is often limited.

    In the next Behavior section, we can fine-tune the carousel’s behavior, including slide arrangement. The key settings are:

    • Slides Alignment: Aligns slides within the carousel element.
    • Initial Slide: Defines the zero-based index of the starting slide.
    • Group Cards: Groups multiple cards into single slides.
    • Auto Play: Automatically advances to the next slide.

    Appearance Settings

    In the final Appearance settings, we’ll define colors and button sizes to customize the visual style.

    Now, let’s move on to configuring Cards.

    Cards

    Wp all import pro screenshot 6

    In this section, we will decide what type of design we want for our Cards. We can create multiple Card designs and use them in any type of grid we need. For example, we might have one design for carousel grids, another for standard grids, or even a specific design for WooCommerce products if we’re using that.

    Wp all import pro screenshot 7

    In order to streamline the process and explore the variety of built-in designs WP Grid Builder offers, we’ll import the demo templates. To do this, we clicked Import Demos, which brought up the following pop-up window.

    Wp all import pro screenshot 8

    As seen in the screenshot above, we have access to various designs for blogs, portfolios, WooCommerce, and a selection of templates named after colors (Agate, Amber, Coral, Emerald, etc.). We’ll import only what we need or want to experiment with.

    After this step, we’ll see the list of imported Cards.

    Wp all import pro screenshot 9

    In the screenshot above, we can see that hovering over a Card row allows us to edit it. Let’s take a look at what happens when we click the Edit button.

    Wp all import pro screenshot 10

    This brings us to the Gutenberg blocks that make up the Card. We can add more blocks, remove what we don’t need, and tweak the design as much as we like. Pay special attention to the Type of Card, where we can choose Masonry or Metro, depending on our preferred layout. In this example, the Card template is called “Lava” and is designed for a blog.

    To display data from Posts, Terms, or Users in our grid, we need to assign Cards. However, Cards are not explicitly assigned—WP Grid Builder will automatically apply a default Card that only displays the post thumbnail or user avatar (if available).

    Continuing with our guide, we’ll type “Lava” in the Card field to select it.

    Wp all import pro screenshot 11

    Cards can be assigned based on conditions, depending on the data queried in the grid. For example, we can assign specific Cards to Posts containing certain terms or custom fields. We can also set conditions for mobile devices or different User scenarios. As we’ll see, WP Grid Builder offers remarkable flexibility.

    In this tab, we also have options for Sizing. This allows us to globally override the number of rows and columns used for all Cards within the grid—these settings apply exclusively to Masonry and Metro layouts.

    Finally, under Animation, we can configure how Cards appear and transform as users scroll.

    As we navigate through the page, animations will dynamically reveal Cards within the grid, enhancing the visual appeal of the content and potentially increasing user engagement. There are several animation options to choose from.

    Wp all import pro screenshot 12

    Be sure to save your changes. Now, let’s move on to the Media section, where we can configure how media files are displayed based on the query.

    Media

    In this panel, we can determine which media formats are allowed in our Cards. With a single click, we can enable or disable gallery, audio, or video formats using the corresponding toggle buttons.

    Wp all import pro screenshot 13

    WP Grid Builder offers the ability to automatically retrieve the first media element from a Post’s content if no featured image has been assigned. If this is what we want, we can enable the First Media Content option. Additionally, we have the option to display thumbnails for embedded videos and to show videos in a Lightbox-style frame.

    Next, under Thumbnails, we can adjust default sizes and layouts, even considering different settings for mobile devices.

    Advanced Settings

    In the final tab, we can customize messages, the appearance, and the functionality of the grid to better fit our specific preferences and requirements.

    Wp all import pro screenshot 14

    Adapting messages to our language or website’s tone is important, but the rest of the fields require advanced programming knowledge and will not be covered in this quick guide.

    Preview

    We can always preview our grid as we configure it, but now let’s take a look at how our demo grid is shaping up: Voilà.

    Wp all import pro screenshot 15

    In this example, we see the Blog results as we quickly configured them. Images turn to full color only when we hover over them, but this can be easily modified. If we’re not entirely satisfied with link colors, text styles, or fonts, we can adjust them via the Gutenberg blocks in the Card editor. We can also remove blocks—such as comment information or author details—if they’re not needed.

    Regarding structure, if we feel something needs improvement, we can go back to the relevant grid design section.

    Search Filters

    An essential and complementary part of content presentation is allowing users to organize it based on their needs or preferences. That’s where search filters come in. In WP Grid Builder, as we previously mentioned, they are called Facets.

    We can create as many Facets as needed (though we’ll start with just one), depending on our website’s requirements.

    To do this, we need to navigate here:

    Wp all import pro screenshot 16

    By default, WP Grid Builder includes several pre-existing Facets. Think of these as elements or blocks that we can insert using Gutenberg or our preferred page builder (such as Elementor). For instance, we’ll find a search bar (Search), a Load More button, and more.

    Now, we’ll create a filtering Facet for our blog, keeping in mind that the process is the same for a store or portfolio.

    After clicking Add New, we’ll see the following creation screen:

    Wp all import pro screenshot 17

    Behaviour

    In the Facet Action dropdown, the default option is Filter Content, which we’ll leave as is.

    Under Filter Type, we have a dropdown with all the usual options: checkboxes, dropdown menus, sorting (A to Z, reverse, numerical order, etc.), range filters (useful for prices), and more. Since we want to filter by category, we’ll choose a Dropdown menu.

    Data Source

    In Data Source, we can enable or disable content types for the filter (if WooCommerce is installed, we’ll see products here as well). Since this guide focuses on a blog, we’ll select Posts and filter by categories.

    Order & Number

    This section lets us define how elements are sorted within our grid.

    An essential setting here is the choice between AND and OR conditions, which determine how multiple filter criteria interact.

    • AND: All conditions must be met for an item to appear.
      • Example: Category = Books AND Price < $15,000 → Only books priced below $15,000 will be shown.
    • OR: At least one condition must be met for an item to appear.
      • Example: Category = Books OR Category = Magazines → All items from both categories will be displayed.

    As always, remember to save the changes.

    Adding the Grid and Filters to a Page

    When designing our pages, we can integrate the grid elements and the filter box we just created using the widgets provided by WP Grid Builder in WordPress.

    In Gutenberg, for example, we can find them here:

    Wp all import pro screenshot 18

    Thanks to its seamless integration with WordPress, WP Grid Builder allows us to add our Grids and Facets anywhere on our website.

    In the following example, we created a full-width two-column table. On the left side, we added a Facet, making sure to correctly enter the name of the filter we previously created. On the right side, we inserted the Grid widget and configured it to display our custom grid.

    Wp all import pro screenshot 19

    With this final step, we have completed our beginner’s guide to WP Grid Builder.

    What Are WP Grid Builder’s Weak Points?

    While WP Grid Builder is user-friendly and offers an extensive range of configuration options, the sheer number of possibilities comes with a slightly steep learning curve —especially for those new to mosaic layouts and element filtering. Without a guide (like this one, of course), reading the official manuals in English or watching the tutorial videos on YouTube can feel tedious or impractical. Because of this, some users may prefer a quicker alternative that doesn’t require as much time investment. However, once you navigate through this learning phase, chances are you won’t want to go back.

    Another downside is the lack of a free version. WP Grid Builder is only available through paid plans: Basic, Premium, and Ultimate, starting at $49 per year for a single site. Depending on the country or the type of developer, this cost might be a barrier or a decision they wouldn’t make upfront without testing the product first.

    Lastly, if all you need is a simple grid with basic filtering rules, this plugin might feel like overkill. There are more lightweight options available for those with less complex needs.

    Conclusion

    WP Grid Builder stands out for its versatility, the extensive customization options, and the freedom it provides to create advanced, filterable grids without limitations. It’s designed for users who want full control over their content display, without the frustration of encountering restrictive design barriers.

    This plugin is ideal for any type of website, whether it’s an eCommerce store, blog, or portfolio. Its intuitive interface makes it accessible for both beginners and experienced developers.

    Additionally, WP Grid Builder integrates seamlessly with popular WordPress tools like WooCommerce and Elementor. Its powerful features —advanced filtering, faceted search, and Ajax-optimized performance— make it arguably the best grid presentation plugin available today. It’s not an option that can be easily overlooked.

    Thank you for reading, and we wish you success in your projects. We’re here to help!

  • WP All Import Pro

    WP All Import Pro

    With just four simple steps and an intuitive drag-and-drop interface, WP All Import makes importing data effortless. It allows you to restructure information on the fly—deciding what goes where—without limitations on file types or sizes.

    As if that versatility weren’t impressive enough, this plugin also supports live data imports, making it possible to integrate stock market quotes, sports results, or dynamic pricing updates. A niche feature, perhaps, but one that showcases the power and flexibility of this WordPress component.

    When it comes to exporting data, WP All Import works seamlessly with its companion plugin, WP All Export, which enables the export of virtually anything from your WordPress installation—generating XML or CSV files that can be easily edited in Excel.

    PRO Version: The Complete Solution for Your eShop

    WP All Import Pro, included in our WordPress Maintenance service, goes far beyond the standard features. It allows you to import data into custom fields, upload images, fetch live data from a URL, or even check files for updates and apply edits as needed.

    Total Control with an Intuitive Drag-and-Drop Interface

    Wp All Import Pro Screenshot 1
    • Multi-File Support
      Import any .XML, .CSV, or Excel file based on your previously exported extensions.
    • Handles Large Files
      WP All Import supports massive databases, regardless of file structure.
    • 100% Compatible
      Works seamlessly with custom plugins and native WordPress theme fields.
    • Import Everything
      Move images, categories, WooCommerce databases, ACF fields, and more.
    • Easy & Flexible
      A simple yet powerful interface lets you achieve your goals in just a few steps. A truly flexible API.
    • Fully Programmable
      Advanced scheduling options make it easy to automate your imports and updates.

    Bulk Imports and Exports in One Place

    Wp All Import Features

    WP All Import PRO makes CSV, Excel, Google Docs, and XML files easy to handle. With its intuitive drag-and-drop interface, even the most complex tasks become simple to execute.

    Import to Any Theme or Plugin Field

    WP All Import PRO automatically detects custom fields, taxonomies, image galleries, location fields, and other site-specific details in your WordPress installation.

    Upload Any File, No Matter the Size or Structure

    Import your eShop to WordPress from any XML, CSV, or spreadsheet file without needing to reorganize data. Simply drag and drop to assign your data to the correct WordPress fields. You can even import large files on a small WordPress hosting plan.

    Wp All Import Pro Screenshot 2

    Update Existing Content with New Data

    Easily import data into existing posts. You’ll have full control over what to replace and what to leave intact.

    Import WooCommerce, ACF, Users, Listings, and More

    WP All Import PRO lets you migrate variable products, SEO metadata, repeater fields, custom user metas, image galleries, meta terms, and more.

    • WooCommerce
    • Easy Property Listings
    • Toolset Types
    • Pods
    • WPML
    • Polylang
    • Yoast SEO
    • RealHomes
    • Listify
    • WP Job Manager
    • All in One SEO
    • Advanced Custom Fields

    If you have any questions about this component and its powerful features, feel free to contact us. We’re here to help!

    If you’d like to start using this plugin on a fresh WordPress installation, you’ll love the many advantages we include with our WordPress Maintenance Plan.

    Wishing you success in your ventures, and thank you for reading!

  • Solid Affiliate

    Solid Affiliate

    With the Solid Affiliate plugin and its quick setup, you can have your affiliate program up and running in just 10 minutes.

    Affiliate programs are a widely used marketing strategy, and most e-commerce stores offer them today. If you’re a seller using WooCommerce, you know that creating an affiliate program from scratch isn’t easy. That’s why many companies act as intermediaries between sellers and affiliates—charging commissions for their services. However, with Solid Affiliate, you can set up your program effortlessly without relying on third parties.

    Solid Affiliate: My Affiliate Program in Just 10 Minutes

    Thanks to a Setup Wizard that guides you step by step, all you need to do is answer a few questions, select your preferred options, and your affiliate program will be up and running in an average of 10 minutes.

    The following video illustrates the process.

    At Fast Web, we believe that Solid Affiliate stands out from other affiliate plugins because it doesn’t require additional add-ons to function. Moreover, it was built from the ground up to work exclusively with WooCommerce. This specialization not only ensures seamless integration with WooCommerce stores but also makes it a lightweight solution, as it doesn’t include unnecessary code for compatibility with other platforms.

    What Makes Solid Affiliate Stand Out?

    • Seamless PayPal Integration: Pay affiliate commissions in just a few clicks, directly from your WordPress dashboard. Solid Affiliate connects with your PayPal Business account and automates payments.
    • Detailed Historical Records: The Affiliate Payouts tool provides a full payment history that’s always accessible. You can export transaction details anytime you need.
    • Affiliate Approval System: By default, affiliate registrations remain pending until an admin approves them, ensuring only high-quality affiliates join your program.
    • Email Notifications: Stay informed whenever affiliates log in and receive commissions, keeping your team up to date in real time.
    Solid Affilliate Screenshot 1
    Solid Affilliate Screenshot 2
  • WPCodeBox: review

    WPCodeBox: review

    Wpcodebox Cloud Snippets

    What makes WPCodeBox special? This WordPress plugin allows you to store code snippets in the cloud. Not only does this keep them safe from theme updates, builder changes, and more, but since they’re stored in the cloud, you can easily share these snippets across all your WordPress sites.

    We break down all the details in this guide.

    Wpcodebox Demo

    Introduction

    A snippet is a portion of code (a “mini plugin,” perhaps?) that allows us to modify or add features to our site without relying on the heavier load of a full plugin.

    For PHP, adding or removing functionalities is typically done by editing the functions.php file of a theme. For JavaScript, snippets often require a plugin to inject code into the header, body, or footer. As for CSS, it depends—some plugins and themes let you modify or add CSS directly from their settings page; at the very least, WordPress provides the Customizer by default.

    But the plugin doesn’t stop there. It also works as an online snippet library, a repository of third-party functionalities ready to be added to one (or all) of your WordPress sites. These pre-defined snippets from the WPCodeBox cloud repository can be applied directly or customized to meet your needs.

    The concept is, to say the least, impressive.

    Let’s take a look at its snippet editor.

    Wpcodebox Quick Guide

    Whether you need to write your own code, download it from the WPCodeBox repository (highlighted in the screenshot above), or simply copy and paste it from a Google reference, this is the creation screen.

    The snippet can be one of six types: PHP, CSS (including an external option), SCSS, LESS, JavaScript (also with an external option), or plain text.

    Wpcodebox Code Options

    How and Where Should the Snippet Run?

    It’s simple —just select the desired option in the editing field.

    Wpcodebox Rules

    Both execution modes are essential for running the snippet properly:

    • Always (On Page Load): The snippet runs automatically after your content is loaded.
    • Manual (On-Demand): The snippet runs only when you press the Run button (as shown in the screenshot below). This mode is ideal for testing. Remember: you must save the snippet before pressing Run.
    Wpcodebox Run

    Additionally, the “Where to run the snippet” dropdown lets you choose the execution scope:

    • Across the entire website
    • Only on the frontend
    • Only in the WordPress Dashboard
    • Custom: Select specific areas using the condition builder (see screenshot below).
    Wpcodebox Condition Builder

    Saving Your Snippet to the Cloud

    Saving your code snippet to the cloud is effortless —just one click and you’re done.

    Wpcodebox Cloud

    All your cloud-stored snippets will be listed here:

    Snippet Repository

    The Snippet Repository is where you’ll find predefined snippets.

    Wpcodebox Repository Button

    After clicking the above indicated button, you’ll see the following screen:

    Wpcodebox Repository Screen

    Here, you can select a category to explore its available snippets or use the search function to find exactly what you need. Once you’ve identified the desired snippet, simply download it with a click. From that point on, the snippet will appear in the editing panel.

    Conclusions

    WPCodeBox allows you to insert code —whether your own or from others— decide how and where it runs, store it in the cloud, and have everything ready for use across multiple WordPress sites.

    It eliminates the need for additional plugins by centralizing so many functions in a single tool. WPCodeBox keeps your site clean and well-organized, preventing you from making unnecessary changes to core files like functions.php.

    This plugin ensures you use only the code you truly need, reducing your site’s load (for example, avoiding full plugin downloads when a small snippet does the job). Plus, enabling and disabling snippets is just a click away, making testing a breeze.

    The repository is minimalist and intuitive, offering a design that complements its purpose. It allows you to add fully customizable functions while maintaining total control over your snippets. Managing snippets with WPCodeBox is effortless, clean, and fast.

    For all these reasons, we include it free with our Managed WordPress service.
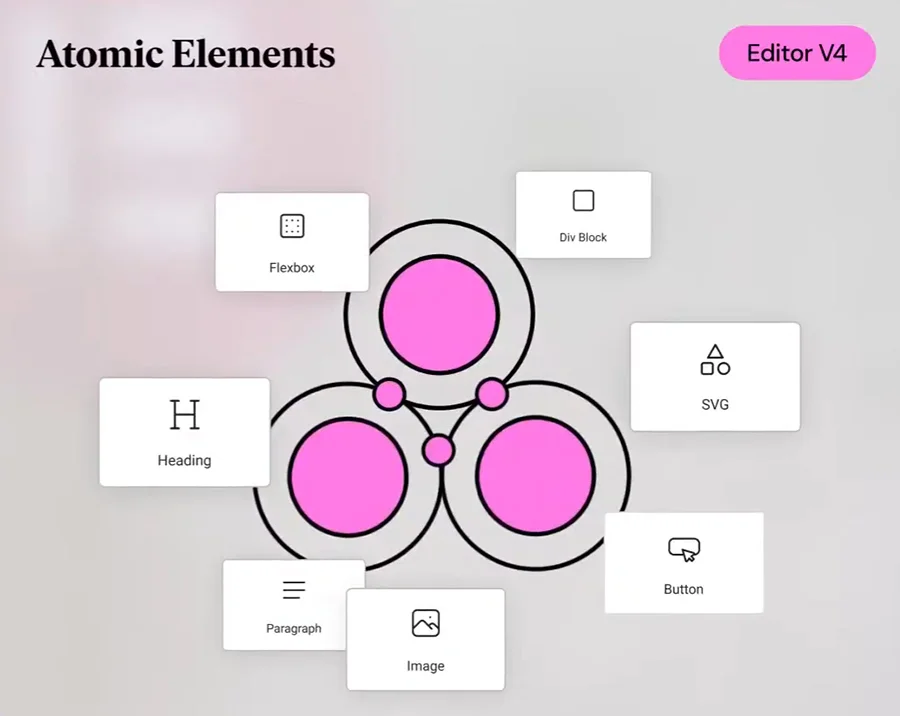
    We read and respond to every message. Wishing you success, and thanks for reading! See you in the next post.

  • RankMath review: free vs PRO

    RankMath review: free vs PRO

    Rankmath Banner

    Introduction

    It’s striking to see how many industry blogs initially approached Rank Math for a review, only to end up adopting it themselves. In our case, we’ve been testing it for a couple of years now. That’s why we confidently recommend it—and in fact, we include its PRO version for free in our premium Managed WordPress service.
    Rank Math was launched in 2018 in India, specifically in New Delhi. However, its core team of 30 people is spread across various locations worldwide. The PRO version came later, debuting at the end of 2020.

    SEO

    We’re all familiar with the term SEO. We have a general understanding of how search engines work, and we know that leveraging organic traffic requires careful site optimization. Text, images, metadata, loading performance—everything can (and should) be made “SEO-friendly.”

    But there’s a catch: we can’t do everything on our own. It can take an enormous amount of time, effort, and, of course, money. And even then, we can’t always be sure we’re heading in the right direction.

    That’s where SEO plugins come in—they exist to simplify and even fully handle a site’s search engine optimization.

    Today, WordPress offers several popular SEO optimization plugins that provide services, diagnostics, and testing. Among them are the legendary Yoast SEO, SEOpress, and The SEO Framework. However, Rank Math has become one of the most reliable choices on the market.

    Why Rank Math?

    With so many SEO plugins on the market, why should Rank Math be our top choice? Because it offers the best content optimization experience, with features that stand out from the competition. Let’s take a look:

    • Easy Installation: Thanks to its step-by-step guided setup wizard, you’ll be ready to take full advantage of Rank Math in no time.
    Rankmath Setup
    • User-Friendly Interface: Rank Math’s design has been carefully crafted. Once installed, you’ll notice its clean, well-organized, and intuitive layout. It’s designed to be straightforward, ensuring no one feels lost or overwhelmed. Simply head to General Settings, and you can configure the desired tools in just a few clicks.
    Rankmath Settings
    • On-Page SEO: After using Rank Math for the past two years, we can confidently say it’s one of the best tools for refining on-page SEO. It covers virtually every SEO strategy, from basic to advanced.

    Just open the Rank Math tab while editing a post or page (as shown in the screenshot below) to access the General section. There, you’ll find diagnostics, editable fields, previews, and more.

    Seo On Page Rankmath

    The button itself provides an instant SEO score for the current content as soon as we enter one or more keywords (yes, we can enter as many as we want). The score ranges from 0 to 100, with anything above 80 considered a strong result. Important note: There’s no need to obsess over hitting a perfect 100. Depending on the content and its purpose, reaching that score might not even be possible. The key takeaway: a score above 80 means your content is well-optimized.

    All the SEO Tools You Need

    Unlike other well-known SEO plugins that limit users to a specific set of features, Rank Math offers a vast array of tools covering every possible aspect of optimization. Some of the key areas it handles include:

    • Meta Data
    • Sitemaps (including Google News, Videos, and Trends)
    • All types of Redirects
    • Schema generation
    • SEO Breadcrumbs
    • And much more…

    We’ll break down these features in a table to differentiate the free functionalities from the premium ones.

    Rankmath Modules
    Modular Installation ensures that we only load the features we actually need, keeping our site clean and efficient.

    Keyword Ranking Tracking

    With the PRO version, we can track specific keywords, and Rank Math will show their performance in search engine results. This helps answer an essential question: Is the chosen keyword the best option for ranking our content? If not, we can get creative and explore alternatives. Keyword optimization is the most crucial step when aiming to improve our content’s ranking.

    Rank Math Ranktracker
    Rank Tracker provides a clear overview of which keywords rank the highest on Google, the number of impressions they receive, their current position, whether their trend is rising or falling

    Auto-Configuration & Smart Suggestions

    Rank Math doesn’t just analyze our site based on predefined parameters—it also conducts autonomous evaluations. This means the plugin proactively suggests the best optimization strategies, highlighting missed opportunities or critical areas for improvement. Since every website is unique, Rank Math’s automatic configuration saves time while streamlining optimization.

    Schema Integration

    Schema markup has become increasingly important, especially with the rise of voice search. Proper Schema implementation helps Google and other search engines better understand what our content is about. Rank Math makes this process effortless by diagnosing and incorporating Schema guidelines seamlessly.

    Lightweight & Fast

    Compared to its competitors, Rank Math is significantly lighter and more efficient. Its code is meticulously optimized, ensuring a fast, smooth experience without slowing down your website.

    Comparison with Rank Math PRO

    The paid version of Rank Math offers a huge number of advantages over the free version. The comparison table below will provide a clear overview, but here are the key highlights:

    • Keyword Rank Tracking: With PRO, we can monitor our keyword rankings and fluctuations over the past twelve consecutive months, providing much deeper insights into keyword performance.
    • Integration with Google Trends: Gain direct access to Google Trends data to refine your SEO strategy.
    • Local SEO Optimization for Multiple Locations: Essential for businesses targeting different geographical areas.
    • Dedicated Sitemap for Google News: Helps increase the chances of getting featured in Google’s news section.
    • Video SEO Support: Similar to Google News, PRO allows us to generate dedicated sitemaps for video content, improving visibility in search results.
    • Automatic Image Watermarking: PRO can automatically add our logo as a watermark to images shared on social media.
    • Over 20 Predefined Schema Types: Enhances search engine communication by implementing structured data effortlessly.
    • View Historical Google AdSense Earnings: Gain insights into past revenue performance.
    • Enhanced WooCommerce SEO Tools: PRO provides advanced features for optimizing online stores running on WooCommerce.

    With these additional tools, Rank Math PRO takes SEO optimization to the next level, providing valuable insights, automation, and precision that the free version simply can’t match.

    Rank Math Business

    To get straight to the point, the defining advantage of Rank Math Business is that it allows us to install Rank Math PRO on up to 100 websites. This is particularly useful when managing multiple sites, whether for personal use or for clients.

    Comparison Table: PRO vs. Business

    Rank Math Pro Versus Business

    Conclusions

    Rank Math is like a Swiss Army knife for SEO, packed with dozens of tools within a single plugin. If our goal is to enhance our site’s search engine performance, this WordPress plugin provides everything we need—and more.

    By integrating features found in other SEO plugins while offering a modular system to activate only what’s necessary, Rank Math stands out as an optimized, lightweight, visually appealing, and user-friendly solution. It also includes a remarkably extensive free version, which is rare in the industry. However, if our website is an eCommerce platform or generates revenue in any way, we highly recommend the PRO version for its advanced SEO diagnostics and professional-grade tools.

    Rank Math ensures flawless communication with search engines, making our website speak the same language as ranking algorithms.

    The SEO landscape is constantly evolving, and keeping up with these changes is crucial. The dedicated development team behind Rank Math ensures it stays ahead of the curve, making it a reliable and future-proof choice.
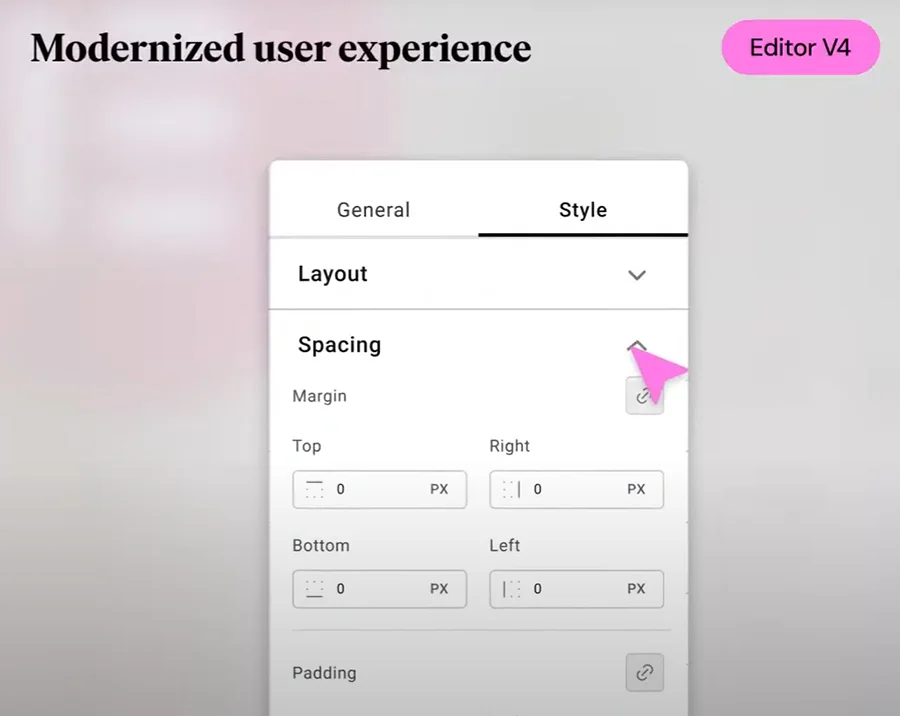
    If increasing website traffic is a priority, this is a plugin we simply cannot afford to overlook.

    Questions, feedback, or personal experiences? Drop a comment below—we read and respond to every message. Best of luck, and thanks for reading!

    rank math PRO INCLUDED FOR FREE IN OUR WORDPRESS MAINTENANCE PLAN

    We offer assisted and free migration services along with a 30-day satisfaction guarantee

  • WP Login Lockdown: guide & review

    WP Login Lockdown: guide & review

    Wp Login Lockdown Slogan

    What is WP Login Lockdown?

    WP Login Lockdown is a WordPress plugin focused entirely on securing the backend login page (wp-admin). It offers two major advantages.
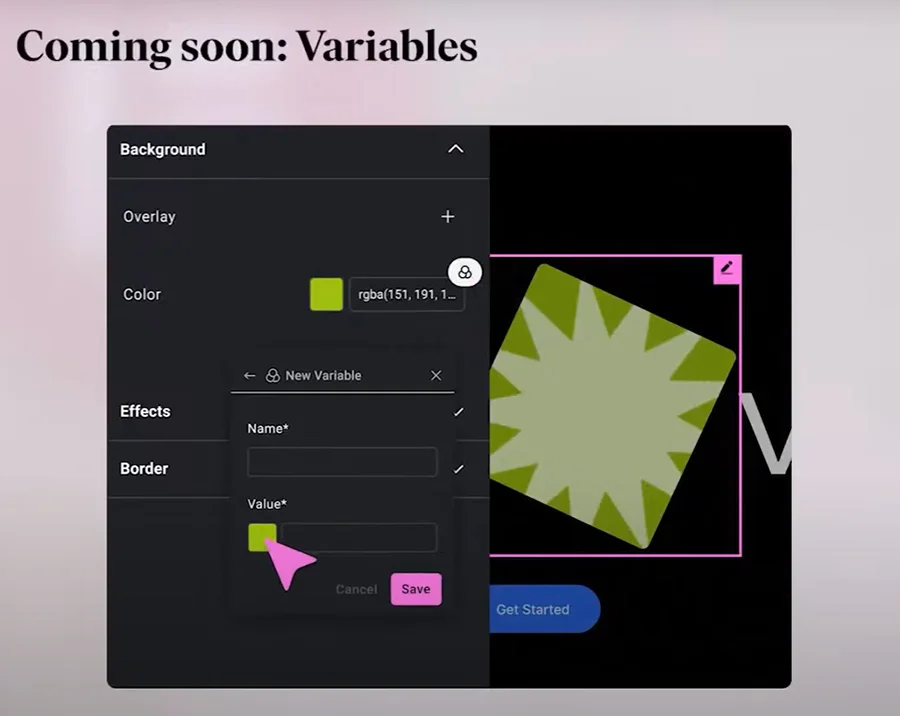
    First, it limits the number of failed login attempts from a specific IP address. This prevents brute-force attacks because after three failed attempts (or any limit you define), the user or bot gets blocked based on their internet identifier (IP).

    Second, and just as crucial, WP Login Lockdown allows you to change the default login URL. Instead of /wp-admin/, you can set a custom path, like mysite.com/secretdoor/ effectively making mysite.com/wp-admin/ nonexistent.

    We’ll dive into these features and more in the sections ahead.

    WP Login Lockdown: Key Features

    WP Login Lockdown offers a range of features that make it the go-to tool for securing your WordPress site with just a few clicks.

    Intuitive Interface

    Everything is clearly laid out, making it easy to understand what each setting does and why it matters. You can quickly decide whether to use the default configurations or tweak them to suit your needs.

    Login Attempt Limit

    By default, WordPress allows unlimited login attempts—something hackers exploit. WP Login Lockdown lets you set a limit, blocking the attacker’s IP after exceeding the allowed number of failed attempts.

    Lockout Duration

    WP Login Lockdown lets you customize how long an IP remains blocked after exceeding the login attempt limit. This prevents attackers from continuously guessing passwords and increases site security.

    Whitelist & Blacklist IPs

    You can manually add IP addresses to a whitelist (trusted) or blacklist (permanently blocked). Whitelisted IPs will never be locked out, even if they exceed the login attempt limit, while blacklisted IPs are denied access entirely.

    Email Notifications

    Suspicious or malicious login attempts aren’t just logged—they’re also sent as email alerts to your preferred inbox, keeping you informed in real time.

    Custom Lockout Message

    WP Login Lockdown allows you to personalize the message displayed when an IP is blocked. This can serve as a warning to hackers while informing legitimate users that their access has been temporarily restricted.
    Quick Guide to WP Login Lockdown

    Below, we’ve included two annotated screenshots of WP Login Lockdown, with highlights on each feature for easy understanding. These visuals will help you configure both basic and advanced security settings with ease. Clicking on the images will open them in full screen.

    Wp Login Lockdown Settings Guide
    Wp Login Lockdown Advanced Settings

    The Tools section also offers several functions that can be quite useful.

    Fluentboards Screencap 11

    The first option, Email Test, ensures that we can successfully receive emails from the plugin through our WordPress (let’s remember that WP Login Lockdown reports are sent via email if we choose to enable this feature).

    Recovery URL is a secret address (known only to us) that allows access to the WordPress Back-End in case we accidentally lock ourselves out due to multiple failed login attempts.

    Finally, Import and Export performs the typical functions of these plugins, allowing us to import and export all settings —either to transfer them to another site we own or to keep a backup.

    Fluentboards Screencap 12

    Under the Activity tab, as we can infer, we’ll find a complete log of all invalid login attempts, along with the IPs that were blocked.

    As for the Firewall section, it includes some more advanced settings that we don’t recommend modifying. We believe the first two configurations are more than enough to keep our site protected. Therefore, we should only customize the options under the Firewall tab if we fully understand what we’re doing.

    Fluentboards Screencap 13

    Big ‘Yes!’: through the Country Blocking tab it is possible to block entirely one or more countries.

    Fluentboards Screencap 14

    WP Login Lockdown is a close ally of web design. Honestly, it offers more customization options than most of the plugins we’ve analyzed throughout FastWeb’s history. As shown in the screenshot above, if we want to tweak any aspect of the tool (or the login page itself), we have complete freedom to do so.

    Login Lockdown Temp Access

    In the above screenshot, we can see the Temp Access tool, which can be extremely useful in specific situations. This feature allows us to create a temporary web address to share with third parties while setting its expiration time. It can last for an hour, a day, 15 days, a month, or even a year—however long we need. Once the set time expires, the link to the back-end access becomes invalid.

    What are the differences between the free and paid versions?

    As always, free versions of plugins keep the more advanced features reserved for their PRO edition. A comparison chart detailing the features included in each plan can be found here.

    Final Thoughts

    WP Login Lockdown is an excellent plugin for preventing attacks. It significantly enhances WordPress’ built-in security by restricting login attempts and blocking unauthorized access. Just as importantly, it also allows us to change the default URL of our back-end login form. In short, WP Login Lockdown provides multiple additional layers of protection against hackers and other malicious actors.

    Its interface is user-friendly, and the settings are highly customizable. This plugin adapts to both basic and complex security needs. By limiting login attempts and blocking suspicious IP addresses, we effectively prevent intruders from gaining access to our site.

    Thank you for reading! Feel free to share your thoughts in the comments section below. Wishing you success—let’s keep our content safe!

    WP Login Lockdown PRO INCLUDED FOR FREE IN OUR WORDPRESS MAINTENANCE PLAN

    We offer assisted and free migration services along with a 30-day satisfaction guarantee

  • FluentBoards: guide & review

    FluentBoards: guide & review

    What is FluentBoards?

    FluentBoards is an all-in-one solution crafted to enhance:

    • Task organization
    • Team collaboration
    • Workflow management
    • Unlimited boards for ultimate flexibility
    • High customization to fit your needs
    • Progress tracking at a glance
    • Full control over your data
    • Minimized administrative bottlenecks
    • Strong community support
    • A cost-effective project management solution
    • …and much more!

    Let’s explore why FluentBoards is a game-changer for project management within WordPress.

    FluentBoards Dashboard

    Let’s take a look at the FluentBoards Dashboard and then dive into how to create Boards later on.

    In the screenshot below, we’ve already set up different project and goal boards and assigned team members (including ourselves).

    Fluentboards Screencap 1

    The Dashboard is divided into two main sections. The upper section displays the created Boards —these are the project boards or timelines where we outline our plans and objectives. The lower section showcases Tasks, which represent the stages that make up each Board. Here, you’ll find three tabs: Upcoming Tasks, Overdue Tasks, and Completed Tasks.

    Clicking on a Board reveals its workflow stages, where you can edit existing ones or add new stages.

    Fluentboards Screencap 2

    When creating a Board, three default stages are provided: Open, In Progress, and Completed. Of course, you can delete them, add new ones (using the vertical blue + Add Stage button), or rename them to better suit your project. Simply drag and drop the stages to rearrange them effortlessly. You can also add tasks within each stage by clicking the + Add Task button.

    Tasks within each stage (such as Easy Training and Meeting with Trainers in the screenshot) appear in the lower section of the Dashboard. These tasks help break down each stage into actionable steps, making complex goals more manageable and achievable.

    Once a Task is created, clicking on it allows you to edit its details. Let’s explore that next:

    Editing the task

    Fluentboards Screencap 3

    In the pop-up Task Editing window, you’ll find various fields and buttons to fine-tune your tasks. You can assign people to the task via the Assignees section (and remove or modify them later if needed). You’ll also set a Due Date, specifying the deadline by which the task should be completed.

    The Priority setting allows you to classify the task into three levels: High, Medium, and Low, ensuring a clear distinction between urgent and less critical tasks.

    By adding Labels, you make it easier to locate the task later using FluentBoards’ built-in search function. For example, if the task involves meetings, an appropriate label could be “Meetings”.

    If necessary, you can add a Description by clicking the Pencil icon, and here’s something great—you can also upload attachments. Whether it’s images, location photos, inspiring references, manuals, invoices, or any other relevant documents, everything can be neatly stored within the task.

    The + Add Subtask button allows you to break the task down even further, adding smaller objectives that contribute to its completion.

    In the Comments section, you (and others) can leave messages, keeping communication fluid. The Activities tab provides a detailed history of all changes and actions taken within the task.

    The right-hand column offers useful buttons, such as “Leave Task”, which lets you remove yourself from a task (leaving it to the remaining assignees or unassigned if no one else is listed). The “Move” button is particularly handy—it allows you to either transfer the task to another Board or change its Status, for example, marking it as Completed.

    Fluentboards Screencap 4

    Keep in mind that we can also quickly edit the actions on the Desktop by clicking as shown in the image below:

    Fluentboards Screencap 5

    Creating New Boards

    To create a new Board, simply click the + Add Board button.

    Fluentboards Screencap 6

    A pop-up window will allow you to set a name and description for the new board.

    Fluentboards Screencap 7

    Once you hit the blue “Save” button, the board will appear with the three default stages: Open, In Progress, and Completed.

    Fluentboards Screencap 8

    You can rename these stages by clicking on their names, ensuring they make sense for your specific workflow. Everything else related to board customization follows the same editing principles we covered earlier.

    Reports

    The Reports tab provides insightful statistics on all the activity happening within FluentBoards, helping you track progress and optimize workflow efficiency.

    Fluentboards Screencap 9

    FluentBoards Settings

    Lastly, in the Settings tab, you can adjust various configurations. These include:

    • Defining which actions trigger email notifications.
    • Modifying member roles and permissions.
    • Customizing the Dashboard card view preferences, deciding which tasks appear and which do not.
    Fluentboards Screencap 10

    Final thoughts

    FluentBoards stands out as an exceptional project management solution within WordPress. Its emphasis on simplicity, seamless integration with the platform, and clear task visualization makes it a powerful tool for both team collaboration and personal workflow management.

    By eliminating the need for external platforms while still delivering a smooth and intuitive user experience, FluentBoards positions itself as a top choice for anyone seeking efficient project management within their favorite CMS.

    You can try an online demo [here].

    Additionally, FluentBoards PRO is included for free in our WordPress Site Maintenance plan.

    fluentboards pro INCLUDED FOR FREE IN OUR WORDPRESS MAINTENANCE PLAN

    We offer assisted and free migration services along with a 30-day satisfaction guarantee