If managing your WooCommerce store feels like a cumbersome task, you’ll be thrilled to know VendBase is here to revolutionize it. This enhanced dashboard transforms WooCommerce with a cleaner, more organized, and lightning-fast interface—no matter how many products you’re selling. In nerd terms, it’s a complete revamp of the WooCommerce we know and love.
The mastermind behind this gem is Mark Ashton, a developer with an impeccable track record in WordPress. Among his remarkable creations are UiPress, Postebase, and LemonPress —plugins designed to simplify and optimize workflows with alternative dashboards. With VendBase, Ashton takes his expertise to the next level, delivering a tool that saves time and boosts productivity.
Why Choose VendBase?
VendBase —formerly known as WooBase— is not just another plugin; it’s a complete reimagination of WooCommerce store management. Its sleek and modern design welcomes you with clean typography, soft color schemes, and a user-friendly interface that prioritizes usability. Here’s what makes it stand out:
Global Advanced Search: Find what you need in seconds.
Live Updates: Stay on top of orders in real time.
Data Analytics: Gain valuable insights to make informed decisions.
Advanced Customization: White-label options to match your brand and a dark mode for late-night work or reducing eye strain.
VendBase is also optimized for seamless performance across devices, from desktops to smartphones. This means you can manage your store anytime, anywhere, with ease.
A True Transformation for Your Online Store
In a nutshell, VendBase doesn’t just improve store management—it redefines it. With its speed, flexibility, and ease of use, you’ll gain greater control over your eCommerce business while saving time and reducing daily management stress.
It’s time to give your WooCommerce the upgrade it deserves: more efficient, more appealing, and more powerful.
Key Features
Global Search in WooCommerce
VendBase aims to enhance every aspect of managing a WooCommerce store. One of its standout features is the global and automatic search, which delivers real-time results as you type. With this plugin, a single search field allows you to instantly find customers, orders, and products. This centralized, one-click solution dramatically boosts your efficiency, saving you valuable time —time you can use to improve your store’s content and features, or perhaps to enjoy a sunset with a nice drink in hand, courtesy of your newfound productivity.
Real-Time Order Updates
Just like searches happen in real time, so do transaction updates. With VendBase, you’ll receive live notifications of orders as they happen in your WooCommerce store. This keeps you in the loop about everything going on in your business and ensures you’ll never miss an important order. Your sales, always under control.
Optimized Interface
VendBase offers an intuitive design aimed at streamlining navigation and minimizing distractions. You can customize your dashboard to keep the most important information front and center, ready for a quick glance. Plus, with its responsive design, managing your store from a smartphone or tablet becomes a breeze —no matter where you are.
Dark mode, now a must-have option in every modern interface
Drag-and-Drop Workflow
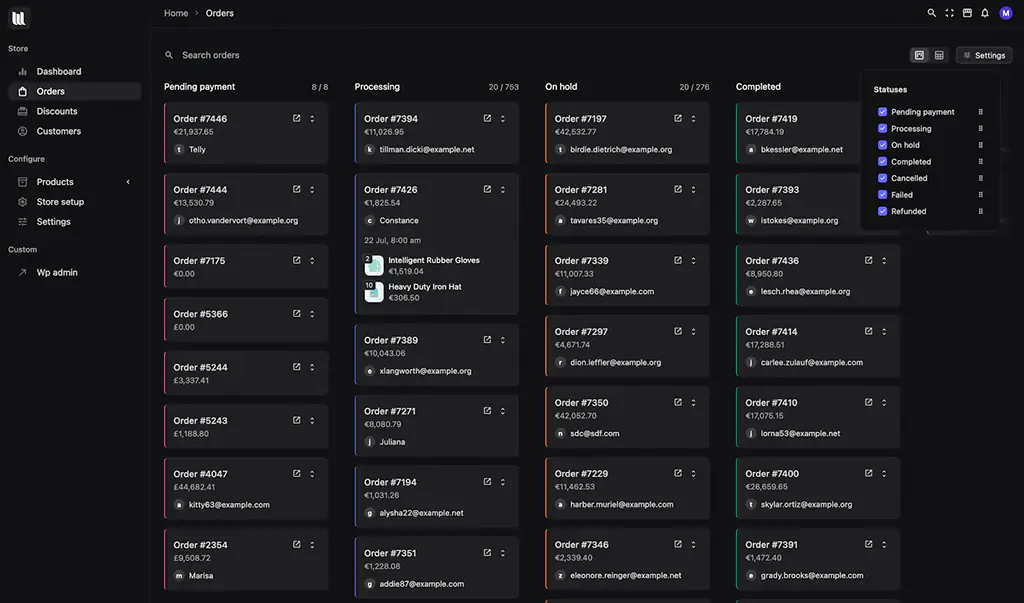
Manage your orders effortlessly with an intuitive drag-and-drop interface that keeps everything running smoothly. You can customize the columns to align with your business processes, making it easy to spot bottlenecks or obstructions at a glance. This streamlined organization helps optimize your business performance without unnecessary hassle.
Clear Analytics
VendBase provides detailed analytics to help you observe, evaluate, and better understand your store’s performance every step of the way. From daily sales to long-term customer behavior, you’ll have access to key data in real time, along with comprehensive reports to guide your decisions and boost conversions. The charts are clear, accessible, and designed to help you identify trends, adjust strategies, and maximize results without wasting time on complicated interpretations.
VendBase delivers lightning-fast performance with optimized queries that retrieve data instantly. Its highly refined caching system significantly reduces WooCommerce load times. Additionally, the plugin is optimized for tablets and smartphones, allowing you to manage every aspect of your store from any device —even on mobile connections without Wi-Fi.
Easy and Flexible Deployment
VendBase proves to be the ultimate companion for any WooCommerce store. It allows you to manage every detail effortlessly from within the WordPress dashboard or integrate it directly into your front-end pages. A major bonus: if you rely on administrators, they’ll appreciate the transition to VendBase thanks to its intuitive and clear interface, enabling sharper focus for everyone involved.
Continuous Improvements
The developers behind VendBase are committed to keeping it cutting-edge, emphasizing that it’s “built for the future.” In simpler terms, the team works tirelessly on frequent updates to address user needs. Their support team is highly responsive, delivering improvements requested by the community —prioritized by demand and popularity— with every new release.
What’s the Cost?
The basic VendBase plan, for a single site, costs a one-time fee of $97. This pricing reflects the product’s current niche status. However, we anticipate a shift to an annual licensing model as it gains popularity, which is a common trend once a product moves beyond its early stages and steps into the spotlight.
Conclusion
VendBase presents itself as a tool originally designed to revitalize the digital commerce dashboard introduced by WooCommerce. Its immediacy, real-time global search, ability to adapt to specific needs, and a sleek, polished interface —not to mention its visually pleasing design— make it an intuitive, fast, and innovation-focused ally for enhancing your WooCommerce experience.
For those of us who strive to squeeze every drop of potential out of our beloved store, VendBase doesn’t just deliver efficiency—it opens our eyes to better ways of managing an online business.
The New LearnDash is a A Game-Changer for Online Course Creation
LearnDash 4.1 promised to streamline the process of creating online courses—and it delivered. Thanks to the new “Course Creation Wizard”, users can now generate lessons directly from playlists on YouTube, Vimeo, or Wistia. In this article, we dive into this feature and explore other exciting updates to this popular WordPress plugin.
From Playlists to Online Lessons
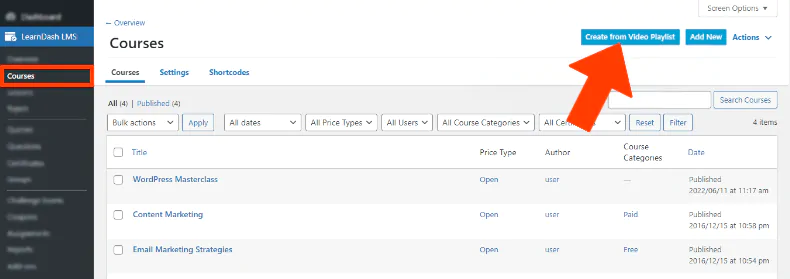
If you already have video content hosted on a popular platform (think YouTube, Vimeo, or Wistia), the new LearnDash 4.1 makes it easy to turn that content into lessons with just a couple of clicks. The Course Creation Wizard enables users to create courses directly from playlists—simply copy and paste the playlist link into the wizard, and you’re good to go. With this tool, courses can be up and running in seconds.
As shown in the screenshot above, you’ll see how LearnDash loads your playlist and uses it to create a course in the familiar format. You can then edit and tweak the course to your liking if needed.
Enhanced Coupon Management
One of the key improvements in LearnDash 4.1 is the dramatically simplified process of creating coupons. The latest version introduces robust support for discount coupons, including flat-rate and percentage-based discounts, natively integrated into the platform. This update provides greater control over how courses are marketed and sold, eliminating the need for third-party add-ons. Selling bigger numbers through coupon-driven marketing is now easier than ever.
Keeping Learning on Track with the “Mark as Incomplete” Feature
To help learners track their progress, LearnDash 4.1 introduces the “Mark as Incomplete” feature. This functionality allows users to easily identify and separate completed lessons from those still in progress. It’s an excellent way to keep students engaged and aware of their advancement throughout the course.
GDPR Data Export/Deletion Sets for a Cleaner Browsing Experience
Let’s remember: GDPR is the regulation that governs the protection of user data. In simple terms, it safeguards individuals’ privacy rights, ensuring they can freely choose whether to share their personal data with third parties.
LearnDash 4.1 empowers users by providing them with greater control over their data through its export or deletion feature. Visitors can access the browsing records and data LearnDash has collected about them and delete it if they wish. This makes the new version fully compliant with GDPR regulations for data protection.
Focus on Focus
LearnDash 4.1 also enhances options for keeping learners focused. The new “Focus Mode” allows users to customize the position of the sidebar, moving it to the left or right as preferred.
Additional Improvements
Beyond security and speed enhancements, LearnDash 4.1 introduces several optimizations:
Updated Assignments: Assignments now open in the WordPress admin area for improved usability.
Quiz Enhancements: Fixed carriage returns and added JSON analysis options for quiz submissions.
Course ID Fixes: Resolved an issue where the course ID in ajaxQuizLoadData would sometimes appear blank.
Quiz Save & Resume: Minor bugs with the save and resume functionality in quizzes have been addressed.
PayPal Transaction Fix: Corrected an issue where the “PayPal Transaction” report tab displayed as a draft if the IPN response was not returned.
Course Navigation Fix: Resolved an issue where course navigation was not displaying for open courses.
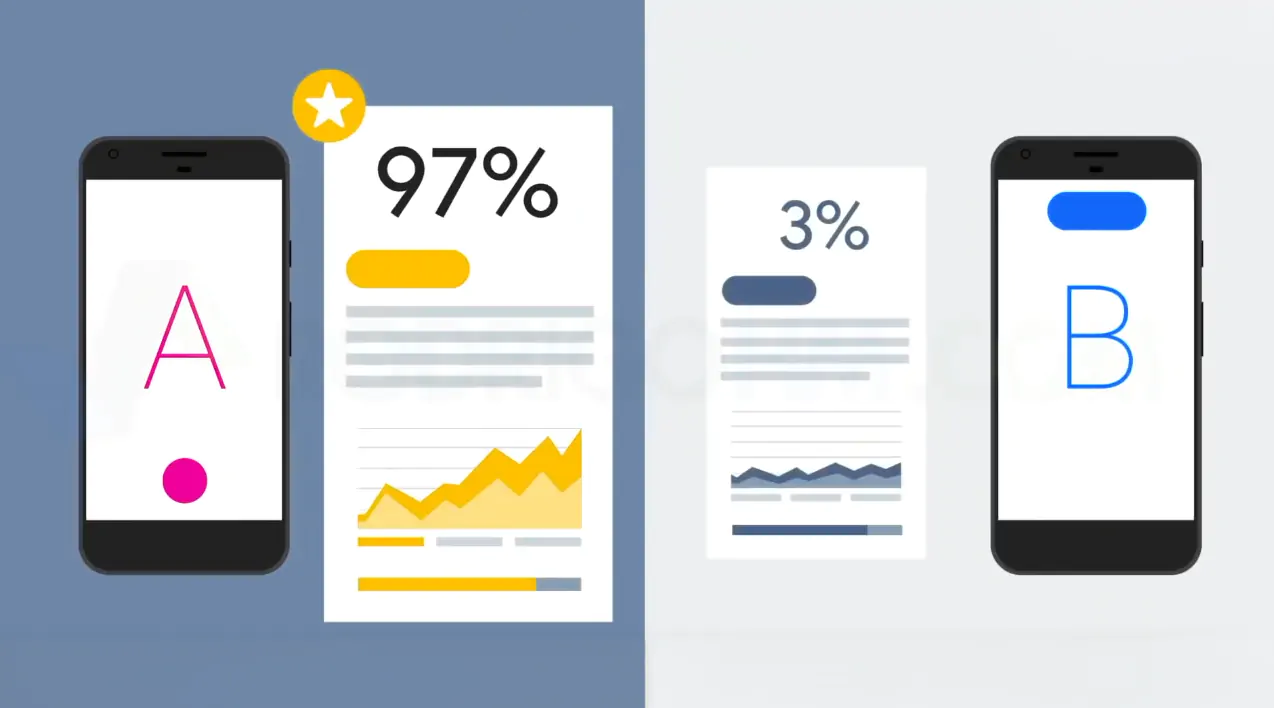
In web design, we face thousands of decisions that can determine the success or failure of our project. Where do we place a button? What colors and fonts should we use? What information do we provide? How do we design a form? To answer these and many other questions inherent to our website, the best approach is to conduct AB testing. In other words, this involves showing visitors different versions of the same setup, alternating between options, and letting user behavior statistics speak for themselves.
On WordPress, the AB Split Test plugin was created to address this very challenge, and in this article, we’ll explore its key advantages.
Understanding AB Testing
AB testing operates with variables —modified versions of the same setup. By presenting alternatives such as A, B, C, or X, you can determine which design achieves better conversions. Over time, you’ll discover which design element best meets your objectives. Once you’re confident in the results, you can make it permanent—or even run a new AB test for further fine-tuning.
AB Split Test allows you to run experiments on your WordPress site with ease, speed, and automation.
Features of AB Split Test
Versatility Across All Content
Whether you’re working with Pages, Posts, Gutenberg blocks, or designs created with Bricks, Beaver Builder, or Elementor, this plugin enables you to optimize any type of content seamlessly.
Comprehensive Content Testing
AB Split Test scans your entire site, allowing you to experiment with everything: blocks, elements, rows, columns, sections, headers, page templates, footers, and virtually every other component of your site.
Automatic Completion
The plugin automatically determines when enough data has been collected to declare a winning variation. It will then implement the best-performing version automatically, so you don’t have to wait months for actionable results.
Data Privacy Compliance
Respecting your privacy, AB Split Test adheres to GDPR guidelines. It doesn’t store user-identifiable data or rely on remote servers to manage your customer data.
Unlimited Experiments and Variations
You can create as many tests as you want with unlimited variations. However, note that the free version allows only one test to be run at a time.
Advanced Targeting and Segmentation
AB Split Test enables you to filter visitors during tests based on user type, device size, geolocation, and a wide range of other criteria.
This powerful tool ensures that your website’s performance is always improving, tailored to your audience’s preferences and needs.
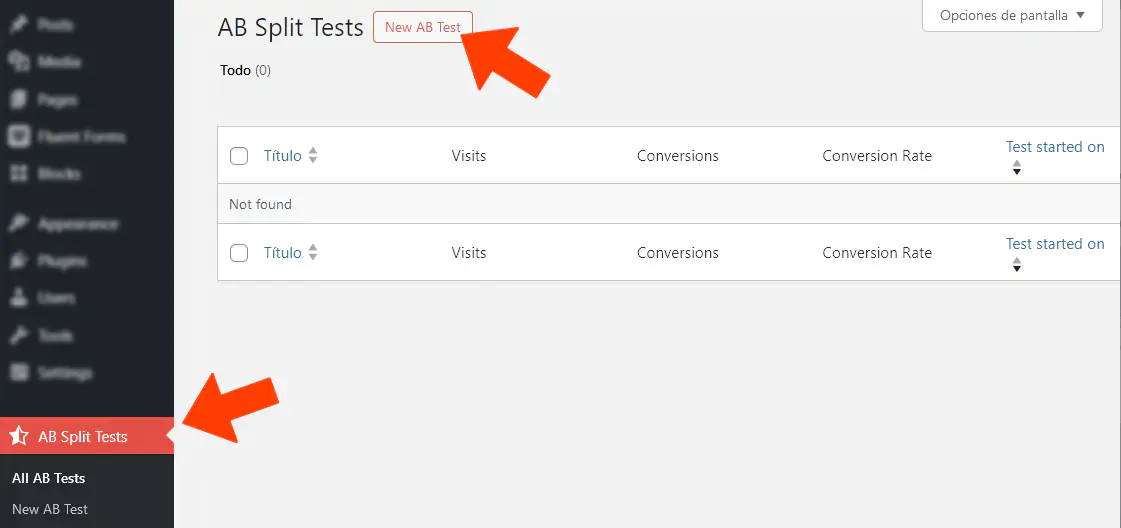
Once you’ve installed and activated the plugin on your WordPress dashboard (a free, limited version is available to try out), you’re ready to start experimenting.
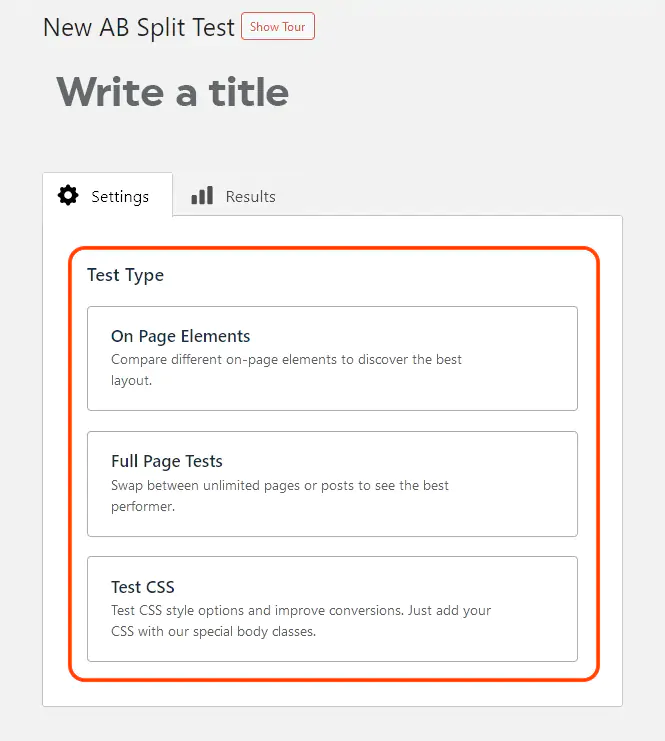
AB Split Test allows you to experiment with all website visitors or segment your audience for more precise A/B testing. Start by selecting one of these three options:
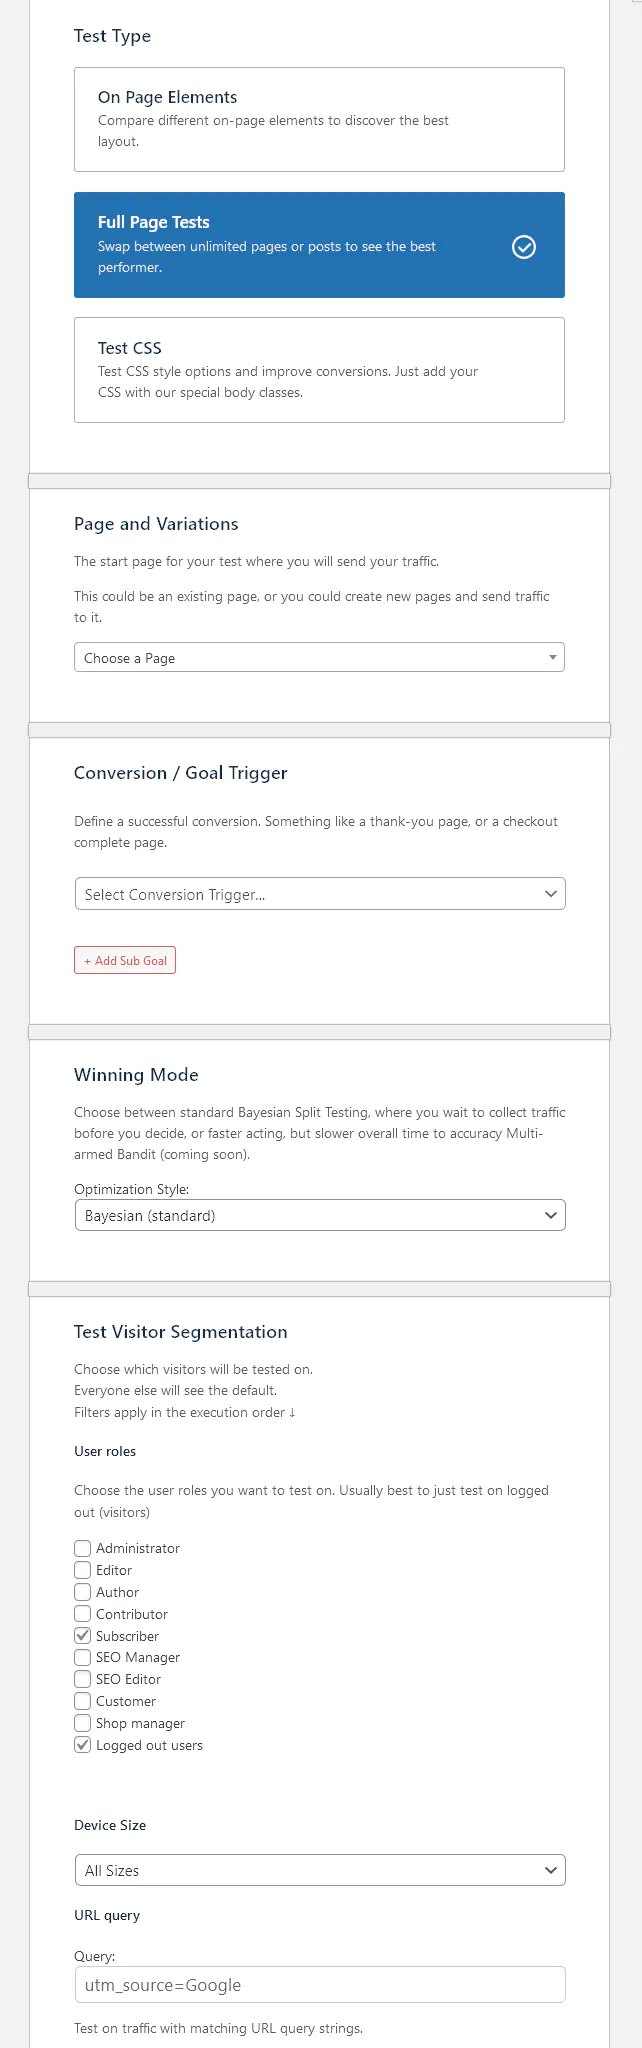
Thanks to this plugin, you can target experiments to users based on their geographical location, specific traffic sources, device type (such as mobile, tablet, or desktop), and even the exact screen size. Additionally, the plugin offers advanced options to select audiences based on browser language, time spent on the site, and other custom parameters. This allows for a segmented user experience optimization, helping to enhance website performance in a more strategic and effective way.
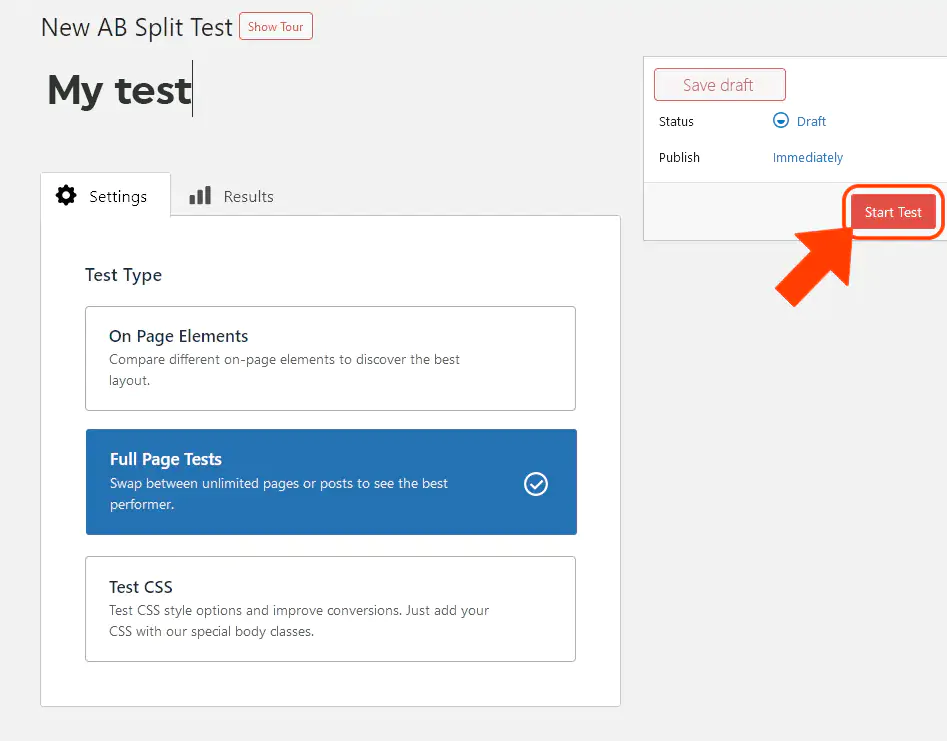
Once the options are selected and the variables for the test are defined, click on the Start Test button to launch the experiment. Before proceeding, don’t forget to give the experiment a descriptive name. As you conduct more tests, having clearly labeled experiments will make it easier to identify them quickly from the list.
From this point on, AB Split Test will present different versions of your content to visitors, meticulously recording all relevant data about their behavior.
This includes tracking clicks, time spent on the page, navigation paths, and conversions, capturing the full journey of each visitor from the moment they enter until they leave your site. Using Bayesian statistics, AB Split Test analyzes the results to determine, with greater reliability, which variation is most likely to maximize conversions. Unlike conventional (frequentist) methods, the Bayesian approach adapts to incoming data in real-time, providing more robust conclusions and optimizing decisions regarding the most effective content for your site’s objectives.
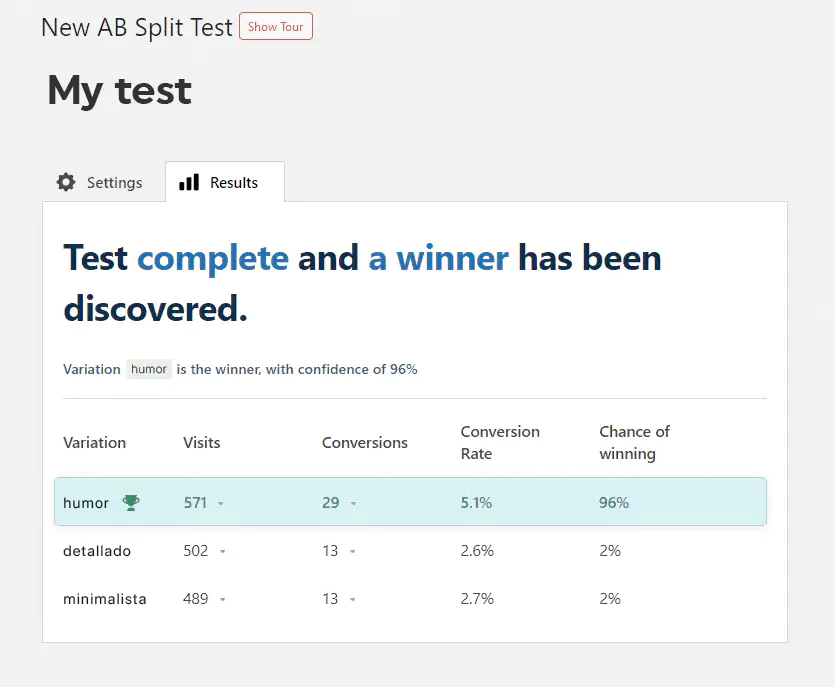
As mentioned earlier, tests are automatically finalized as soon as the program identifies a winning variation. At that point, you’ll see a screen similar to the one below:
Conclusion
This A/B testing plugin comes highly recommended for its versatility and ease of use. AB Split Test empowers content creators and marketers alike to optimize web content conversions with Bayesian precision, accelerating experiments and delivering reliable results.
Thanks to its intuitive interface and extensive customization options, you can create and manage A/B experiments without needing expertise in statistics or programming. This makes it accessible to anyone, enabling precise testing and valuable insights based on real user interaction data.
While there are certainly other solutions available, AB Split Test stands out for its simplicity and seamless integration within the WordPress ecosystem. For those seeking to improve their website’s performance without unnecessary complexity, this tool is a robust and reliable choice.
FluentCommunity is a WordPress plugin that provides a platform to create social networks and even remote learning environments —all within WordPress itself. Until now, BuddyBoss was the most recognized plugin for building such spaces, but it’s time for it to face a new, heavyweightlightweight competitor. In this article, we’ll explore why FluentCommunity stands out as an excellent choice.
What is FluentCommunity?
FluentCommunity is another WordPress plugin developed by the creators of renowned tools like FluentBoards, FluentForms, FluentCRM, and FluentBooking. As a result, it integrates seamlessly with these tools if you’re already using them. For example, with FluentCRM—the email marketing manager—you can create a mailing list of FluentCommunity members with just one click.
This plugin allows you to build online communities and manage courses efficiently without compromising your site’s performance. FluentCommunity incorporates typical social networking tools (with a rather Facebook-ish touch) and a Learning Management System (LMS). This dual functionality facilitates member interaction, idea exchange, and course administration—all within one platform.
Features
User Profiles: Like with any social network, members can customize their profiles, displaying personal information, interests, and activities.
Unlimited Groups: There are no limits to the number of “spaces” you can create.
Discussion Threads: Users can start and join discussions on various topics.
Support for Mentions, Hashtags, and Polls.
Private Messaging: Members can communicate through private messages.
Real-Time Chat: A built-in chatroom for live interactions.
Content Sharing: Share posts, photos, videos, and documents.
Notifications: Alerts keep users informed about new activities or messages.
Directories: Easy navigation through member, community, and course directories.
Engagement Tools: Features like leaderboards, reactions, GIFs, and emojis enhance user interaction.
Light/Dark Mode: Users can toggle between display modes to suit their preferences.
Installation & Setup
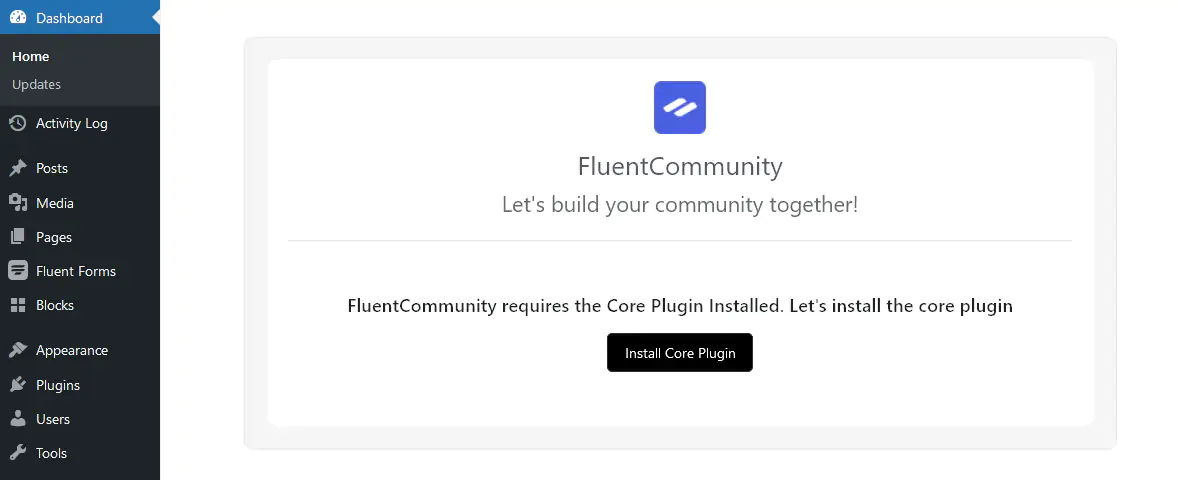
After downloading the .zip file, navigate to the Plugins section of your WordPress dashboard to install it. Once activated, you’ll be prompted to install the “Core Plugin,” followed by creating your first community.
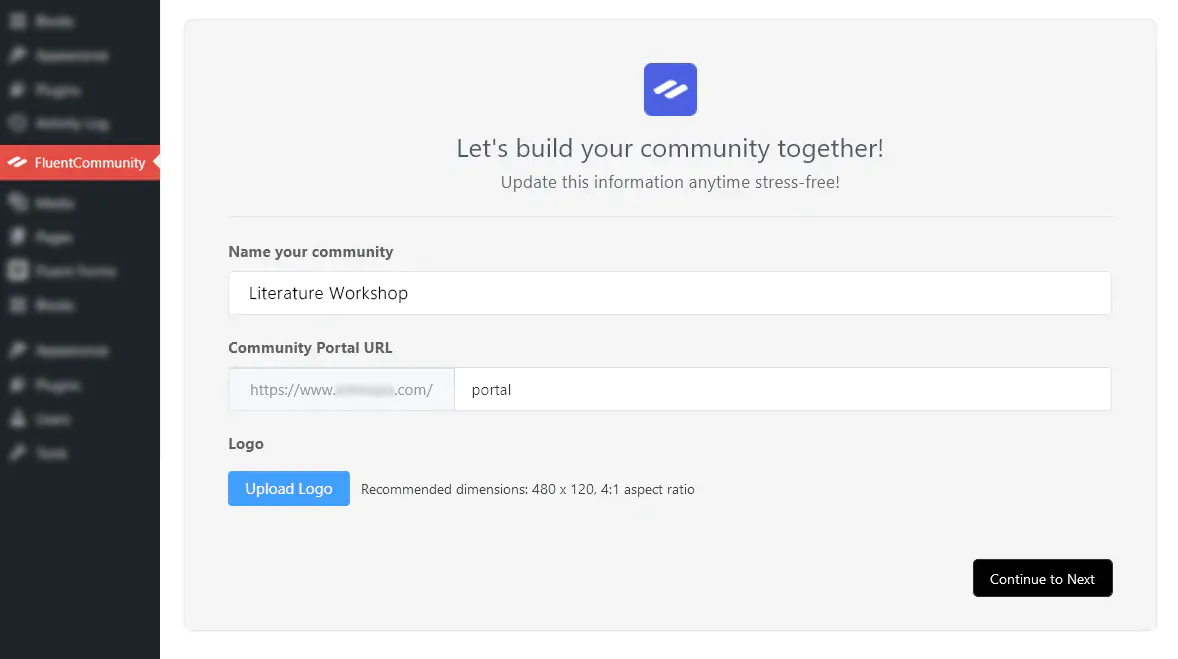
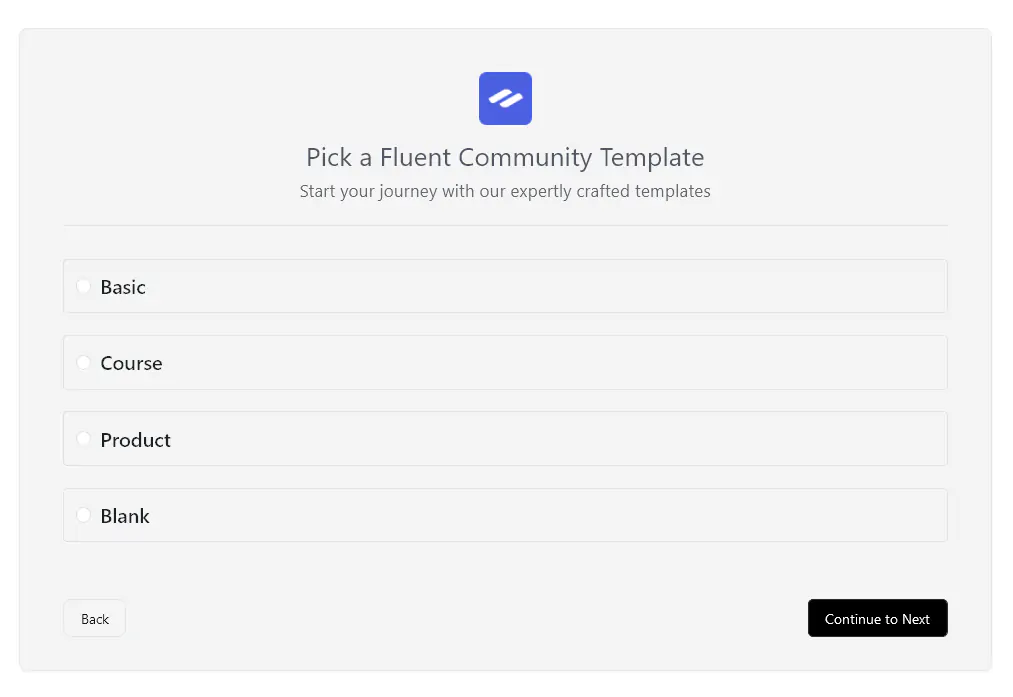
Once this step is done, the next thing we will see is the community creation screen. There we will decide a name for our project/community, and we will also choose the path where the space will be created.
Yes!, we can choose a template to speed up our project, which could prove a very convenient alternative. Now we will talk about the benefits and characteristics of each one of them.
Basic: A minimalist template ideal for getting started quickly with standard features like forums and blogs.
Course: Tailored for online learning, with tools to create lessons, modules, and private areas for students.
Product: Perfect for promoting and supporting physical products, featuring spaces for reviews, discussions, and feedback.
Blank: A fully customizable option for experienced developers looking to build a community from scratch.
For our example, we’ll use the Course template to demonstrate how FluentCommunity can facilitate narrative literature courses.
Basic
This is a minimalist template designed to get started right away with the basics and essentials. Basic offers typical sections like forums, blog posts, and also a homepage with simple architecture.
This FluentCommunity template is recommended for those who want to start a project without being overwhelmed by customization options. In other words, it’s easy to set up and is an excellent choice for generic communities or projects in their early stages of development.
The Basic template is ideal for modest communities and projects whose scope may not yet be fully defined.
Course
As its name suggests, the Course template was designed to create online learning courses. For this reason, Course includes tools for creating and managing educational content. It’s undoubtedly the ideal option for lessons, creating content modules, and conducting remote classes.
Course integrates systems for student assessments and progress tracking. It also comes with features such as forums for course Q&A, private areas for students, and exclusive modules for specific learners.
This template is perfect for virtual academies, empowering instructors and teachers by combining education with robust community tools.
Product
The Product template for FluentCommunity focuses on the seamless promotion and support of physical products. It includes spaces for reviews, technical discussions, and user feedback.
The design here was conceived to strengthen and foster interaction between users and manufacturers, artisans, and all kinds of physical product creators. Therefore, it includes tools for creating surveys, polls, and feedback management.
Product is the template to choose for businesses and companies interested in building communities around their products. It’s the ideal option for SaaS companies (cloud technology solutions), tech or software user communities, and brands seeking to build loyalty by fostering interaction around their products.
Blank
This is a blank slate —a canvas for those who want full control over every choice in building and designing their community.
It’s a 100% customizable template that doesn’t impose any restrictions on its preset design. With it, you can build from the ground up and pursue a specific content design direction. Naturally, you can integrate any functionality from the templates mentioned above, but this template demands a bit more effort.
For this reason, it’s recommended for developers with experience in website creation and/or projects seeking their own unique shine, a more exclusive identity, or special requirements.
For our example, we’ll use the Course template to demonstrate how FluentCommunity can facilitate narrative literature courses.
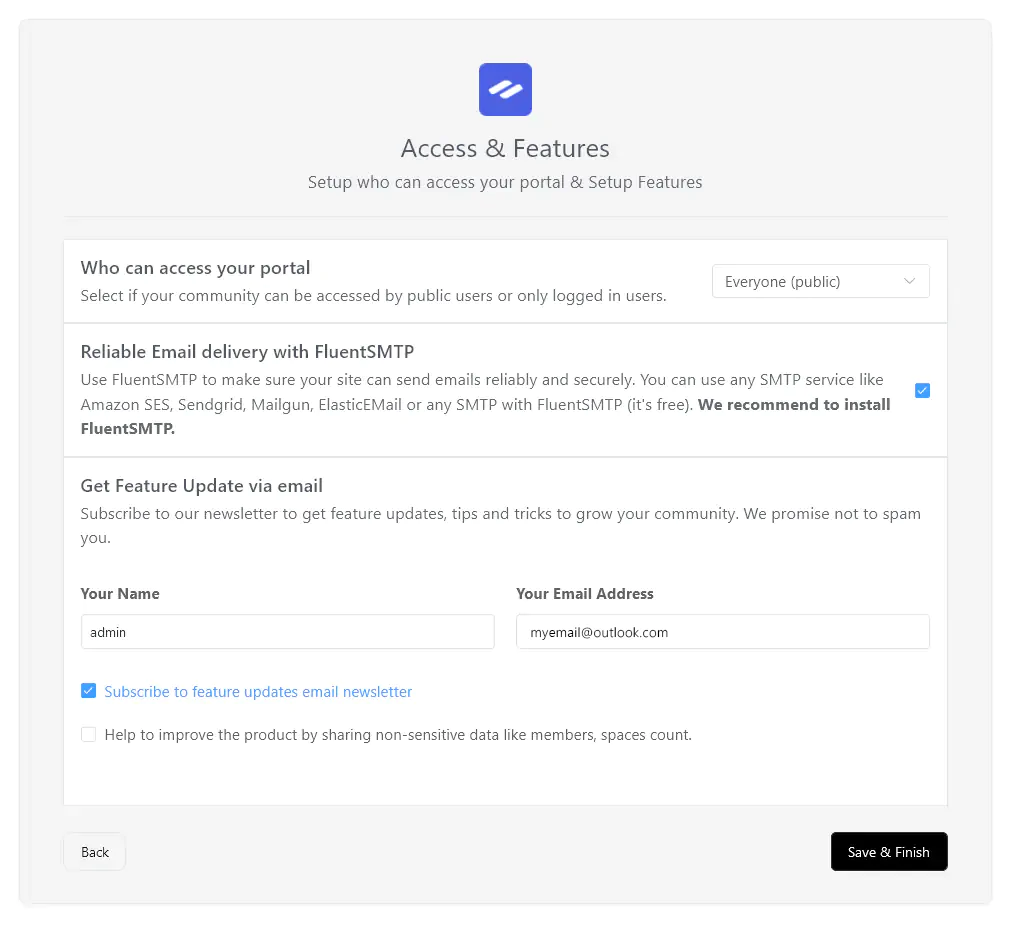
As we can see, we can change the default settings that allow anyone to access the portal, configure our contact email for alerts, and also use email sending via SMTP with FluentSMTP (recommended).
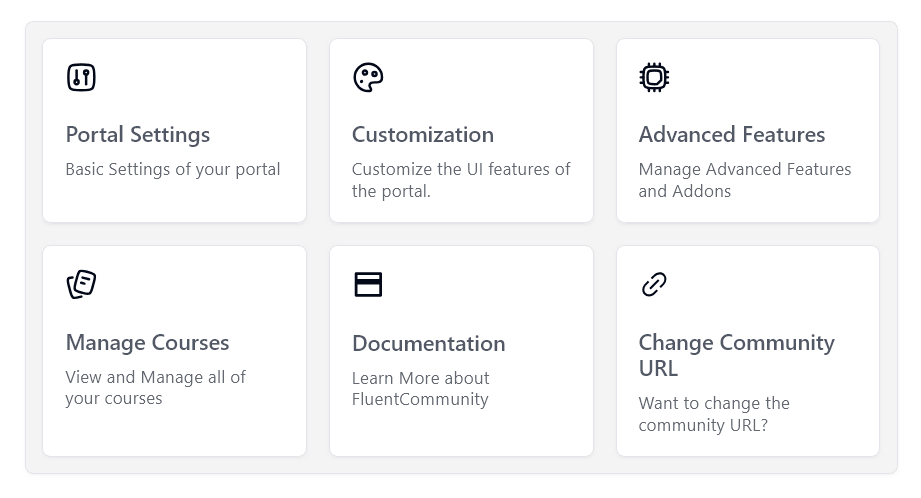
Once the settings are saved, the Configuration Panel will appear, offering six options in the form of large buttons: portal settings, customization (aesthetics), advanced settings, course management, access to FluentCommunity documentation (recommended), and finally, the ability to change the URL of the portal we’ve created.
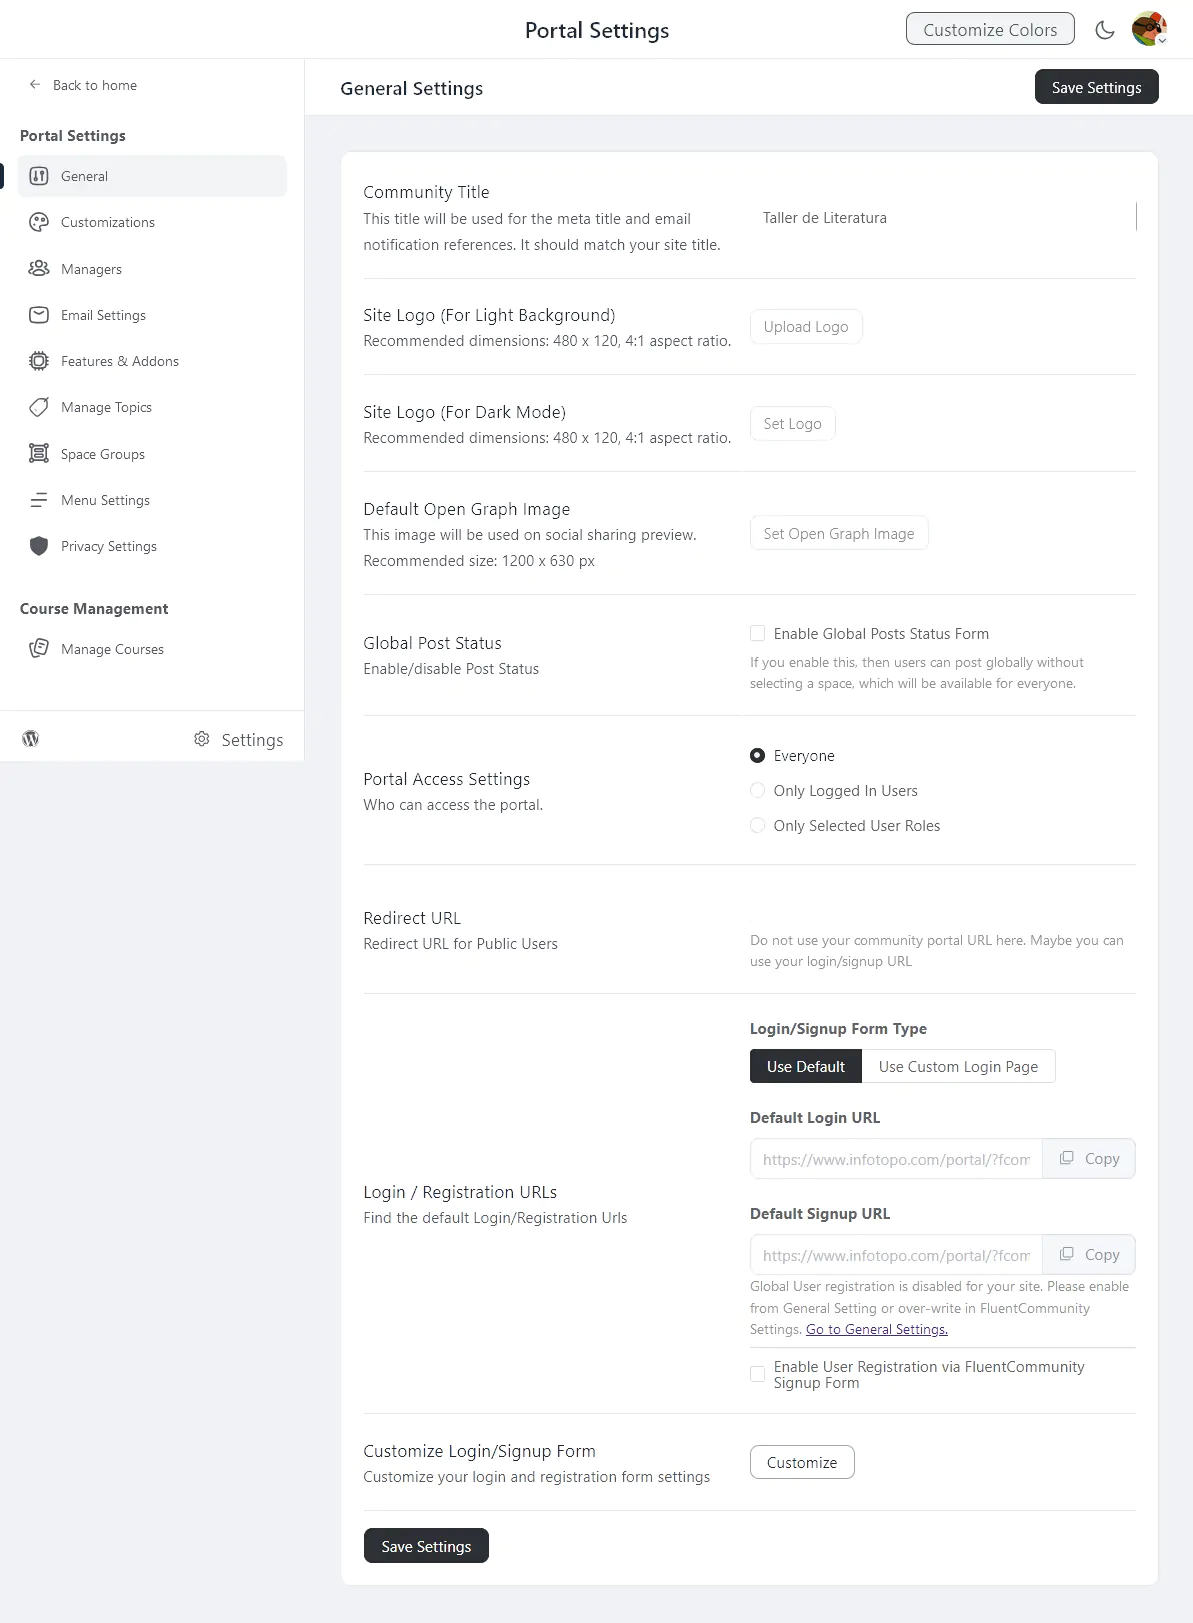
Within the Portal Settings we will find all the relevant options to give shape, personality and functionalities to our community.
The sections are divided according to a right options menu that groups configurations according to their area of incidence.
In the first option, General, we find the most basic options (e.g. adding a logo, changing the community name and customizing the login page).
Under Customizations we are (again) offered to make aesthetic changes (e.g. activate the Dark Mode).
In Managers we can create additional managers and manage the already appointed ones (when we enter the first time, the list will be empty but we will see the +Add Manager button to create members).
Email Settings allows us to configure the sender name, email and footer of emails (these settings will be used to send emails from FluentCommunity).
Features & Addons allows us to add functionalities in the form of modules; for example, Leaderboards, Badges, Courses with structured lessons, animated Gifs via Giphy, Emojis and Media location settings.
In Manage Topics we will configure the various content categories, which will allow members to filter messages with the topic navigation bar in the Spaces.
Space Groups is the place to organize the Spaces in groups to facilitate the management and structuring of our communities.
In Menu Settings we will be able to customize our navigation menus, both the sidebar and the top menus. Here we can activate, deactivate or reorganize all the menu items according to the needs of our community.
Privacy Settings is the area where we can activate or deactivate different access permissions for Spaces and specific pages depending on the users.
Finally, Manage Courses is where we will create courses and modules for our community members.
Why FluentCommunity could be the best alternative for building communities?
To start, FluentCommunity’s code is highly optimized. This doesn’t just preserves our original site performance: it powers a portal that operates at lightning speed. In comparison, BuddyBoss feels bloated and sluggish..
With FluentCommunity, everything flows with exceptional smoothness, and the numbers back it up. The file sizes tell a compelling story: at the time of writing, the ZIP file for FluentCommunity’s main plugin is just a couple of megabytes, while the Pro add-on weighs in at a slim 2.96 MB. Contrast this with BuddyBoss, which clocks in at 15.5 MB for its main plugin, an additional 7.1 MB for the Pro add-on, and yet another 13.5 MB for its mandatory theme.
But performance it’s not just about size: FluentCommunity stands out for its flexibility. Unlike BuddyBoss, it doesn’t rely on a dedicated theme to function. While BuddyBoss technically supports other themes, without its official one, the platform feels incomplete and lacks polish. FluentCommunity, in contrast, is free from these constraints, empowering you to focus on what truly matters: creating a vibrant, powerful community without unnecessary hurdles.
FluentCommunity also avoids trying to “do it all.” For the vast majority of site administrators, its features are more than sufficient. Built from the ground up to be lightweight, it operates efficiently without requiring a dedicated server or exceeding standard hosting resources.
In essence, FluentCommunity is a lean, reliable solution tailored for those who value performance, simplicity, and flexibility in community-building tools.
In Conclusion
FluentCommunity represents a challenge to BuddyBoss, the current market leader, urging it to rethink several aspects of its approach.
With its ultra-lightweight coding, FluentCommunity ensures that installation won’t slow down your site. It also provides all the necessary tools to address the typical needs of building communities on WordPress.
It’s clear that the developers are committed to further improving this plugin, which is still relatively new to the market. If we look at the consistent updates and enhancements seen in other plugins from the “Fluent” suite, it’s easy to foresee FluentCommunity quickly positioning itself as the #1 choice in its category.
Thank you for reading! We invite you to share your thoughts in the comments section below. Wishing you all success in your projects!
Transactional emails are those sent by our store to keep our customers updated on their orders. While most marketing emails from a newsletter have an average open rate of 20%, transactional emails have an 85% open rate. Therefore, personalizing them presents a great opportunity to increase customer loyalty and convey any important messages we would like to share.
We have brought WooCommerce emails to life with colors, fonts, and messages that not only reinforce our brand but also add weight, consistency, and help our store be remembered. Hopefully, visitors will return after their first order. Including other products or related services and discount coupons is a great way to pave the way for future sales. In this post, we will help and explain how to accomplish this with simple steps. Let’s begin.
How to edit transactional mails
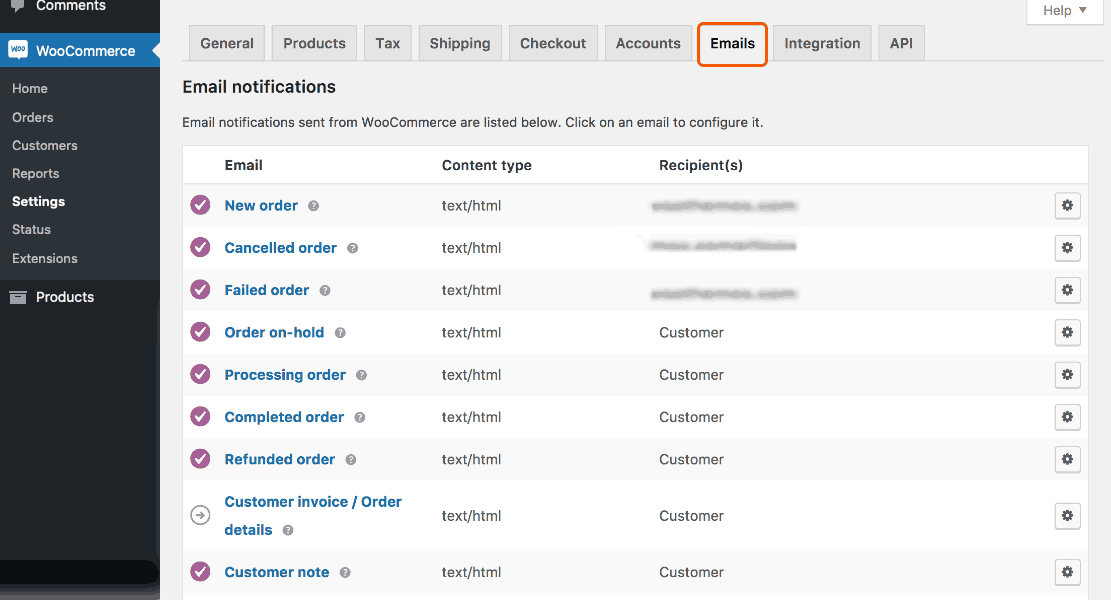
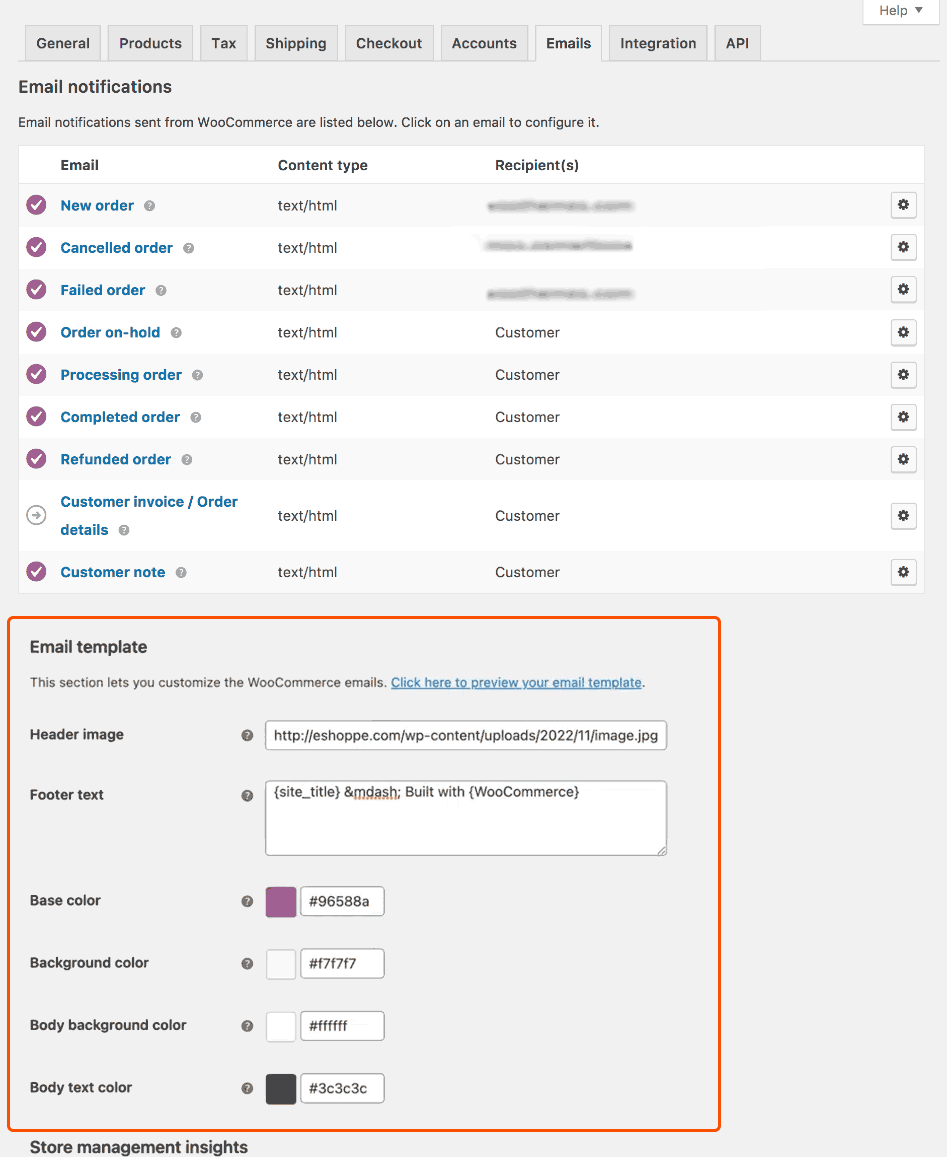
In our WooCommerce desktop, we’ll search for Settings and later clic the tab Emails:
We’ll find a set of templates for each different purpose:
New Order: Notifies us about a new order in our store.
Canceled Order: Notifies us of the cancellation of an order.
Failed Order: Notifies us of an order that failed for some reason.
Order On-Hold: Sent to customers with details when an order has been placed on backorder.
Processing Your Order: Sent to customers after a completed payment; contains all the details of the order.
Completed Order: Sent to customers when their orders are marked as completed; indicates that the order has been shipped.
Refunded Order: Sent to customers when an order is refunded.
Customer Invoice/Order Details: Sent to customers with order information and links to make payment.
Customer Note: Sent when a customer note is added to the dashboard.
Reset Password: Sent to a customer after they requested to reset their password.
New Account: Sent to the customer when they create their account.
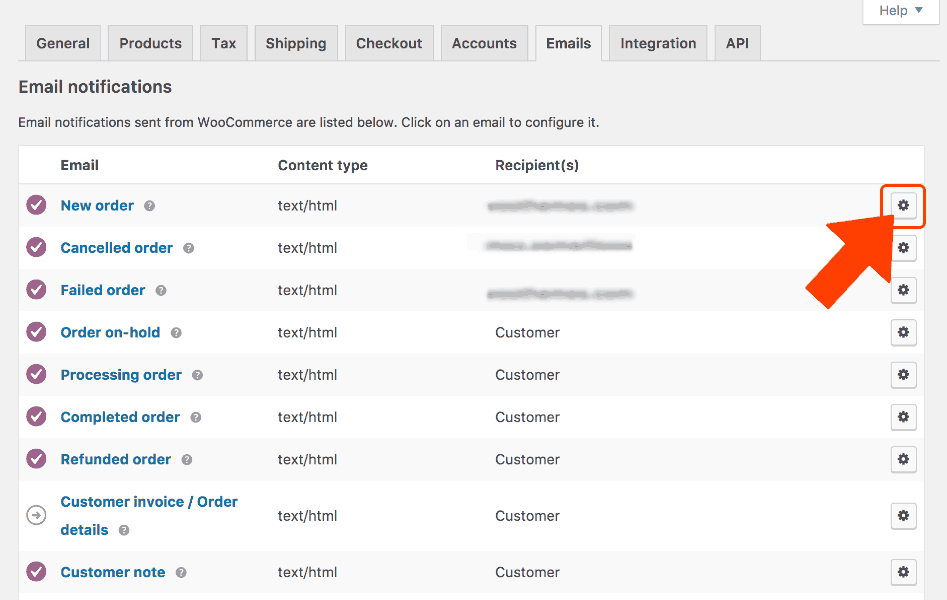
To edit a particular template, simply click on the “Manage” button next to the email you wish to modify.
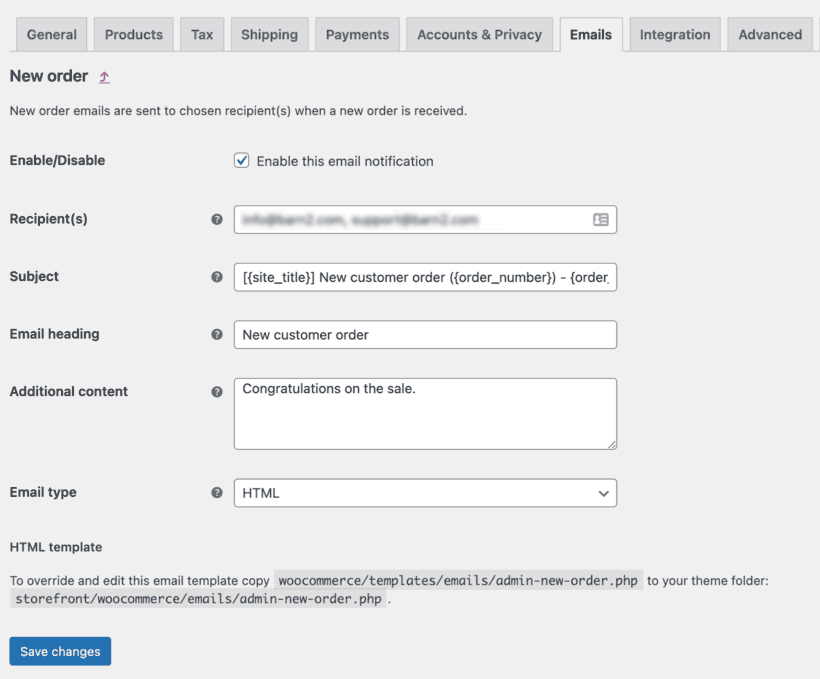
For example, here we can customize the subject, header, content, and type of the email for the “New Order” template (see screenshot below).
Note that it is also possible to use template variables to quickly and automatically complete information; for example: {site_title}, {customer_name}, {order_shipping_address}, or {item_names}. These variables enable us to personalize emails for each individual customer. WooCommerce dynamically replaces these variables with the corresponding information.
The Additional Content field is invaluable for conveying messages to our clients. For instance, we can include a personalized thank you note, and being original can be quite advantageous. This approach fosters empathy with our buyers while infusing our brand with personality.
Considerations should also encompass the inclusion of additional data, such as warranty details, return policies, certificates, awards our product has received, unpacking/assembly instructions, and any other relevant documentation. The goal is to ensure that our customers have easy access to all pertinent details following their purchase.
Global settings
Let’s explore the final section found at the bottom of the email templates window after scrolling down.
Any fields modified here will be reflected in all existing email templates.
In this section, we can modify:
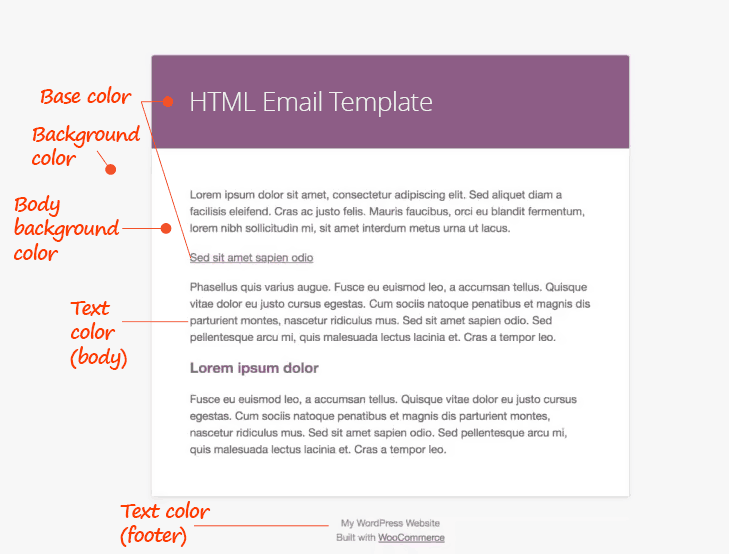
Header Image: Allows us to select an image to display at the top of all emails. Typically, this would be our brand logo.
Footer Text: Here, we can enter information to be displayed at the bottom of each email. We recommend including a link to our website, as well as typical contact information such as WhatsApp, telephone numbers, and emails. This makes it easier for our customers to contact us with any questions, as they will often look for contact information at the end of the email.
Base Color: This is the color used for email headers, links, and title backgrounds. By default, it will be the purple of the WooCommerce brand, so we should enter a color that aligns with our brand.
Background Color: This is the color used for the background of the email. By default, it is almost pure white, but we encourage you to use a tone related to your own brand.
Body Background Color: This is the background color of the email content. The same recommendation applies as in the previous item. If we use a very dark or saturated color, it is best to change the text color to white.
Body Text Color: This is the color of all written content in the email. As mentioned earlier, it will be dark for light-toned backgrounds but white or a very light color if our background color is dark or saturated.
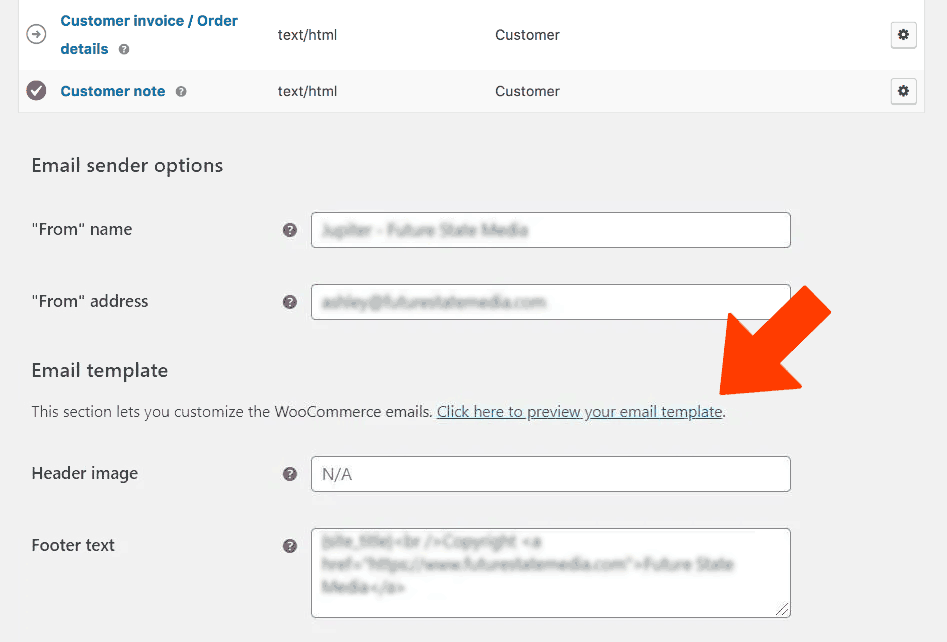
To preview our emails, we can click on the following link:
Personalizing our emails goes beyond aesthetics. If our site utilizes a color scheme with greens and oranges, receiving an email with violets may lead our customers to not immediately recognize our store. Conversely, when our communication and marketing align consistently, it fosters confidence in our business and increases customer loyalty.
Adding specific information about our products
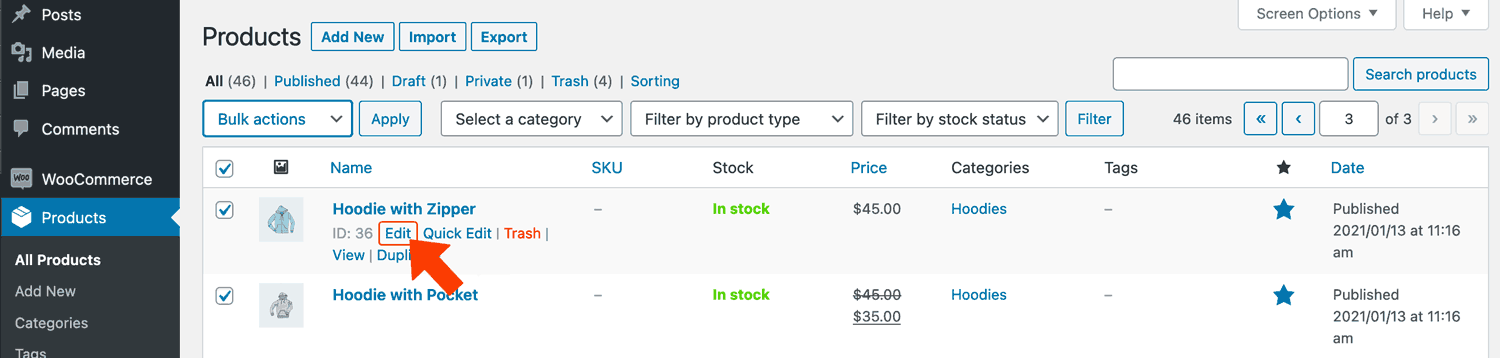
If we wish to include specific information in each of the emails to our clients, we should navigate to the Products section and then click on “Edit” under the product we want to modify.
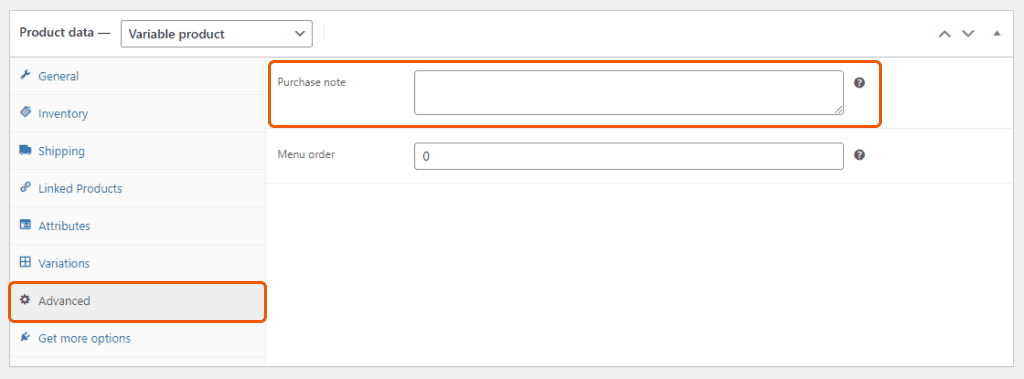
Once this is done, we will scroll down to locate the “Product Data” section and click on the blue “Advanced” link. Here, we will find a free field that allows us to add a Purchase Note.
These Purchase Notes allow us to expand the product information in various ways. For instance, we can provide a link to a PDF with instructions, warranty details, user manuals, etc. This field is also useful for entering a discount code for a future purchase. As sellers, our goal is to provide as much valuable information as possible so that our customers feel valued, important, and become loyal to our store.
Taking advantage of MailPoet
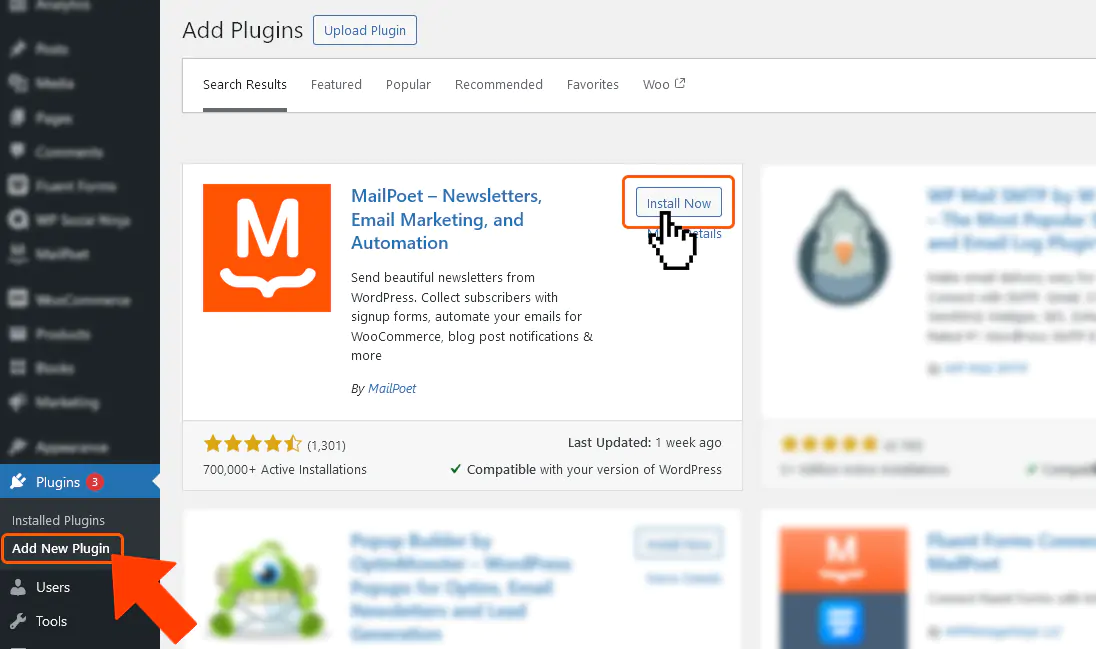
MailPoet is a WooCommerce extension that enhances marketing strategies by enabling easy customization of transactional emails. It’s included in our Managed WordPress plan, but you can also use the free version by installing it like any other WordPress plugin.
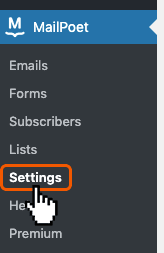
Once this step is completed, and after activating the component, we will navigate to MailPoet → Settings and proceed with a few steps to configure it.
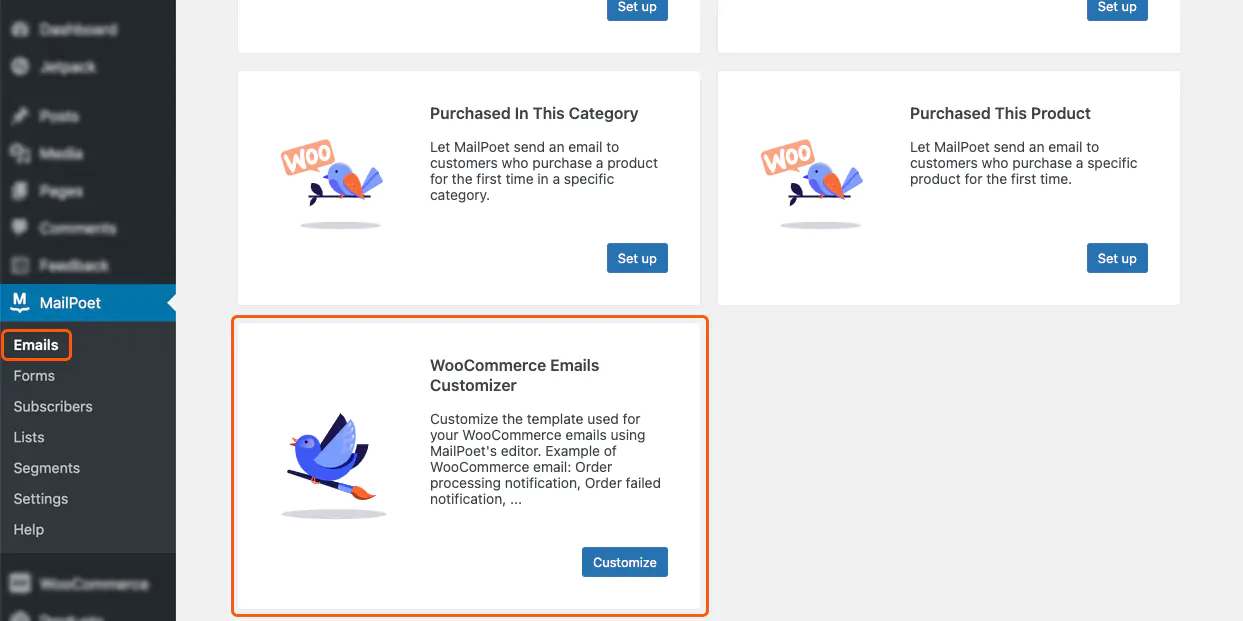
Once this is completed, the section that interests us is as follows:
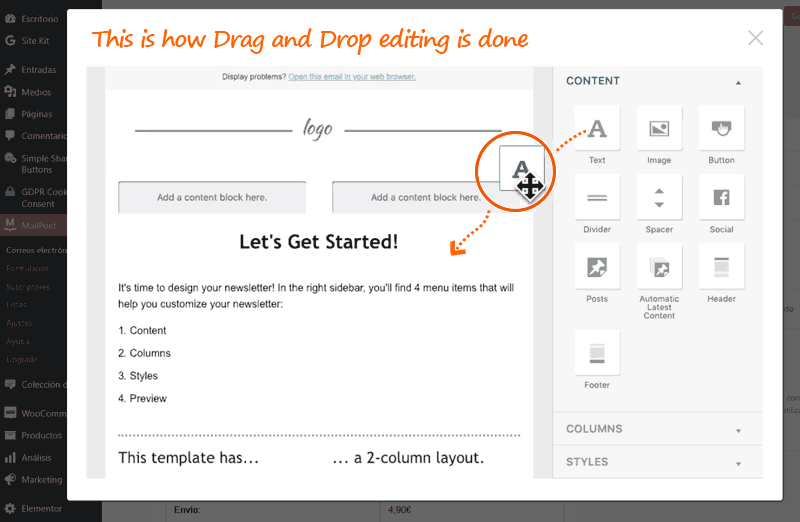
After clicking, a brief introductory video demonstrates the Drag and Drop method.
We will close the video with a click on the upper right X.
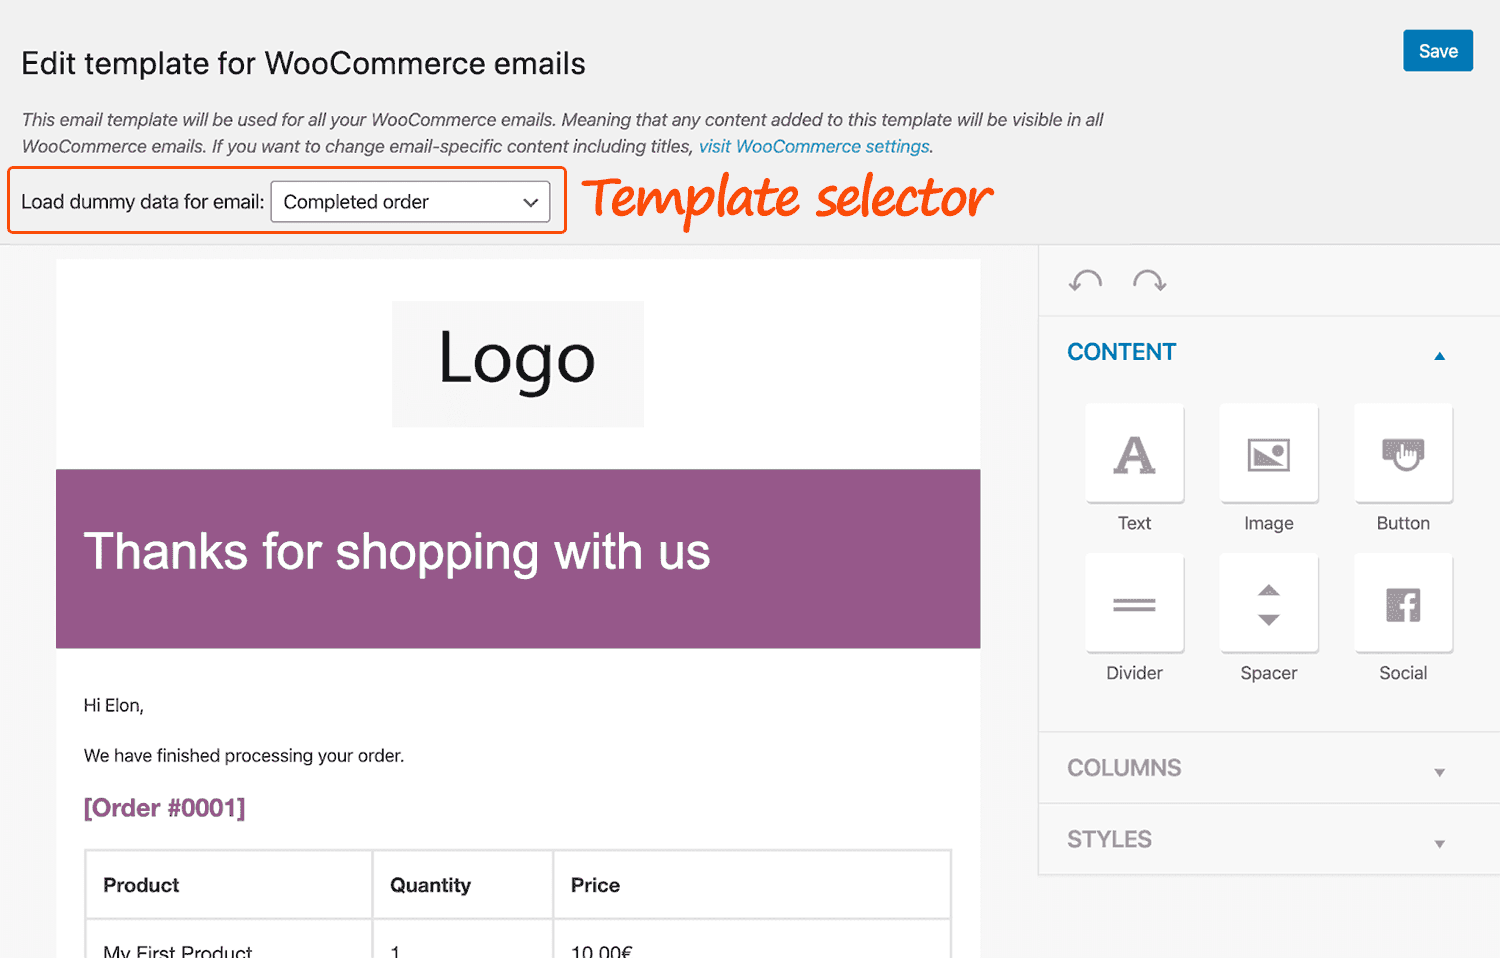
As depicted in the screenshot below, selecting the template and editing it is incredibly easy thanks to the MailPoet extension.
As soon as we hover the mouse cursor over the sections, the available actions for each become visible. Additionally, the drag and drop function enables fluid editing.
For comprehensive, detailed instructions on using MailPoet, it’s advisable to follow this official link.
More control with YayMail
Similarly, utilizing Drag and Drop editing, YayMail serves as a free alternative to MailChimp, which we couldn’t overlook in the context of this guide. This plugin enables the sending of custom emails using shortcodes, placeholders, and WooCommerce native conditional logic. If more control over the emails sent by WooCommerce is needed, we recommend considering YayMail.
Custom email templates for your WooCommerce eshop
We can edit without limits: email header layout and design, body, visual footer, signature, social tracking module.
Destop and mobile preview + sending a test email to our inbox.
The integrated previewer allows us to see a mockup of the order email and also select an existing order placed in our store to check the actual email.
Third in contention
There is another plugin for customizing WooCommerce emails that enables editing of the default WooCommerce transactional email templates. With this plugin, it’s possible to work on the design using the native WordPress customizer for instant visual edits. For more information, follow this link.
If we have some coding knowledge…
For those who have some understanding of HTML/PHP language, it becomes a bit easier to achieve what we want. In WooCommerce → Settings, Emails tab, click on “Manage” next to the email template to modify. At the end of everything, above the “Save changes” button, we will see the precise link of the template associated with that email.
Each transactional email comprises a combination of templates, offering greater control over customization compared to other methods mentioned above. For example, to edit the header of an email, we simply modify the email-header.php file. For changes to the footer, we work on email-footer.php. If we want to edit a specific email template, such as the customer invoice, we modify customer-invoice.php accordingly.
Conclusions
Personalizing the design and content of our emails goes beyond aesthetics or merely a friendly gesture. It reinforces our brand, builds trust, solidifies identity, and enhances communication to grow our business.
Well-designed transactional emails enhance communication with clients/buyers, making it more effective. Regardless of our level of programming or marketing expertise, it’s essential to improve these emails using any of the alternatives provided in this article.
We invite you to share your experiences, and as always, feel free to ask any questions in the comments section. We read and respond to all messages.
Custom Fields are a native (yet rather hidden) feature of WordPress that allows us to append additional information to our Posts. The Meta Box plugin harnesses this capability to its fullest, streamlining the process and even offering an online tool to generate highly optimized code. In this article, we delve into why we believe this component is indispensable.
The utility of Custom Fields
If this article were sponsored by an imaginary patron, and if such cases were recurring on our site, we could leverage Custom Fields by creating a “sponsor” Meta field to label these entries within WordPress. By adding a few lines of code to the functions.php or single.php file of our theme, WordPress would automatically insert an informative statement in the relevant posts (“The present review was written based on a serial key provided by its developers”). This is just one example among numerous advantages.
WordPress once again demonstrates its ultra-flexibility by allowing us to create metadata for our content without restrictions. However, as our site grows or becomes more sophisticated, we eventually realize the need to find a better way to organize the metadata, which are the customizable fields, in order to effectively manage our content. This is precisely where the essence of Meta Box shines.
Say Hello to Meta Box
Meta Box is the component that empowers us to create and manage custom META fields with ease and efficiency. With over a hundred five-star ratings and 700,000 active installations, it’s a highly regarded tool in the WordPress community.
Custom fields can be useful in a myriad of scenarios, mainly in the eCommerce arena. For example, when we need to add specific information to our product range. If we sell books, we will want to mention the genre, the publisher, the author, whether it is hard or soft cover… And, while many plugins offer us comparable possibilities, Meta Box stands out for:
More than 40 different types of fields with their corresponding data types (allowing data entry such as Posts, Attachments, Terms, Media, Radio Buttons, HTML and many more).
Super intuitive interface.
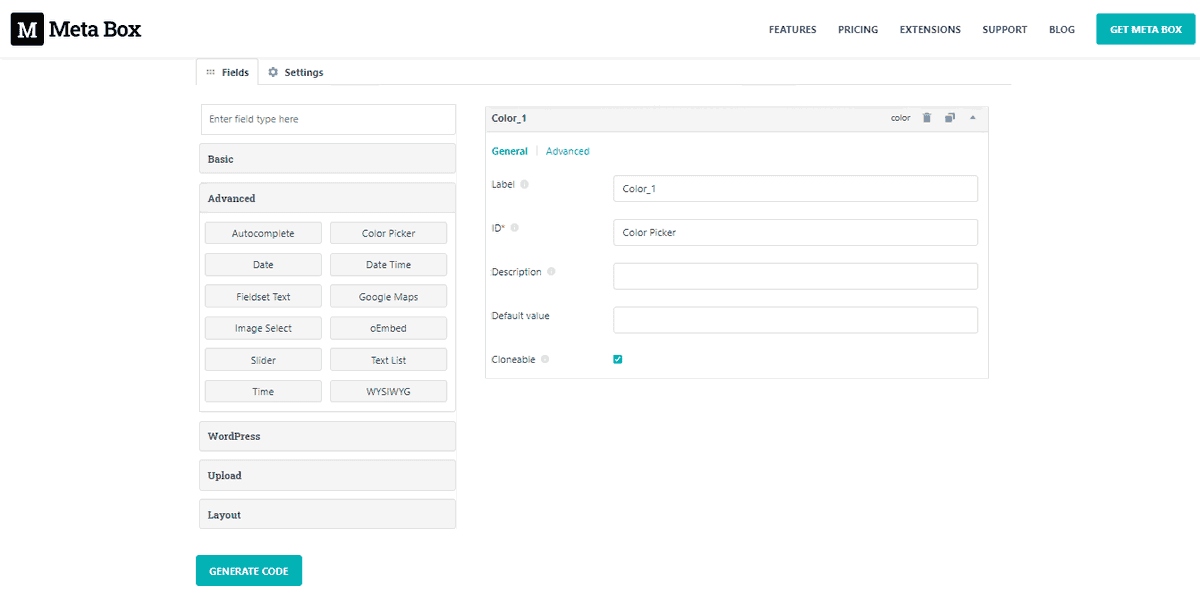
The free version of Meta Box does not include the creation interface within the WordPress Dashboard but instead relies on its free online tool. For users with a PRO license, the editing will be done within the website itself.
Both free and premium versions divide the features into individual extensions, allowing us to activate what is useful for our website and thus discard the rest (keeping our WordPress lightweight).
These extensions can be adapted to almost any developer’s requirements.
Extensive documentation to fully utilize its features.
Meta Box Custom Table is an excellent reason to choose this plugin over its competition (included in our Managed WordPress service).
The number of free extensions is eleven, and among them we have integration with the popular Rank Math, Elementor, Beaver Builder, and Yoast SEO.
The Meta Box Premium version adds 20 additional extensions, including MB Custom Table. Why is MB:CT a great competitive advantage for our site? Because, unlike other MetaData management plugins, Meta Box Custom Table allows us to store data in a custom table instead of relying on the default WordPress Entry/User/Term meta table. Thus, all meta values are stored in a single row, while each column becomes a meta key.
In simple words, we manage to reduce the number of rows in the MySQL database of our website, which prevents the typical slowdown problems when we own a very large site.
In addition to this, the use of a custom table allows us to store the data in a single place, making it easier to view, edit, import, and export.
How to install and use Meta Box?
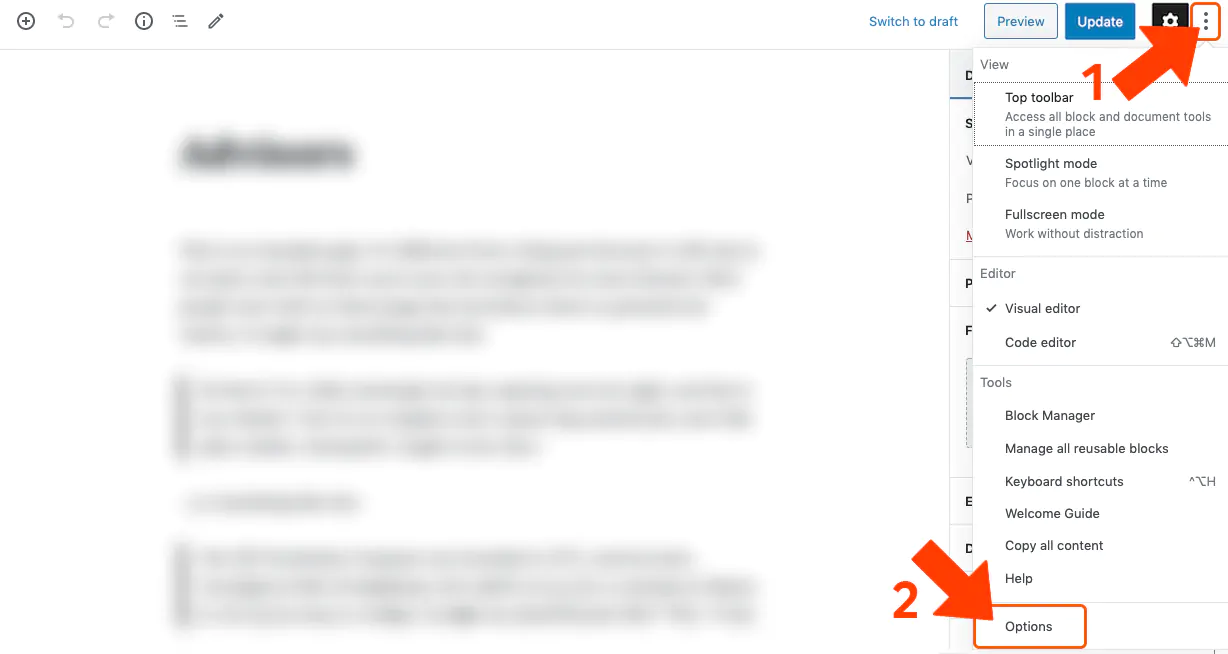
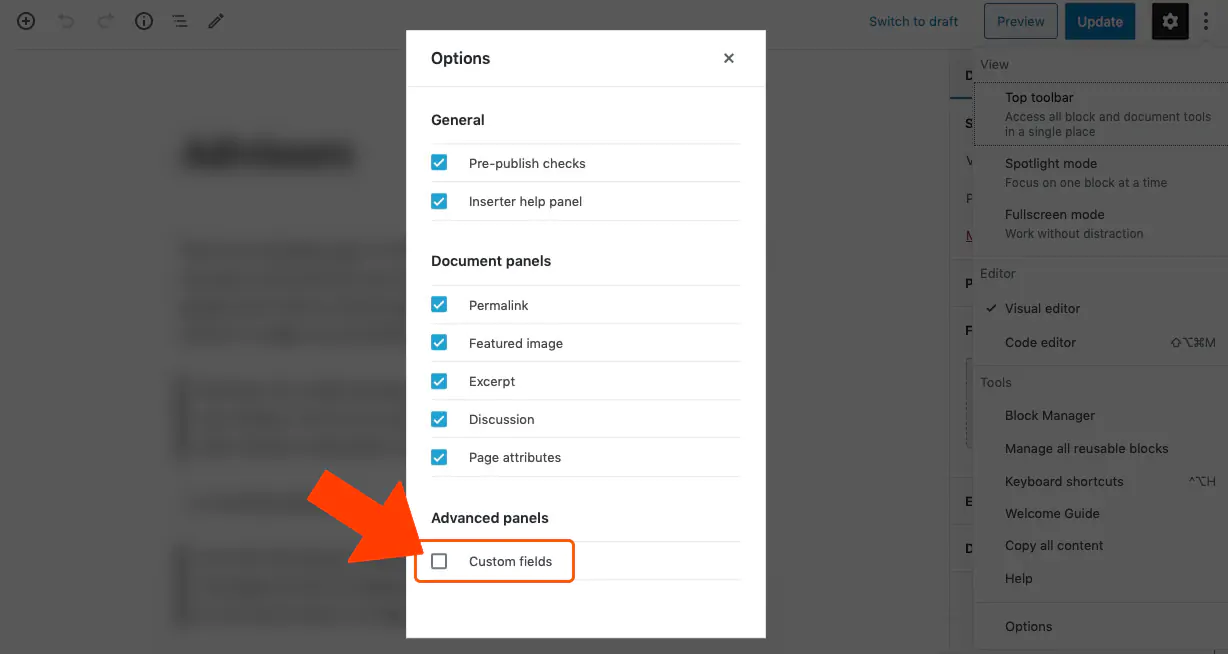
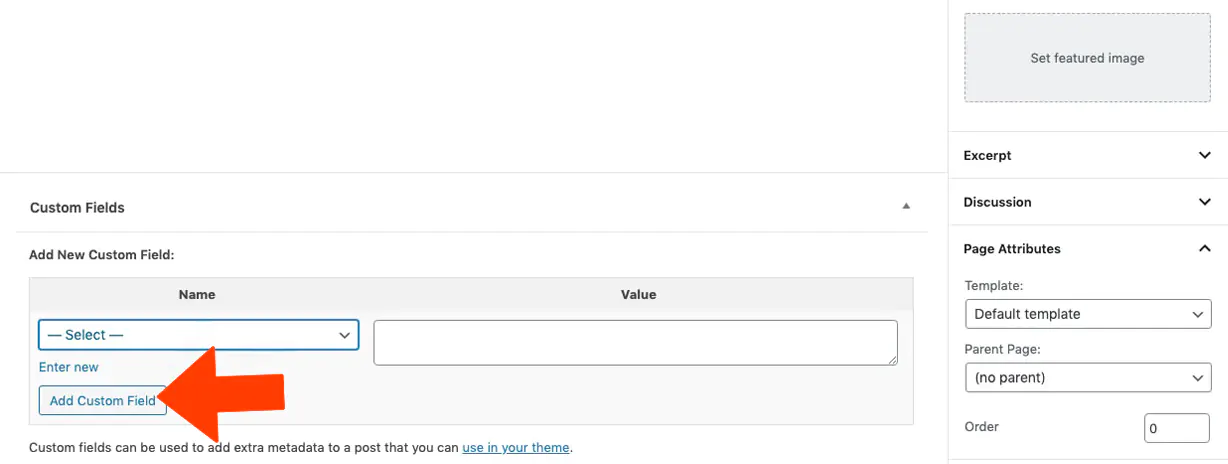
If you intend to try the Meta Box plugin in its free version, simply download it from WordPress.org as you would with any other free plugin. The alternative is to add it from the WordPress Dashboard itself using the search engine in the Add New Plugin section. Once this is done, we will see the options when editing an entry or creating a new one. If we do not find the options at the end of editing our content, then we must activate the display within WordPress by following these simple steps:
We remind you that the free version of Meta Box does not provide an interface for creating custom fields inside the WordPress Dashboard. Instead, it offers an online code generator whose interface is practically identical to the one included in the premium version. Thanks to this web app, we will obtain a code that allows us to program in PHP manually, although we must enter it in the functions.php file of our theme. A fully exhaustive user guide can be found here.
If this workaround means trouble for us, then we better consider the premium version, which will allow us to download Meta Box AIO and take advantage of the graphical interface in our WordPress. In the video below, we see the precise instructions for its operation.
MetaBox Premium with AIO (together with all the paid extensions) is included in our Maintenance Plans. This plugin is part of a bigger package of professional components specially selected to turn your site into a professional website of excellence.
POS (Point Of Sale) systems are complex programs that allow sellers to link hardware (e.g., a cash register) with software, in this case, WooCommerce. Since such a computer system is not exactly an easy thing to code, plugins that provide this function are few, almost rare. In this note, we review what we consider to be the 9 best POS plugins for WooCommerce stores.
What is the purpose of a POS component in WooCommerce?
POS serves to integrate (in some cases, supplant) machines such as a barcode reader, a ticket printer, a cash register, a touch screen, a laptop, a PC, and mobile devices, along with software and their databases. This allows, among other things, to know the inventory in real time, keep track of sales, schedule appointments for services, and more. It works at the front-end level, i.e., as a public interface for employees of a business (or automated sales booths).
A POS plugin for WooCommerce communicates with our online store in order to synchronize orders, inventory, shipping statuses, and more.
If we already use WooCommerce, we are familiar with the checkout process for customers, as the plugin facilitates complex online store tasks. WooCommerce supports both physical and virtual items, allowing customers to evaluate and then purchase through a digital storefront. It provides credit cards, debit cards, PayPal, bank transfers, and other transactions. It even generates digital barcodes, or QR codes, to quickly scan digital tickets and other products.
A WooCommerce POS plugin takes the existing features and advantages of WooCommerce and makes them better. It gives us complete control and management over the in-person sales process through physical stores. If we intend to offer our customers a personalized in-the-flesh shopping experience, WooCommerce POS plugins have the power to give us an edge over the competition through their flexibility and range of customization. Hence the importance of this review.
The POS components described in this note may vary in their operation, but they always place at our disposal a range of functionalities and tools created for computers and tablets. Perhaps not all the components examined offer a native app for Android or iOS, but they do offer responsive web designs so that they can be accessed from mobile devices. Let’s start with the first one:
wePOS
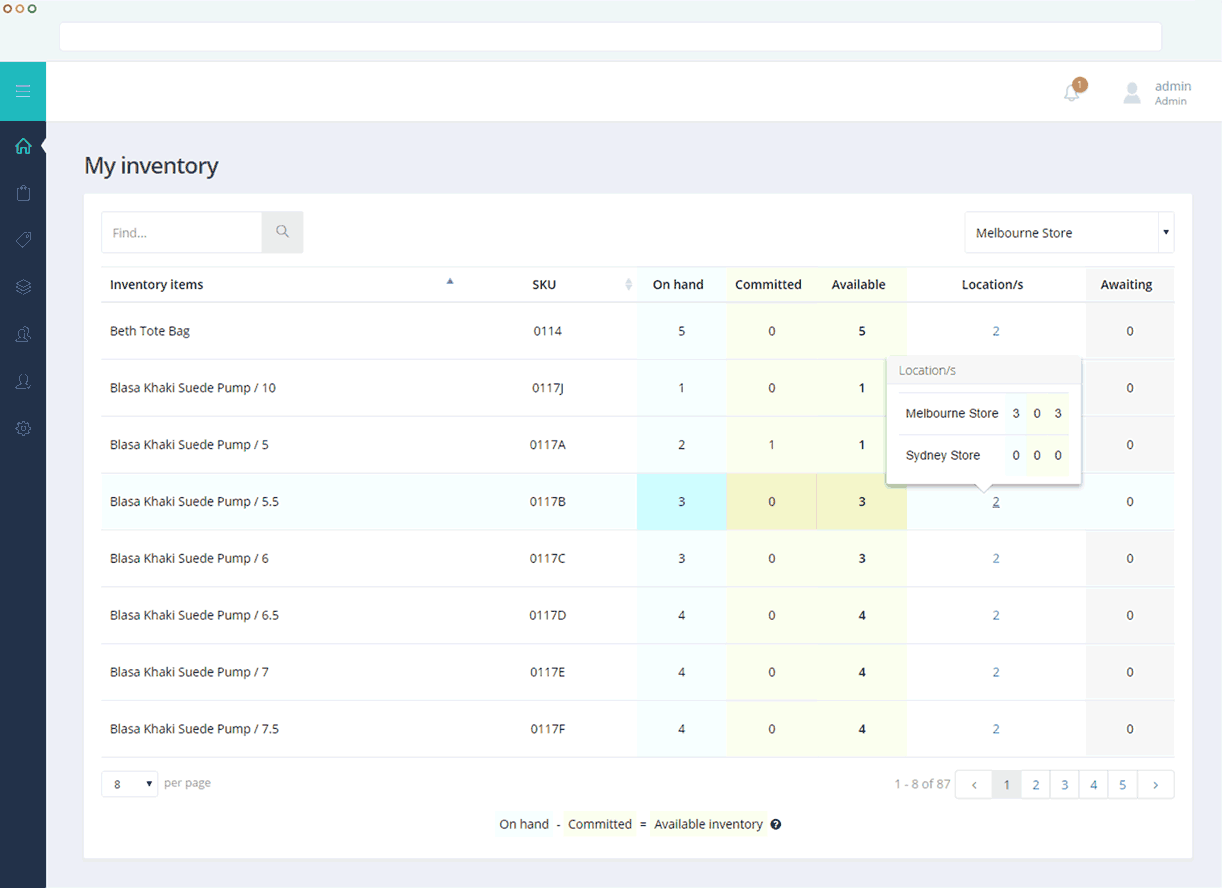
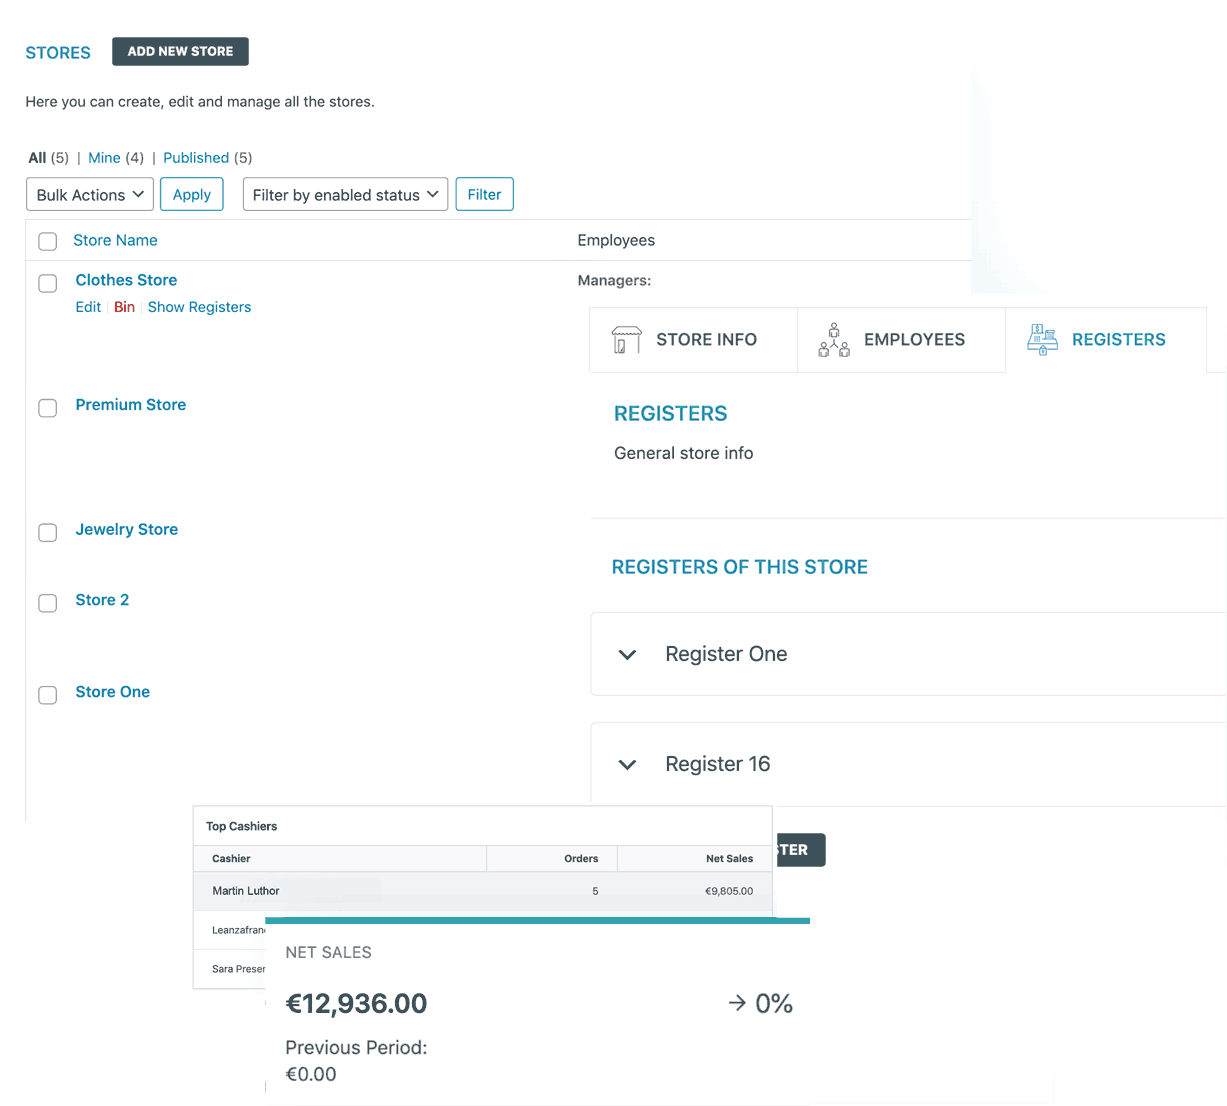
wePOS is widely used thanks to its free (albeit limited) version; of course, there is a premium version with more functionalities. However, the free version already allows adding the desired number of physical locations together with cash registers, also unlimited in each physical location (i.e., cash registers or other stand-alone devices).
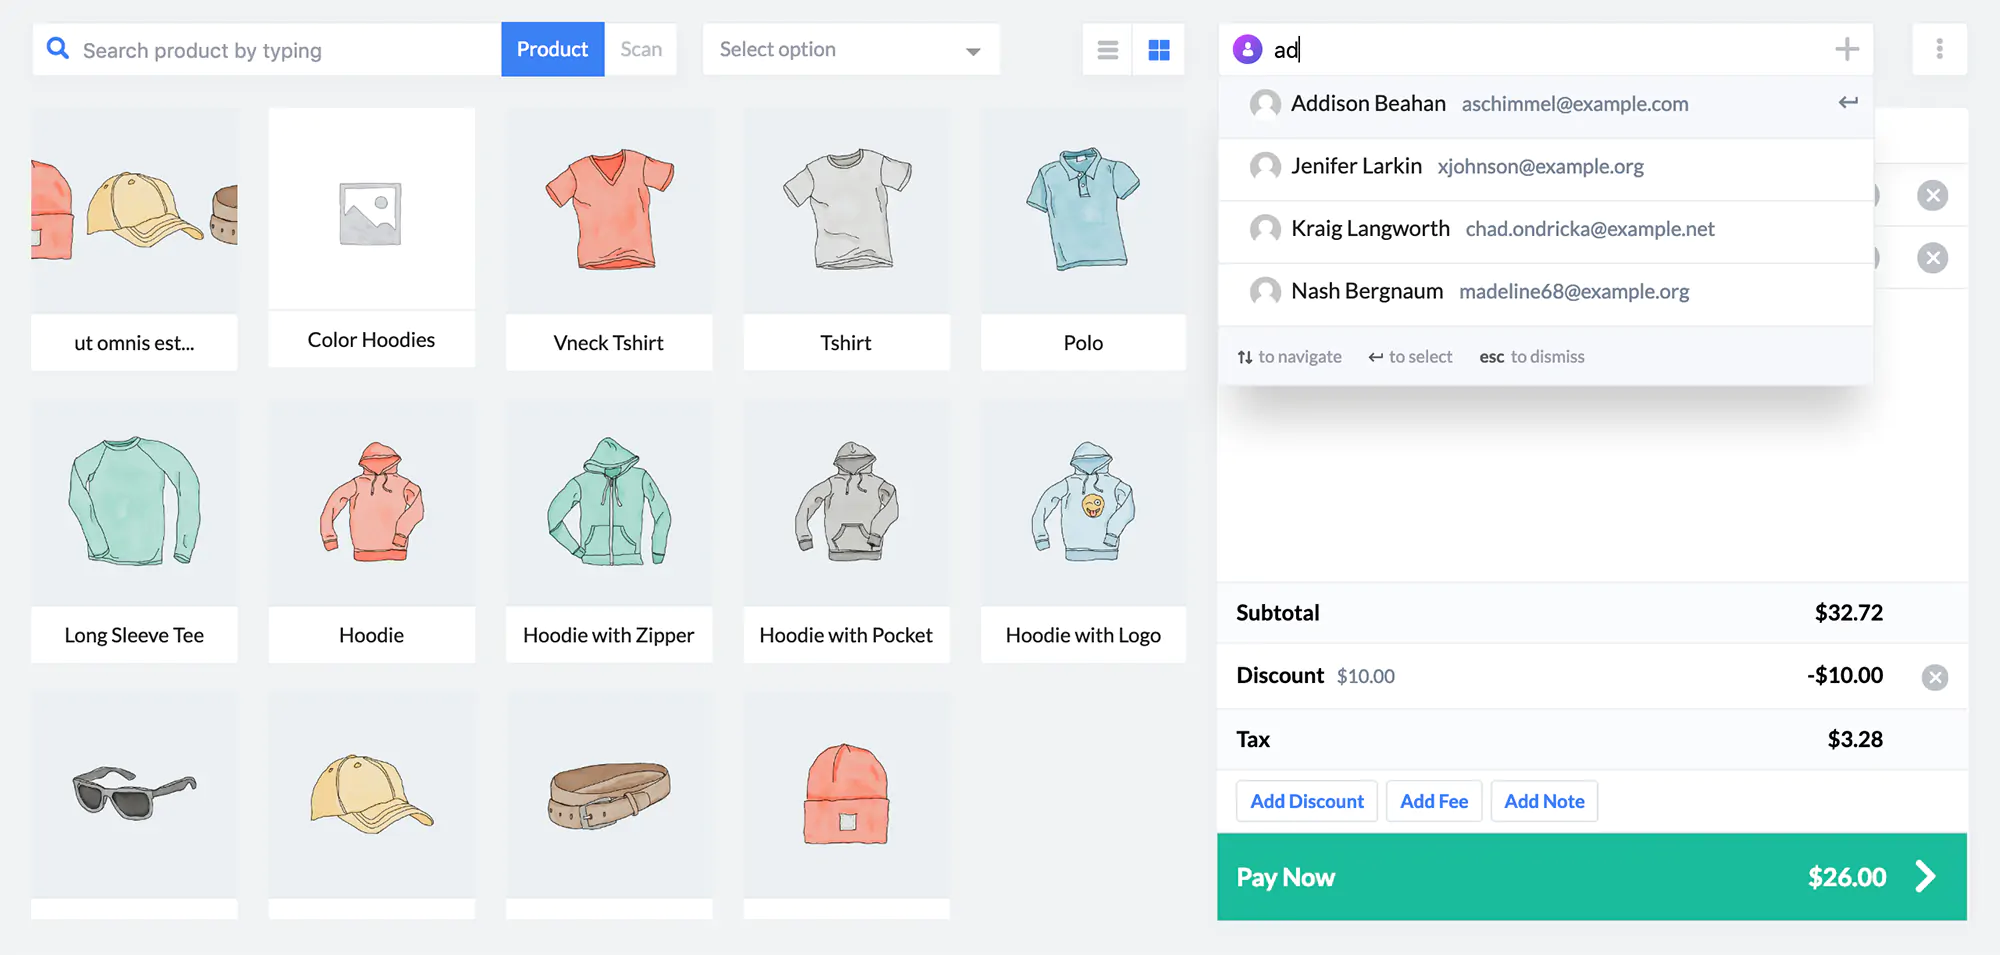
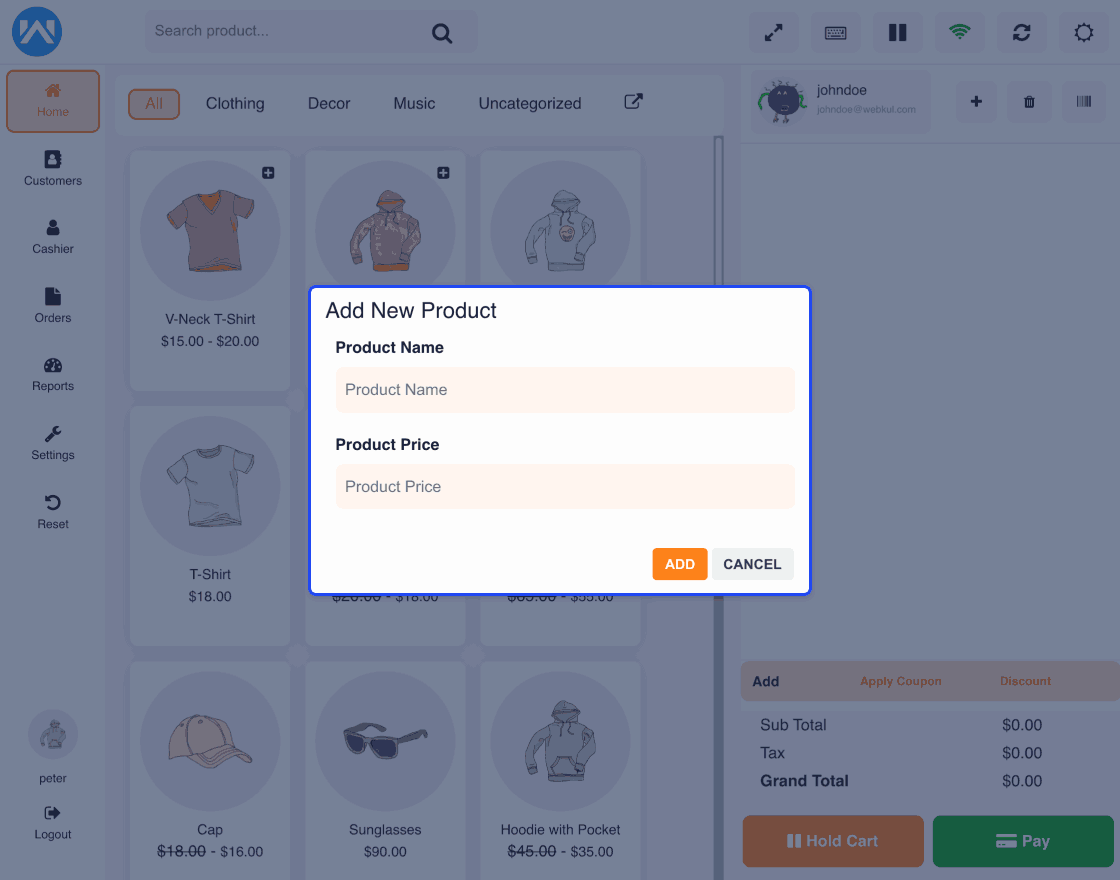
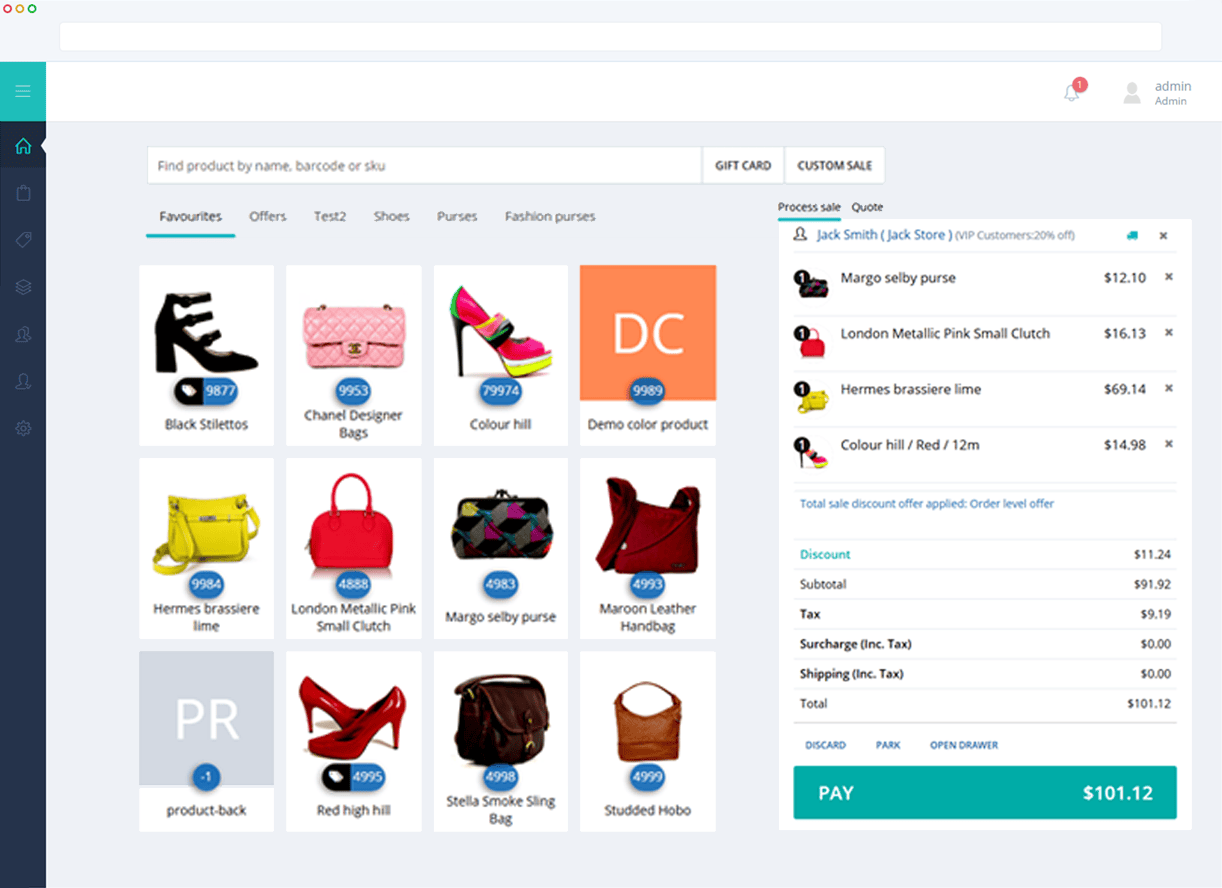
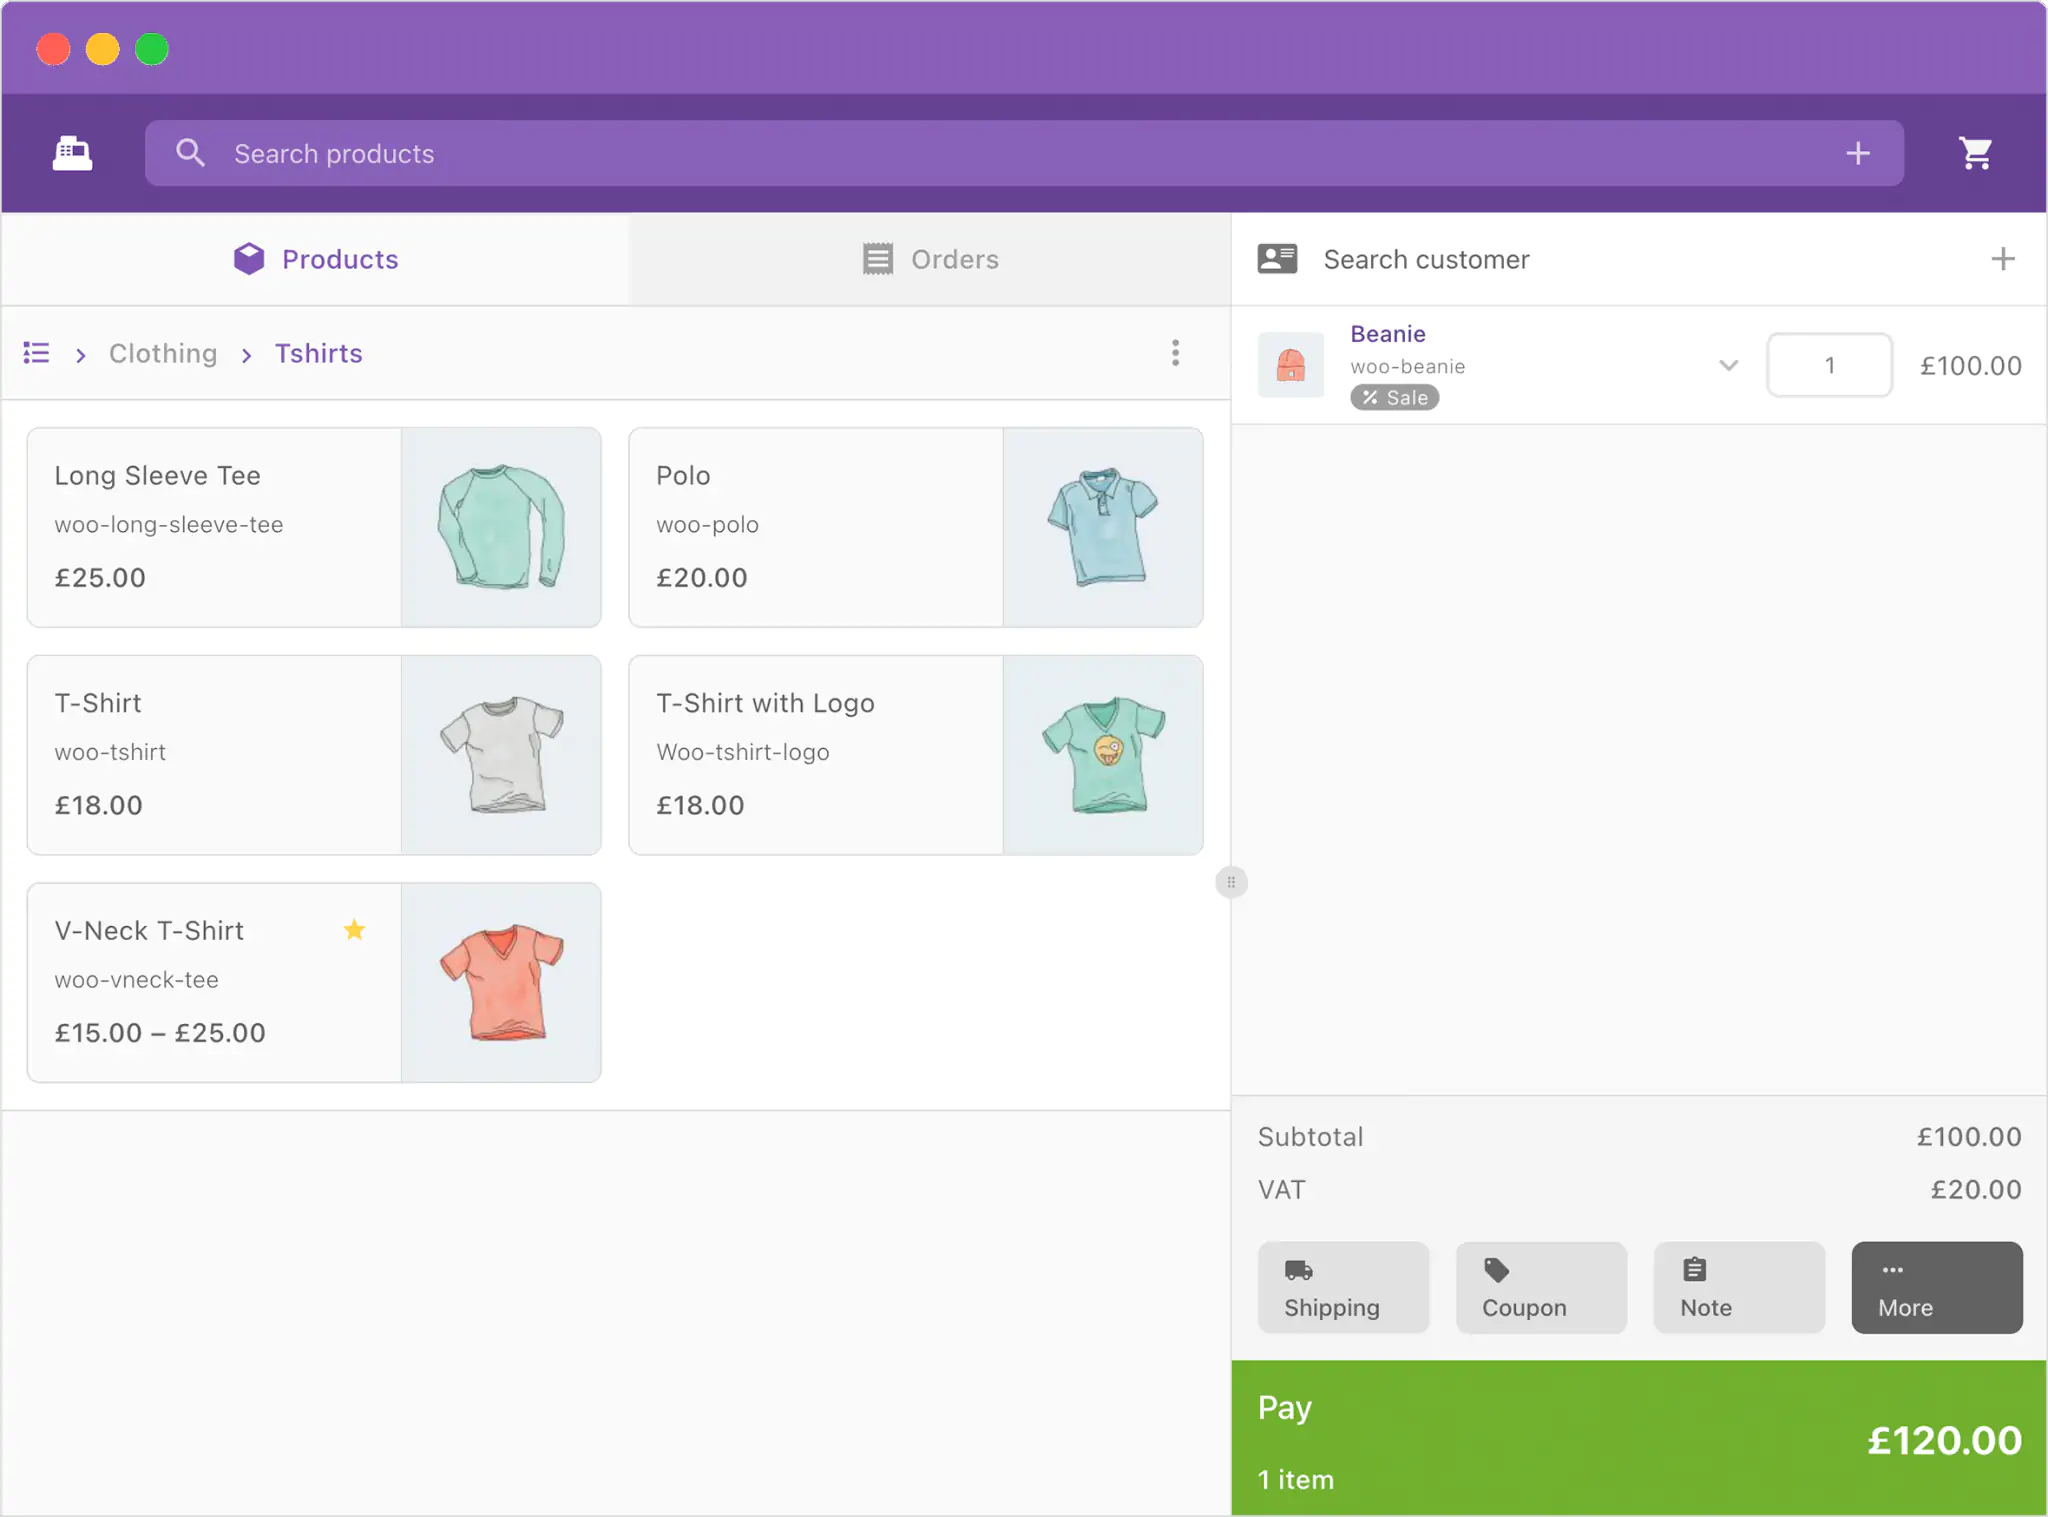
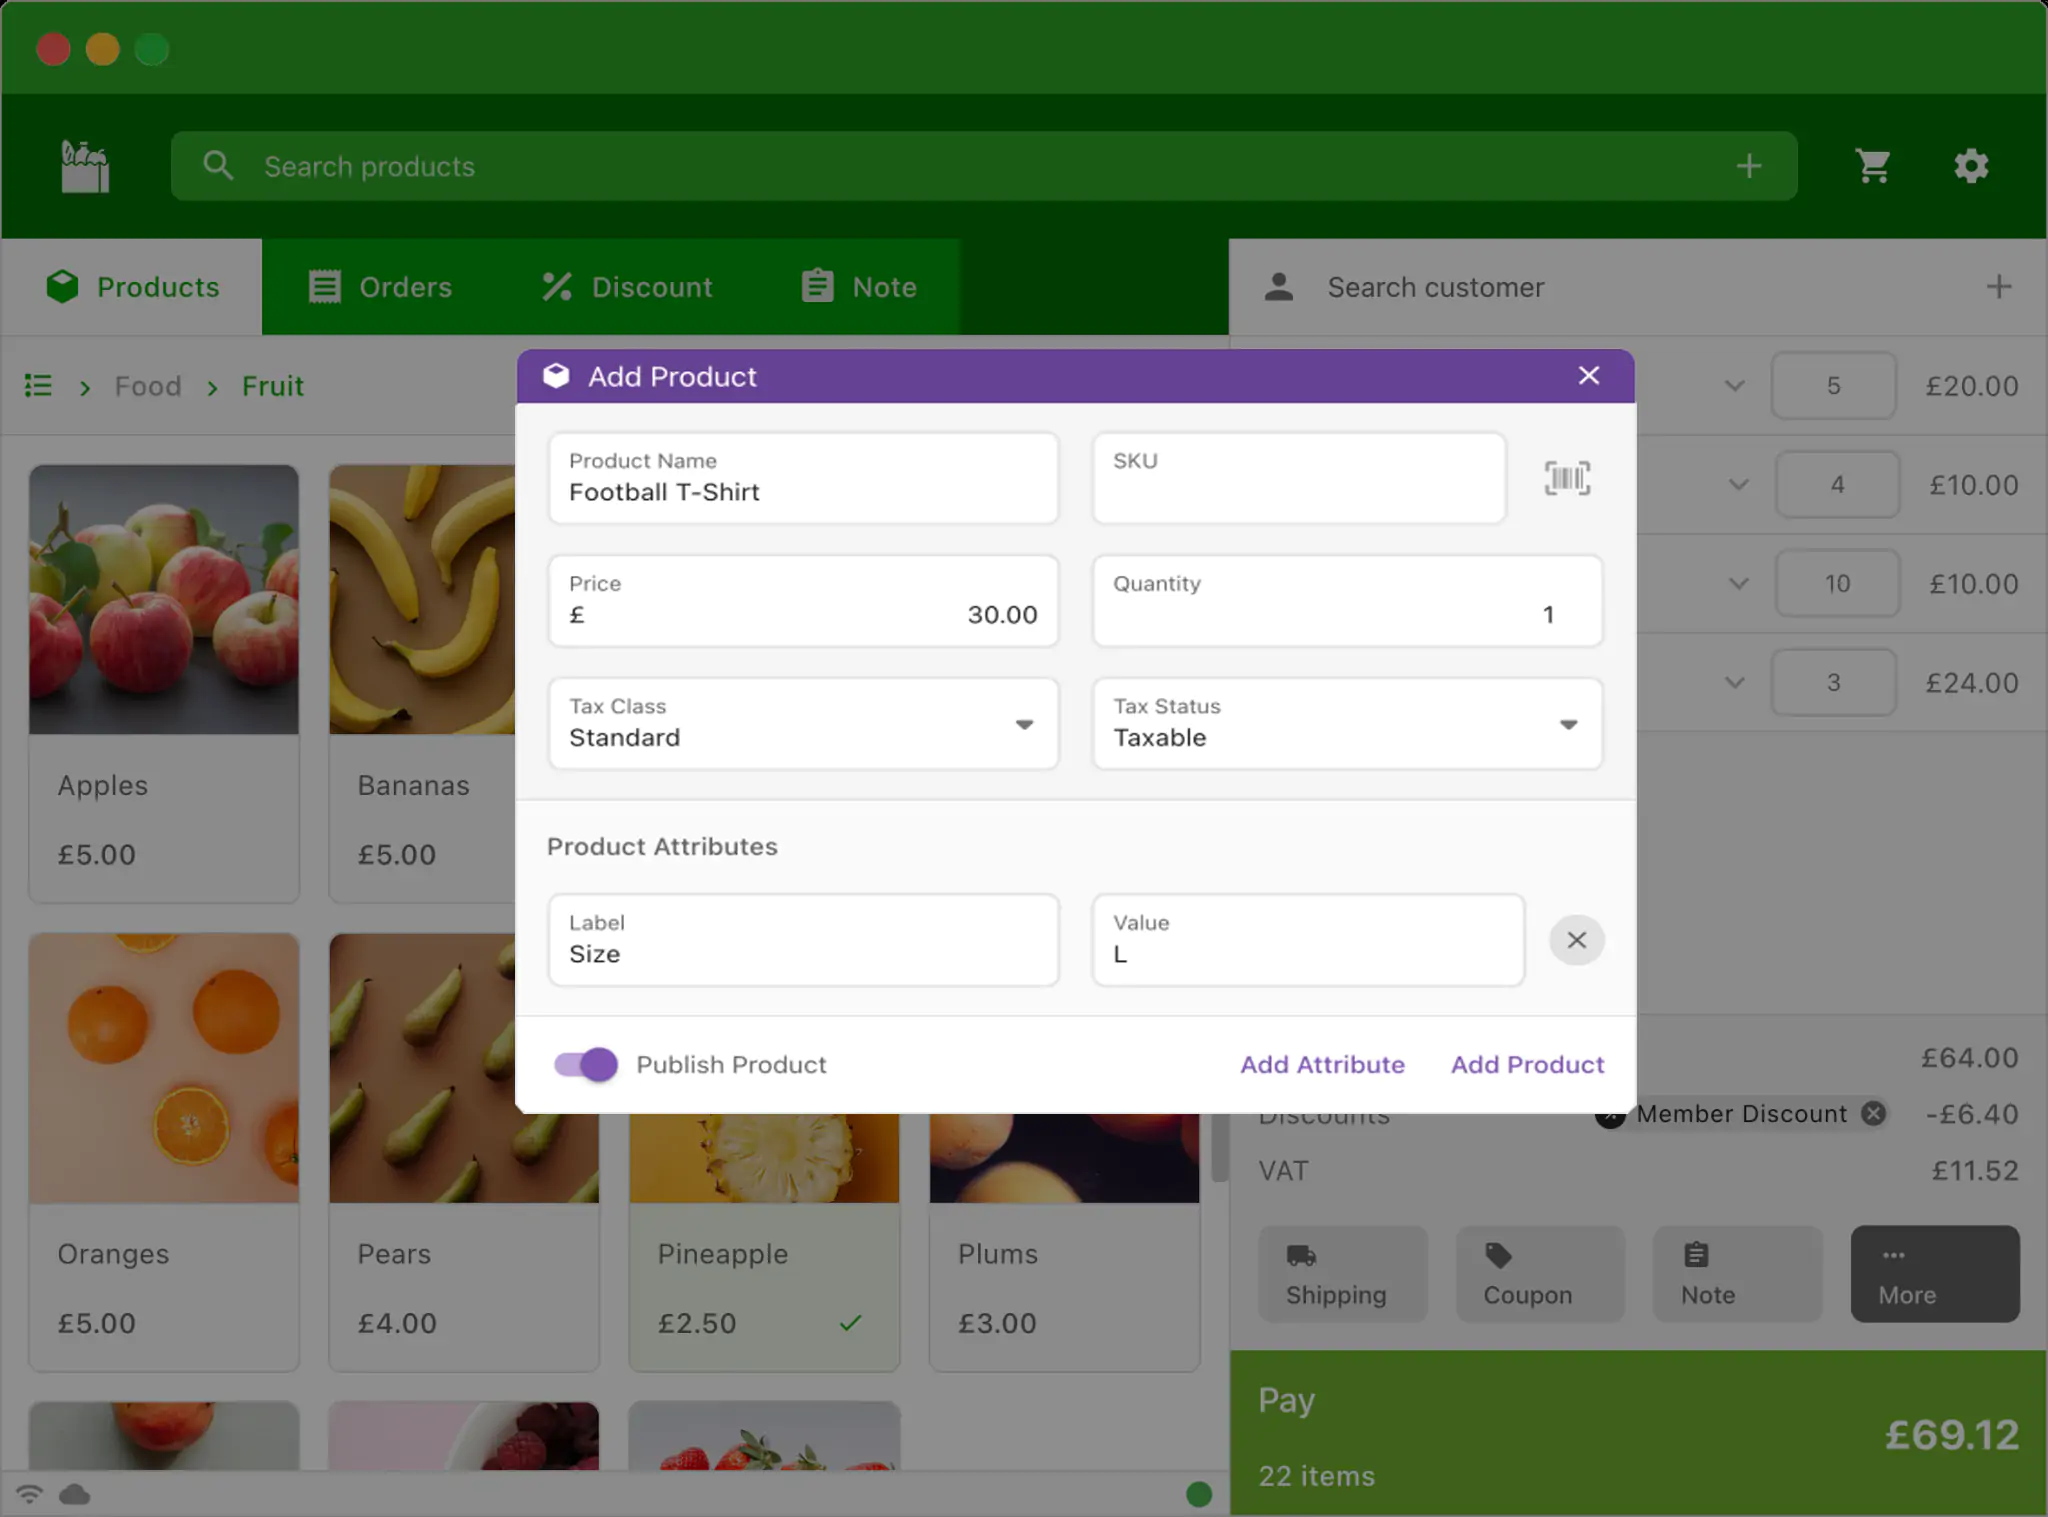
When a cashier logs into wePOS, he/she will be able to choose his/her specific location and counter. The interface has a proper grid layout, as shown in the screenshot above. It also provides us with a quick Ajax search. This helps to search for products as well as customers. Also, wePOS allows product variations (colors, sizes, etc.). The cashier can enter this information when selecting the product. They can also manage several shopping carts at the same time because wePOS allows different parallel transactions in separate tabs.
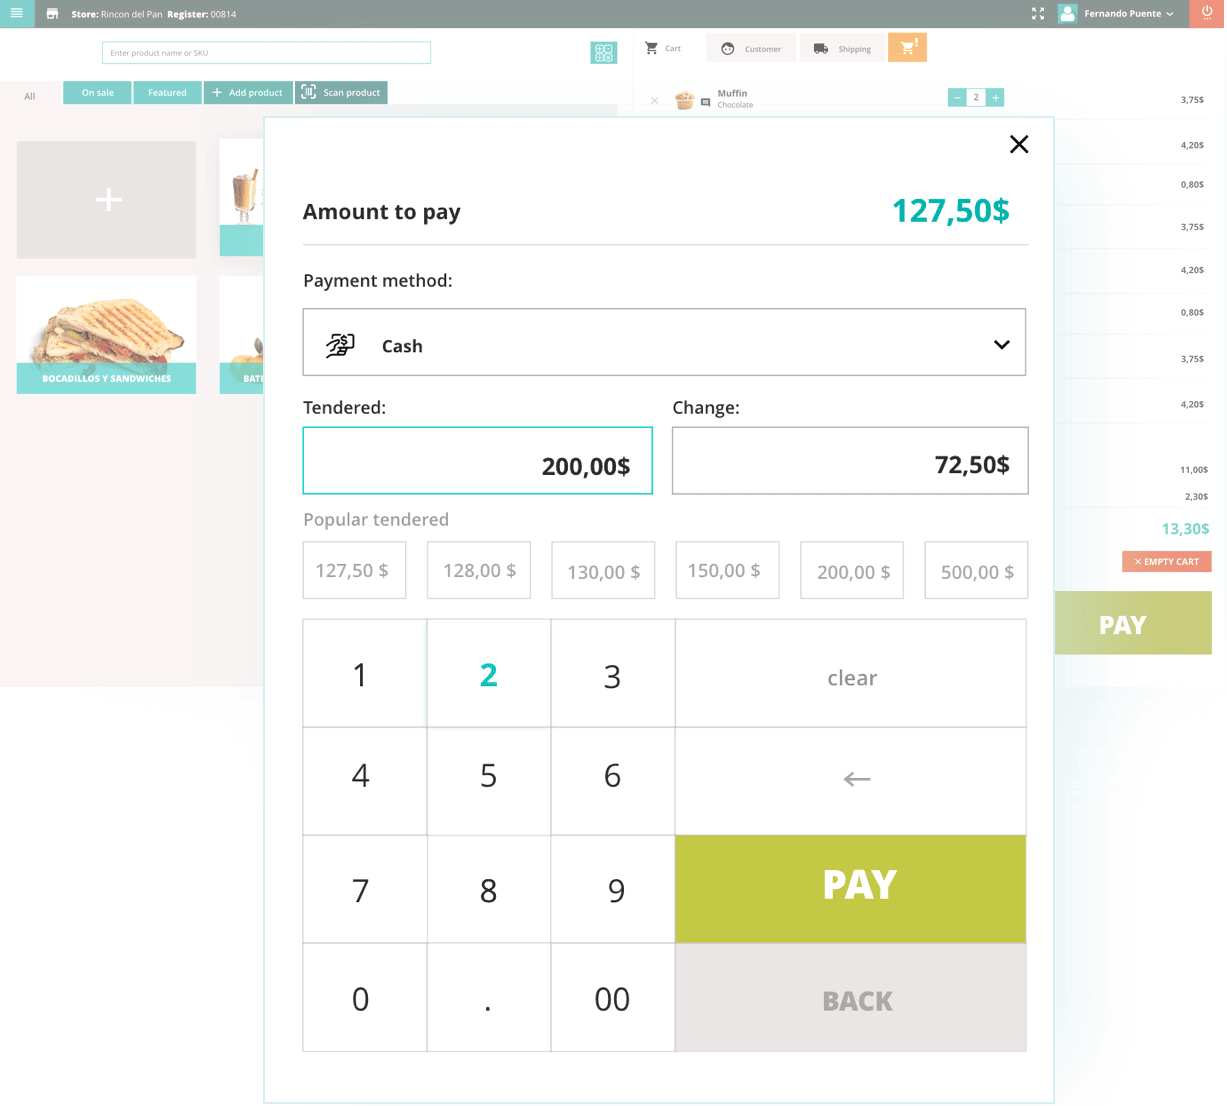
wePOS makes it possible to accept cash or credit card orders. After an order is processed, the plugin lets you print a physical receipt and even offers customization options for the appearance of receipts.
Among its most interesting features are barcode scanning, offline functionality (although at some point we will have to connect to update the databases), secure login, and tax computation.
The free version of wePOS limits us to cash payments only, making it more interesting to buy the product to have the entire functionalities (USD100 for a single WordPress site at the time of writing). Anyway, it is excellent that there is a free version for us to test its operation. In case we need additional features, we will buy the full version.
Point of Sale System for WooCommerce
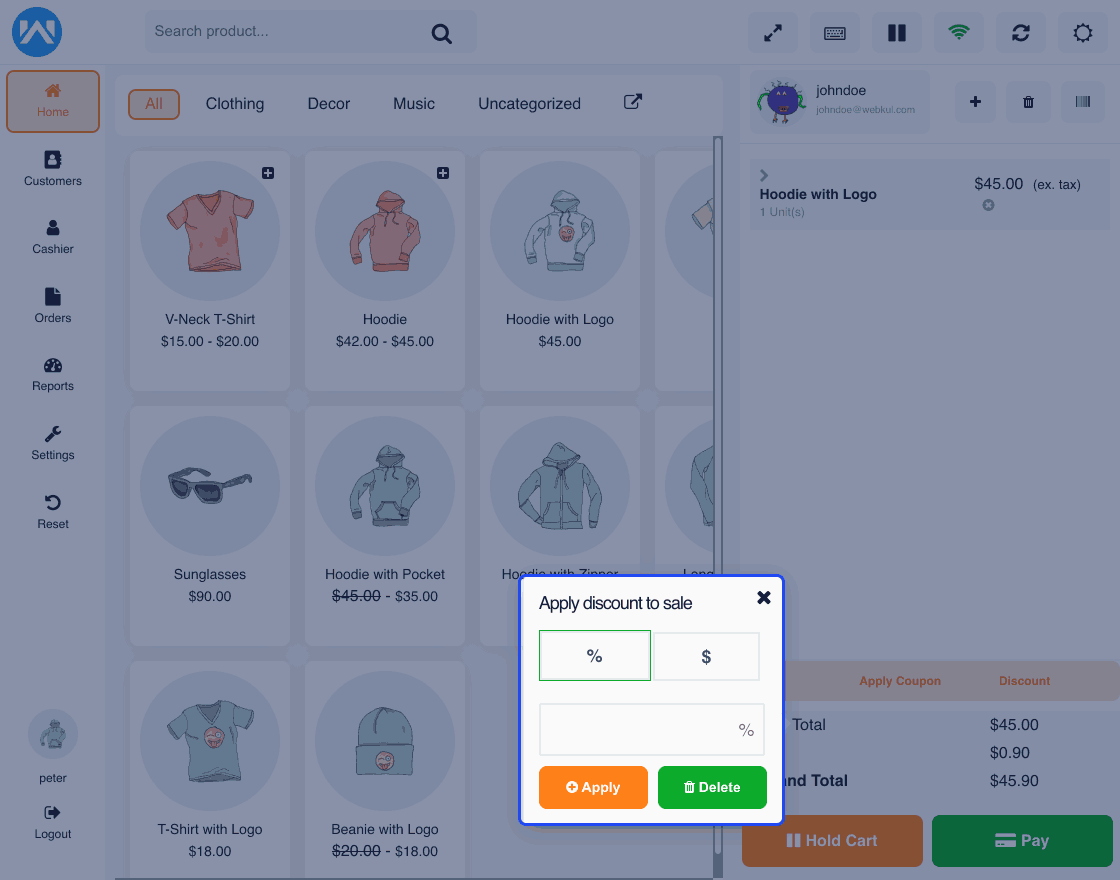
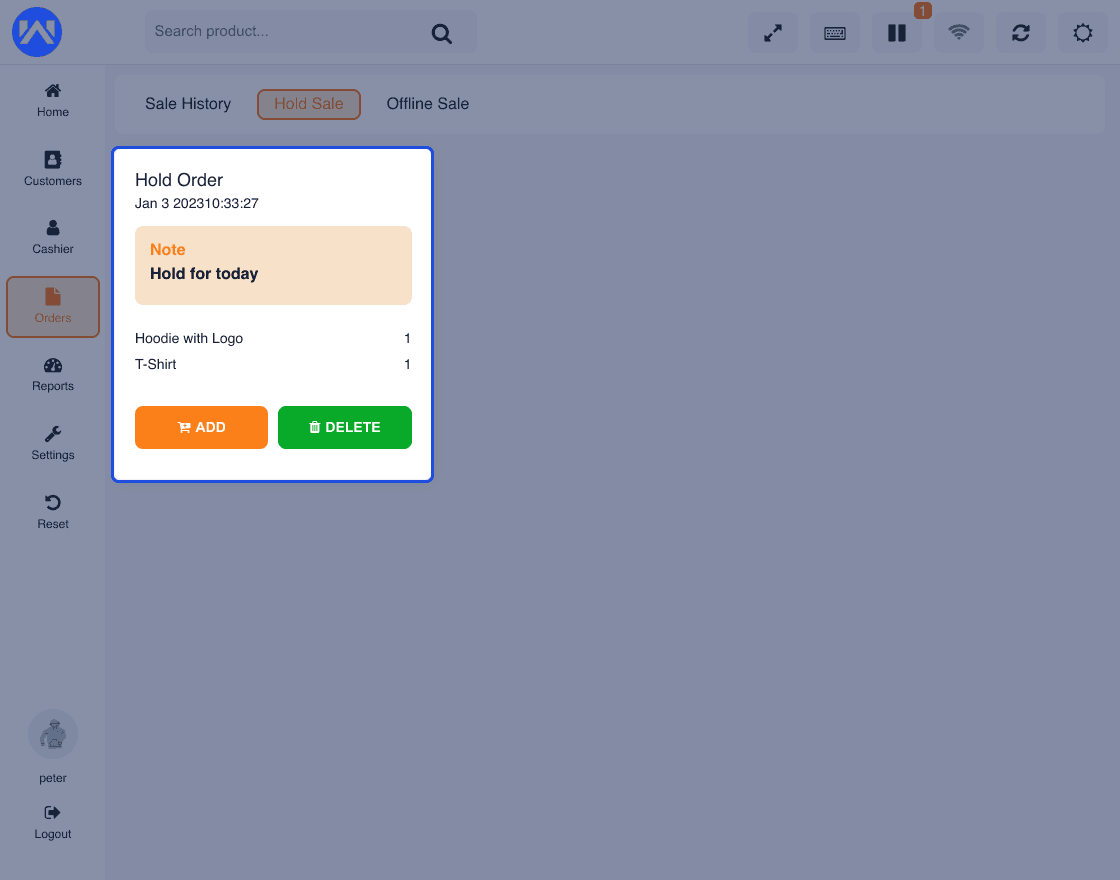
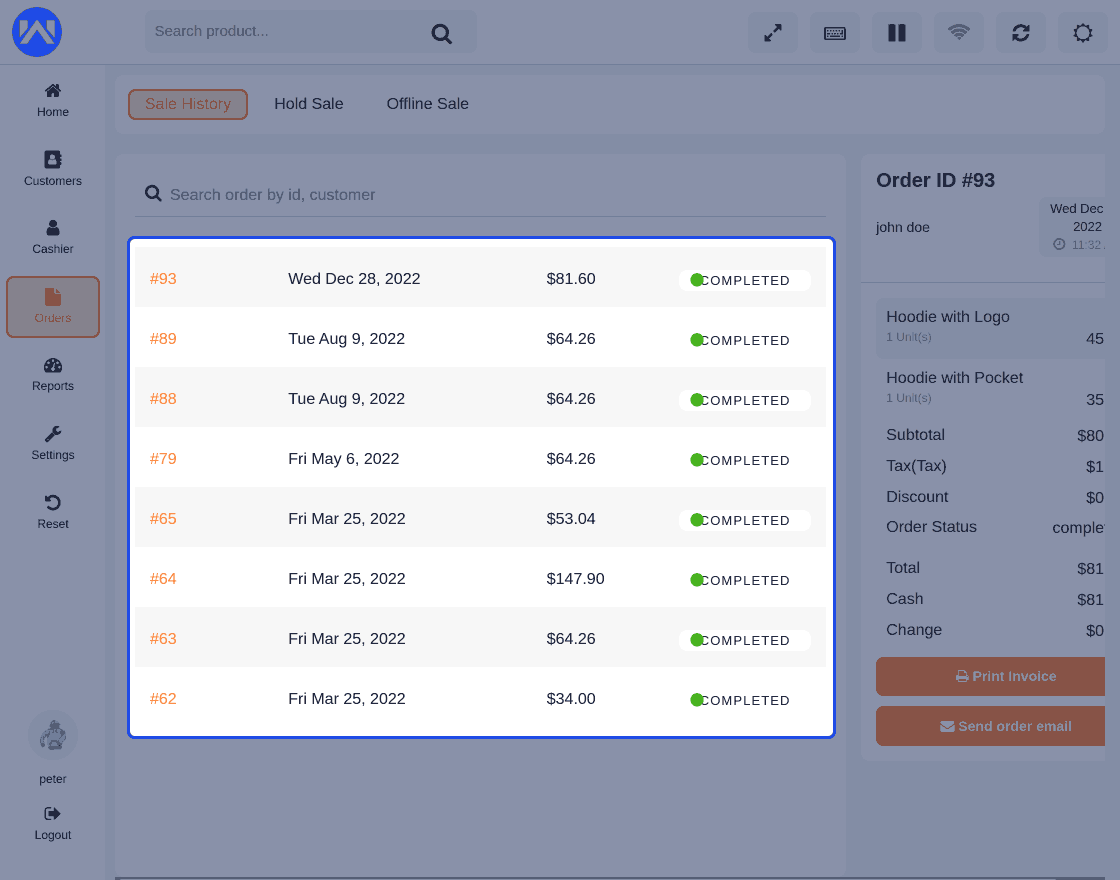
Point of Sale System for WooCommerce is our second recommended plugin for managing points of sale with WooCommerce. This component, developed by Webkul, is not free, so it offers unlimited locations and employees. Staff will be able to enter specific shopper data, apply discounts, enter products by code bar (or manually), and also manage different transactions in parallel.
The point-of system for WooCommerce allows transactions in more than one currency. It accepts cash and card payments, even splitting payments between the two methods.
In addition, it offers offline support via a dedicated Chrome extension.
Built with React, it is fast and easy to use, and we can even test a demo online.
Its standard license on the Envato store is USD99: lifetime upgrades for a single site and six months of support (with the option to pay an additional USD35.25 at the time of this article to extend support to a full year).
FooSales
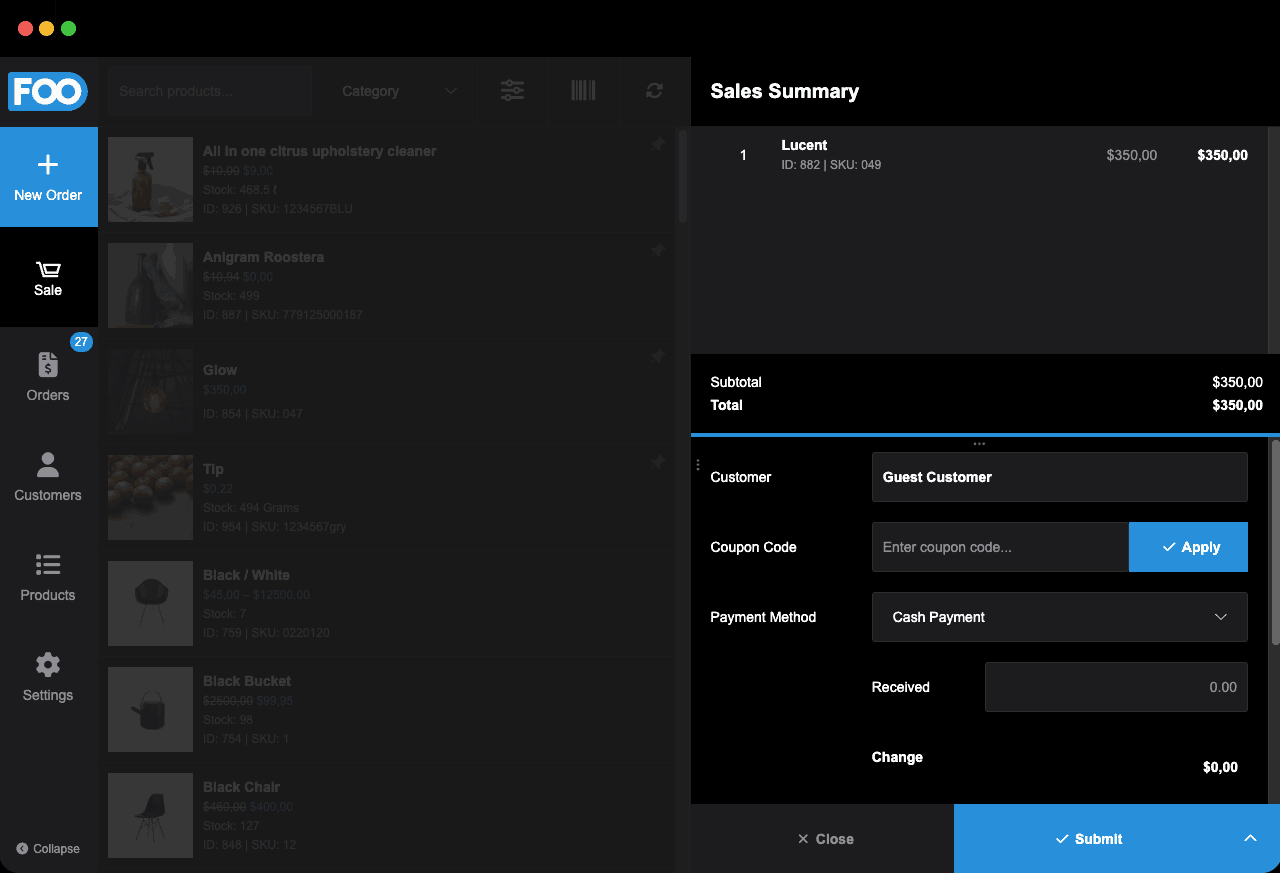
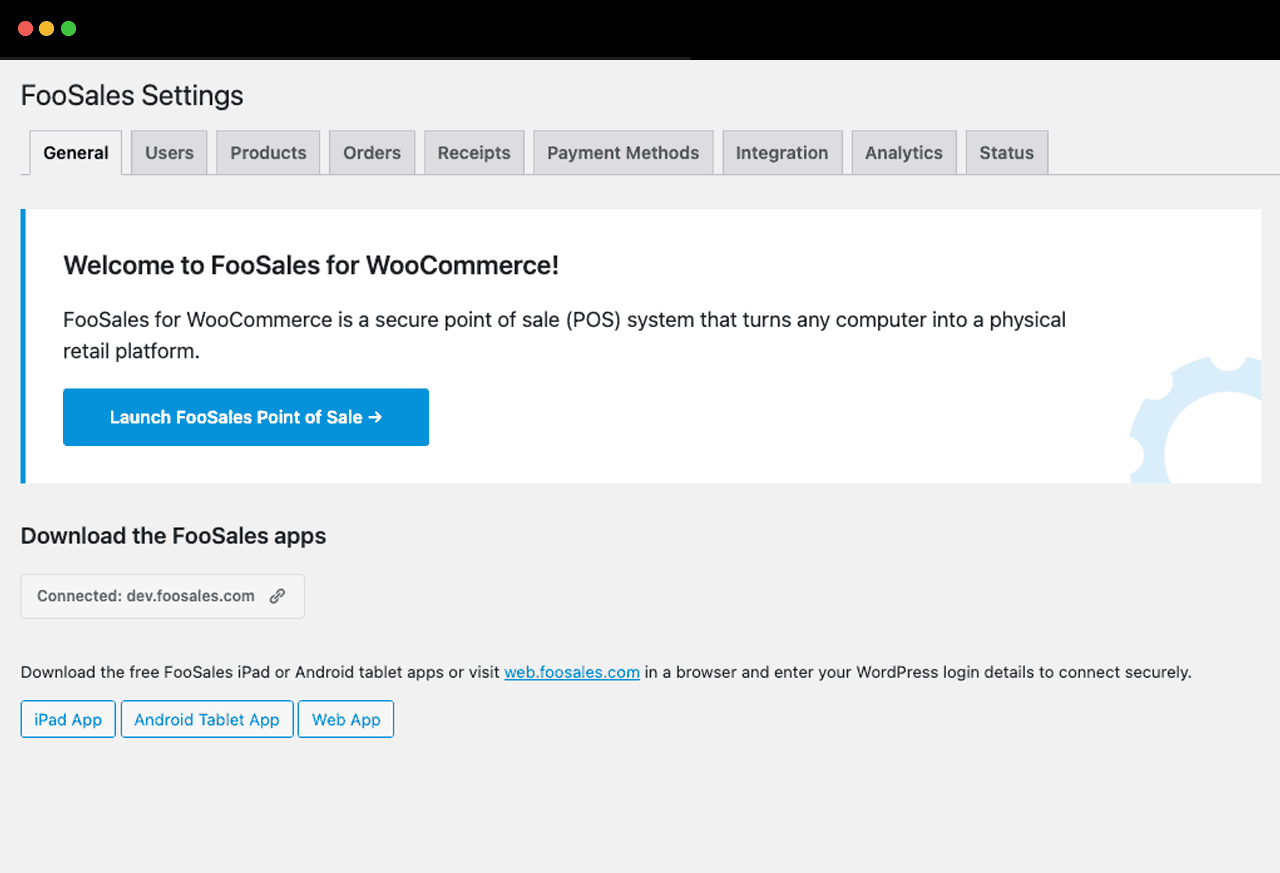
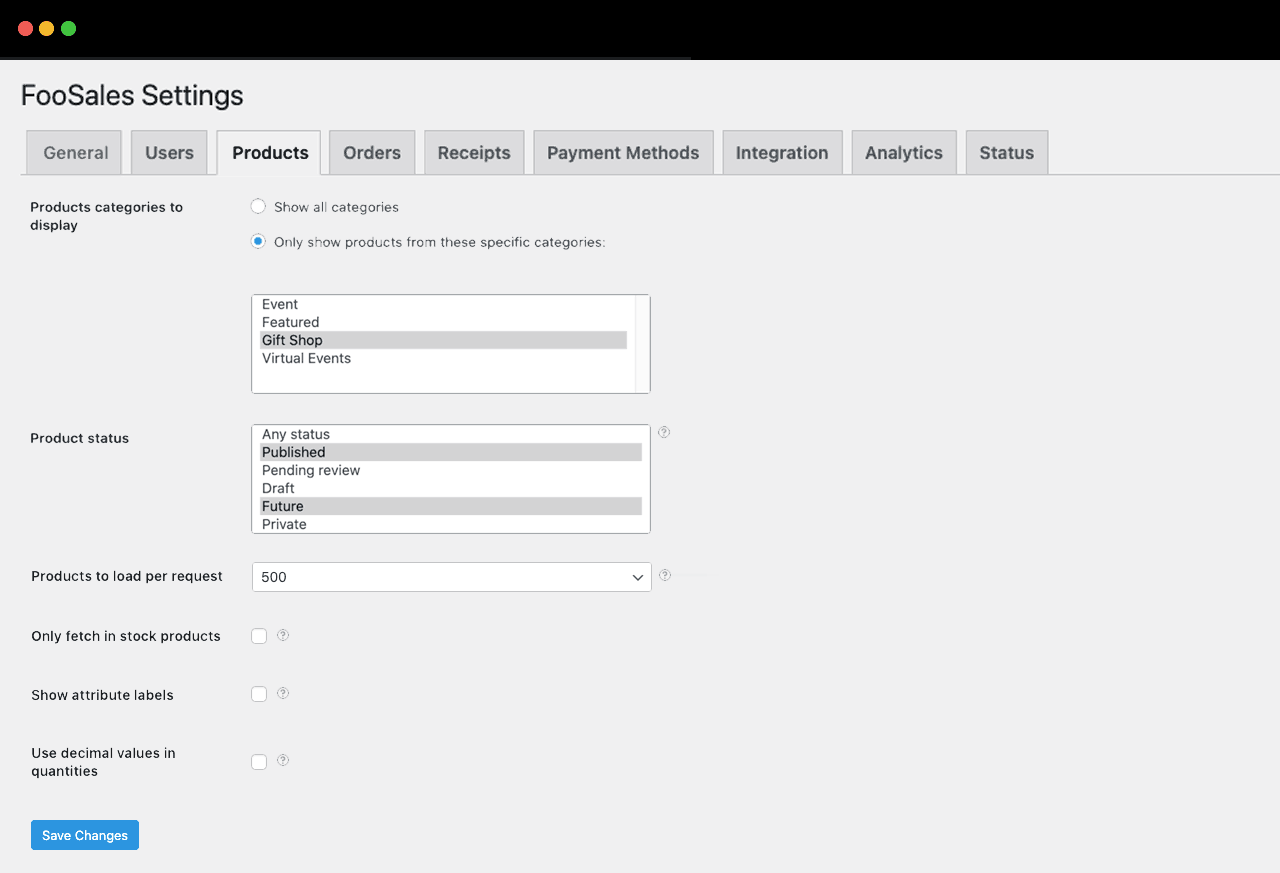
FooSales is another WooCommerce plugin that stands out for its web version and also for its IOS and Android mobile apps. If we are looking for the convenience of selling products and services with a tablet, FooSales is an excellent choice.
Products can be entered via barcode scanning or quickly searched in the app’s search box. Employees can also manage customer data from the interface and synchronize everything with WooCommerce. It has an offline function.
FooSales supports cash, credit, and debit card payments, along with other configurable methods. It is possible to apply discount coupons to orders and calculate taxes.
This plugin can email WooCommerce receipts to customers and, thanks to mobile apps, print paper receipts. Cashiers also have the option to process refunds with this WooCommerce POS system.
Note that FooSales for WP integrates with the FooEvents component, so you can sell tickets for events.
FooSales can be tested right now in its online demo. It offers a 30-day free trial but also all the features so you can fully test it (no credit card required). Its monthly cost is USD15 for a single site with WooCommerce. If we intend to use it on several different sites, we will have to expend USD 44.
Hike POS
Hike POS is a leading cloud-based point-of-sale software that provides everything you need to grow a business in a comprehensive way. That said, it also offers a dedicated plugin for WooCommerce on WordPress sites. Thanks to this integration, it is possible to synchronize product catalogs and inventory, orders, customer profiles, and everything you can imagine in a professional POS system.
The Hike POS app runs on iOS and PC (no, there is no app for Android systems yet). This plugin offers a fast interface that works both offline and online, and supports barcode scanning. Employees can apply discounts and process credit card payments.
Hike POS is notable for allowing gift cards.
Other useful features include refund processing, assigning PIN numbers to staff so they can log into the app with their own ID, detailed analytics of what is going on with our business, and support for multiple stores.
Hike POS is strong with elegance, and it’s the most expensive of all the plugins reviewed in this article. The more economical plan costs USD 59 per month and does not allow online sales through WooCommerce. That is to say, if we want physical store sales in conjunction with the digital WooCommerce store on our page, we must choose the PLUS plan (USD 99 monthly).
So, better try its 14-day free trial and then evaluate if this POS ends up being what we were looking for.
YITH POS
YITH Point of Sale for WooCommerce is a relatively new WordPress plugin from the YITH developers team, specialists in several widely used plugins for Woo.
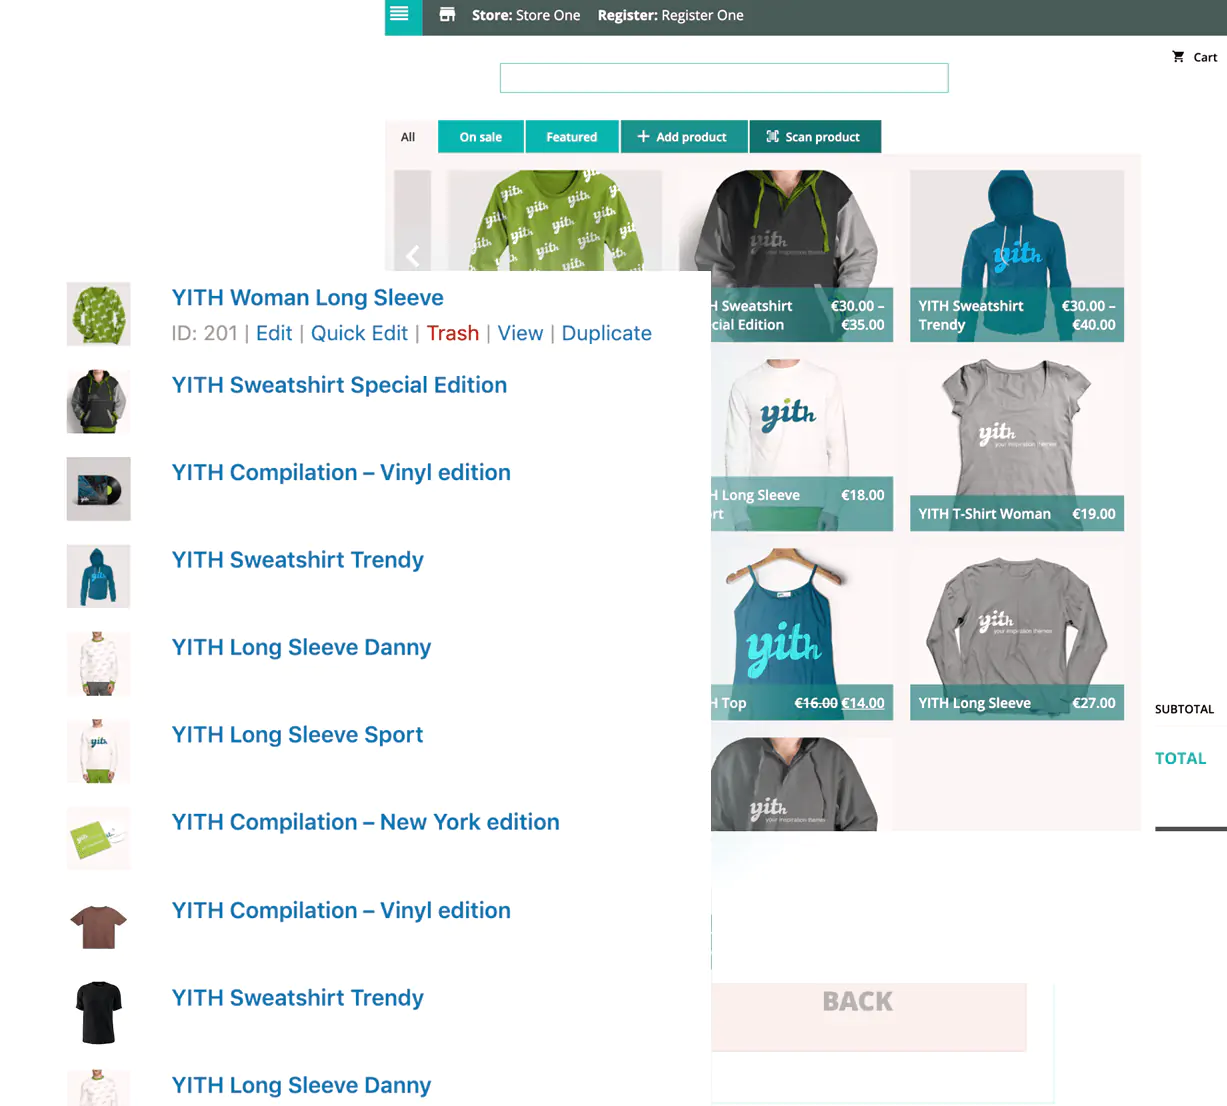
YITH POS allows unlimited physical locations and unlimited registrations. Again, checkout staff can search for products or scan barcodes to quickly find products in inventory. Cashiers can also add new products directly from the POS system.
YITH POS supports cash, credit, and debit cards, as well as other offline methods. Multiple payment methods can also be used, and the total amount can be split among them.
Cashier employees can also apply discounts, coupons, and markups to adjust the cost of an order. It is possible to print physical receipts, and these can benefit from different templates depending on the type of receipt. The system supports using a special template for each physical store, for example.
YITH Point of Sale for WooCommerce avoids offline mode. Nor does it offer a mobile app (although we can use the system via the web with a design that adapts to any screen).
The price of YITH Point of Sale for WooCommerce is USD 179.99 annually for a single site at the time of writing this review.
OpenPOS
OpenPOS, the sixth point-of-sale plugin analyzed today, is, in fact, quite popular. It allows you to synchronize data between your e-commerce and your physical store(s) and is compatible with a multitude of cash registers and barcode scanning devices.
Checkout staff can also add products manually by typing their name or appealing to the SKU. The WooCommerce OpenPOS plugin also supports price variations by weight, rebate coupons, and discounts.
OpenPOS is a solution compatible with different types of enterprises and businesses.
Suitable for a cafeteria, a bazaar, a decoration, lighting, or clothing store; it is also useful for gyms or sports clubs, clinics and hospitals, pubs, markets, and even supermarkets.
Special mention: just activate the “Cafeteria/Restaurant” mode to access necessary functions, such as table management and the kitchen view screen.
Another strong point of OpenPOS is its web app for PC and Mac, which is constantly being improved and enhanced. Its design, speed, and versatility make life easy for employees who need to use the system.
Like many other plugins already mentioned in this article, OpenPOS allows you to split payments between multiple payment methods, make “zero contact” deliveries, and view real-time sales statistics and reports.
We can try an online demo and evaluate its functionalities (including restaurants and cafeterias).
The basic OpenPOS license is USD64 per year for a single site.
Oliver POS
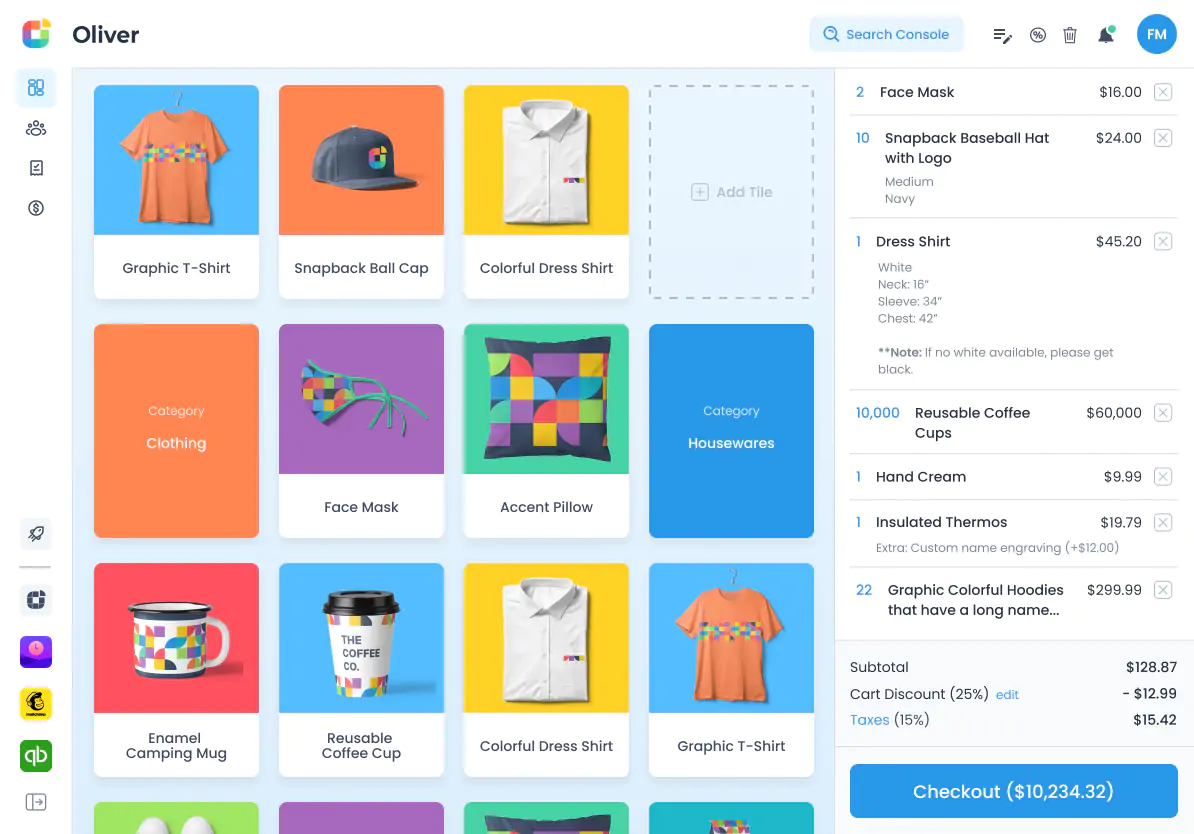
Oliver POS, our seventh nominee, is another powerful WooCommerce POS plugin designed to simplify omnichannel retail store sales. It is a cloud-based POS solution that automatically syncs with our WooCommerce online store.
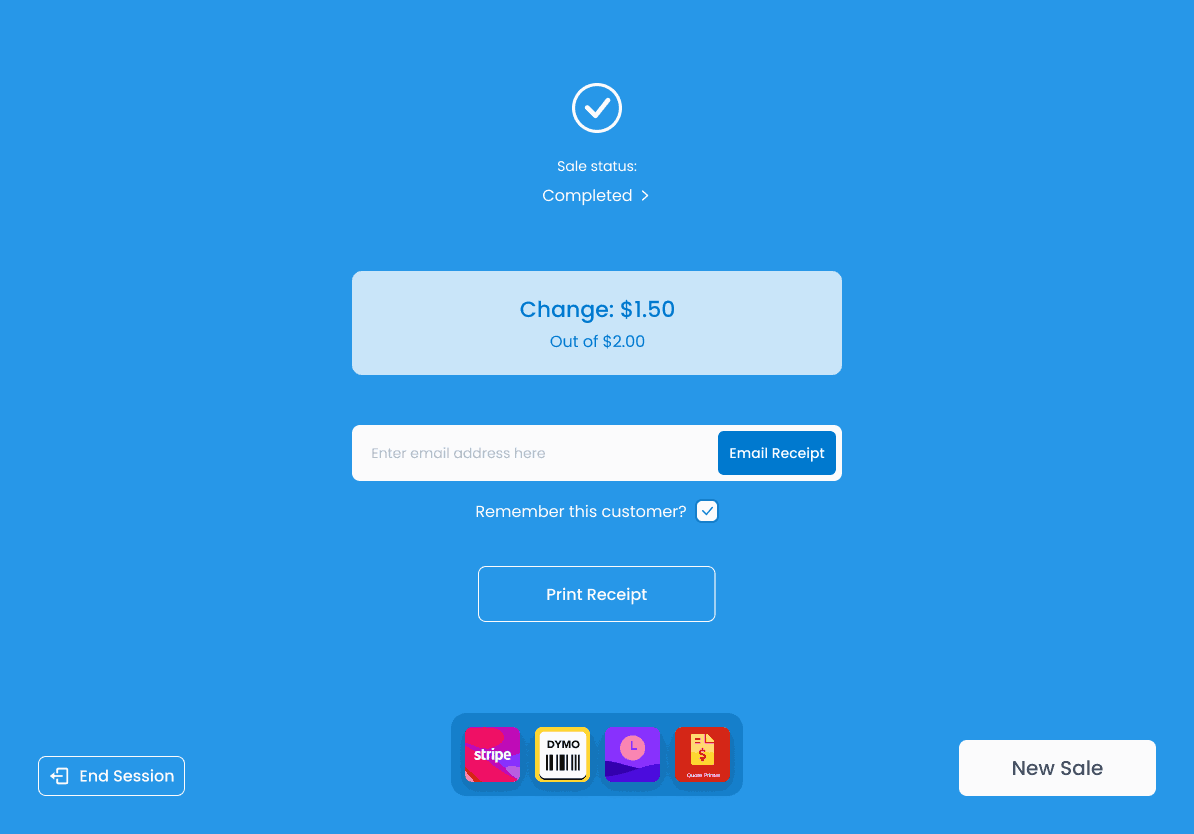
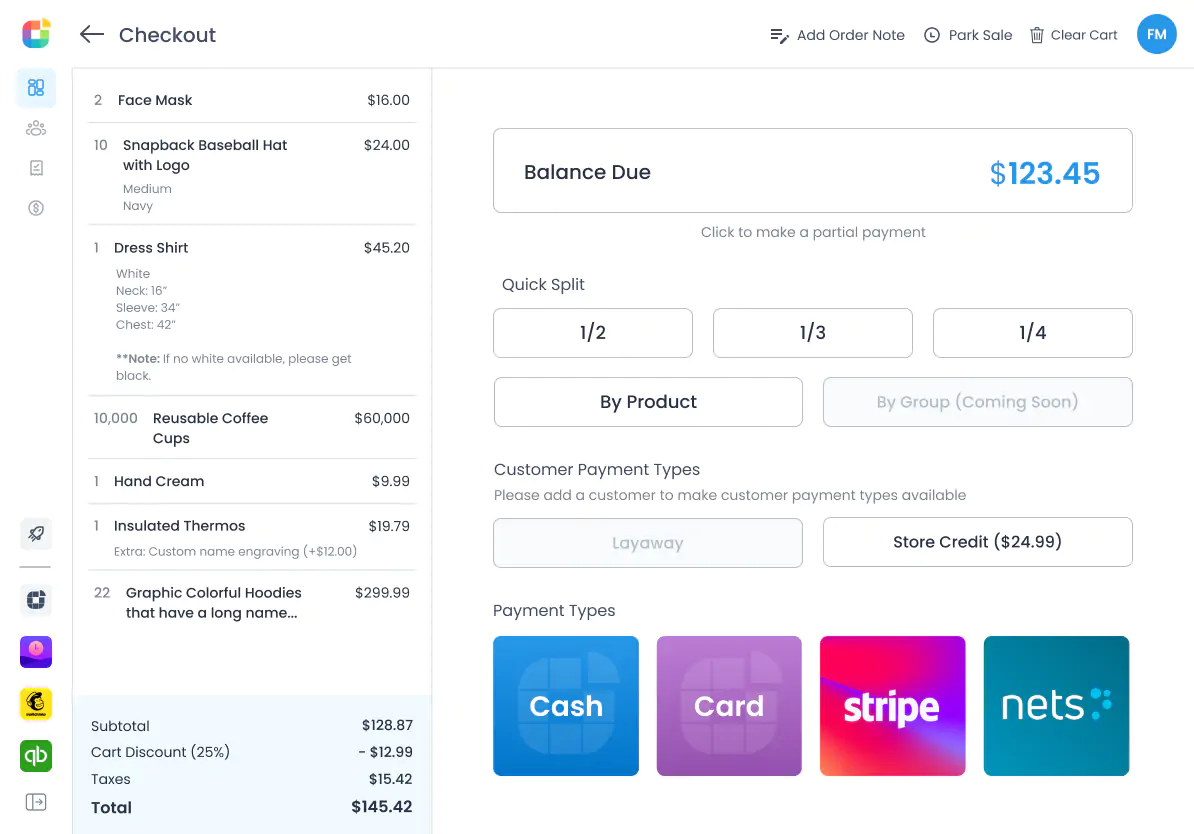
Oliver POS offers all the critical functions needed for a point of sale: personalized rates, email receipts, payment method management, and refunds.
You can try a demo, but only by appointment. Perhaps this may frustrate you since the plugins analyzed above make available online demos without obstacles (though not all of them do). However, through this —somewhat annoying— method, it is possible to get the free version.
Oliver POS effectively brings together our online store with the physical store: after installation and setup, we can access our customer data, view online orders, and manage inventory on the devices we use. This makes the synchronization of inventory, online store product management, and physical warehouse stock a simple task. The Oliver POS app is available for both iOS and Android.
Adding to its virtues is the ability to track performance and optimize business operations thanks to built-in reports. Among its reports, the customer report, payments, prospects, and sales summaries stand out.
The BASIC plan costs USD 24.99 per month, making it suitable for entrepreneurs and small merchants (followed by a PRO and Enterprise plan). Remember that on the offered plans, there is the possibility of using a free version with reduced functionalities for collections.
Point of Sale for WooCommerce
Point of Sale for WooCommerce is our “eighth passenger” in this analysis. In this case, we are talking about an official WooCommerce extension to link our physical store with our Woo. This extension perhaps stands out for its emphasis on security; it allows us to configure restrictions for cashiers and control over commercial operations. For example, it has built-in options to swap cashiers or log them out after each sale.
With the Point of Sale plugin for WooCommerce, we will be able to manage unlimited points of sale and products per physical store. It also supports discounts and modified rates.
In terms of usability, the extension is incredibly intuitive and easy to use. It allows you to customize the product grids for each department of the store and offers multiple display options. It is also possible to add products at the time of sale with their specific attributes.
It is worth noting that this official POS extension for WooCommerce offers the creation of a unique QR at checkout so that it can be scanned and the amount paid via a mobile device.
The extension is priced at USD 16.59 per month or USD 199 per year at the time of writing.
WooCommerce POS
WooCommerce POS is free. Moreover, it boasts of guaranteeing superior speed by storing our product inventory locally (that is, within the same WooCommerce database). Thus, WooCommerce POS is a WordPress plugin that lacks the need for inventory synchronization as well as monthly subscription payments.
Another of its great advantages is that it comes ready to be translated by typical translation components (such as TranslatePress or the WordPress Multilingual Plugin).
WC POS is also recognized for its detailed reports, which provide a well-focused view of significant statistics. Reports include payments, cashier reports, and store reports. If we need a free, fast, and easy point-of-sale plugin for WooCommerce, WooCommerce POS may be the winner, and that’s why it deserves the final spot in this review.
We can test this plugin immediately in its online demo.
So we come to the end of this analysis, hoping you have found it helpful. Faced with the question, “But what is the best POS plugin for WooCommerce?”, the answer is that it is to the taste of the consumer. It will depend on our special needs or pretensions and, of course, how much money we intend to invest. If economy is not an issue, FooSales and Hike POS offer well-polished solutions and have an app for mobile devices. If we don’t want to spend a penny, we can use WooCommerce POS or the free versions of OliverPOS and WePOS.
No need to worry about compatibility, as all options work very well, and they are also compatible with the popular Shoptimizer theme, widely used in the community.
We invite you to leave your impressions in the comments section. Best of luck, and thanks for reading.
Why not assess the quality of our hosting service?
We offer assisted and free migration services along with a 30-day satisfaction guarantee
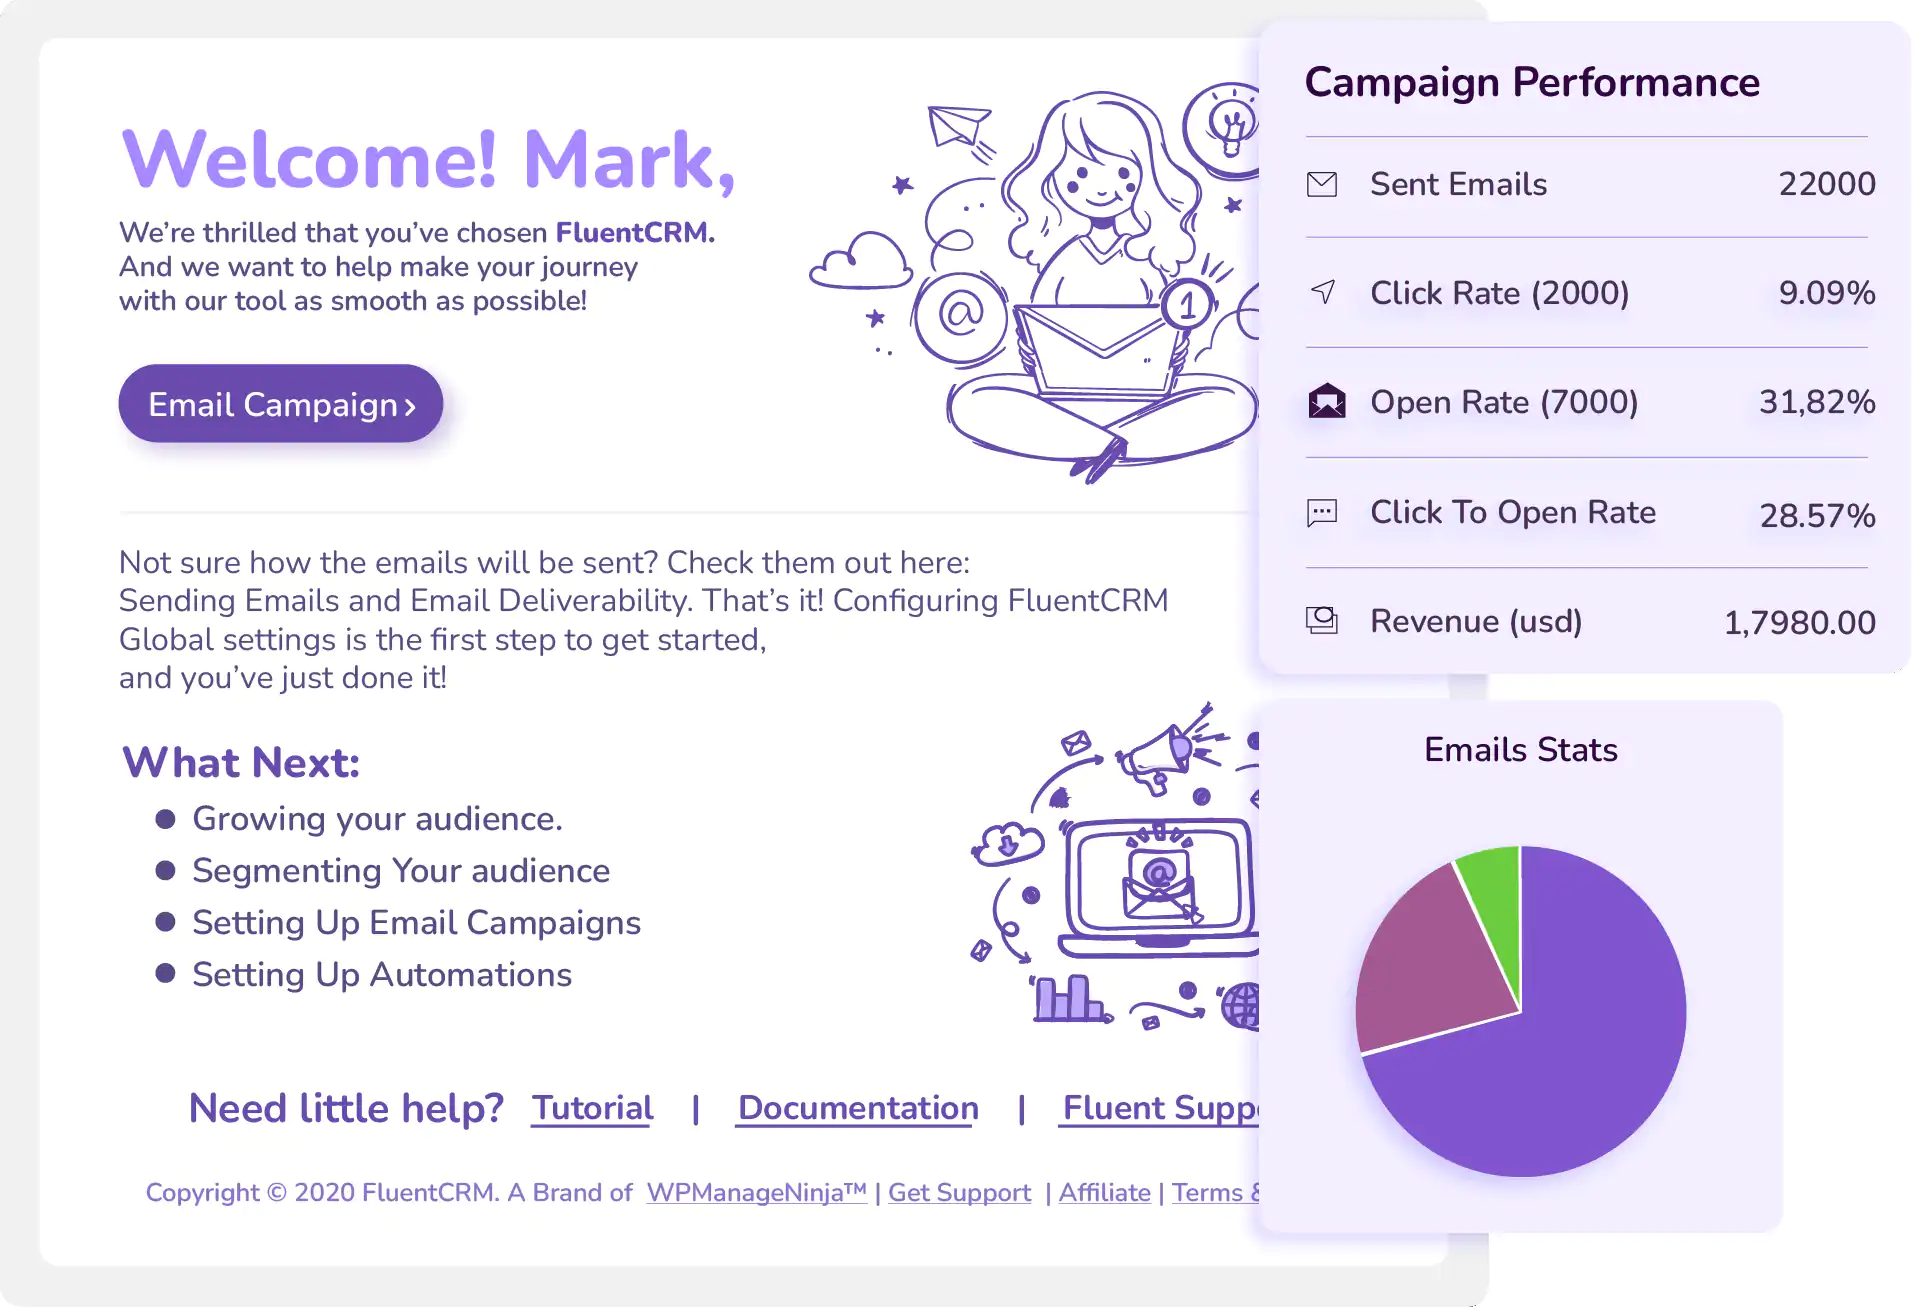
FluentCRM is an email marketing automation plugin for WordPress. Manage your leads and customers, email campaigns, automated email sequencing, student and affiliate management, user activities, and many more in one place—without having to leave your WordPress dashboard!
All the essential features you need to skyrocket your growth.
Email campaign management
Compose emails, filter audiences and send/schedule emails with ease, measure open rate, CTR and everything else on one screen!
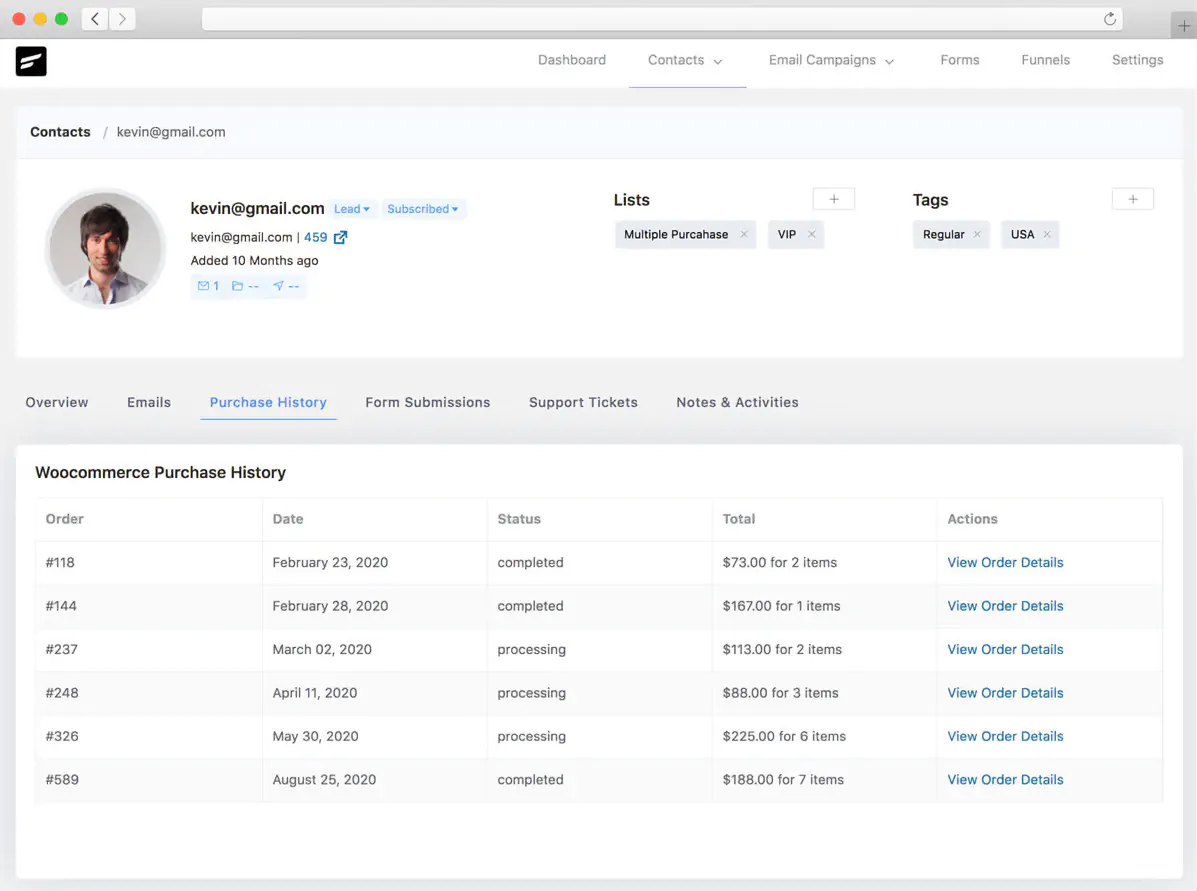
360° contact view
Get to know your users better! When they have opened your emails, purchase history, support tickets, and submitted forms, get everything at a glance.
Contact segmentation
Categorize your users into different lists, tags and priorities automatically. Set the conditions and let FluentSRM do the work for you.
Email sequencing
Run your entire business on autopilot with sequence / drip emails. Design sequences and set triggers based on user registration, product purchase, etc.
Automated email funnels
You don’t need to be a developer or a professional marketer to design effective email funnels! Monitor every stage of your funnels and improve them instantly!
Granular reporting
Never miss an action. From campaign reports, CTR, and A/B testing to the engagement of a particular user, see everything in one place.
● Unlimited email campaigns ● Marketing automation ● Email list management ● User activity monitoring ● WooCommerce integration ● MemberPress integration ● Webhook integration ● A / B Testing ● Custom HTML editor ● More than 10 referral actions ● Activity filtering ● All SMTP supported
Automating your business has never been so easy
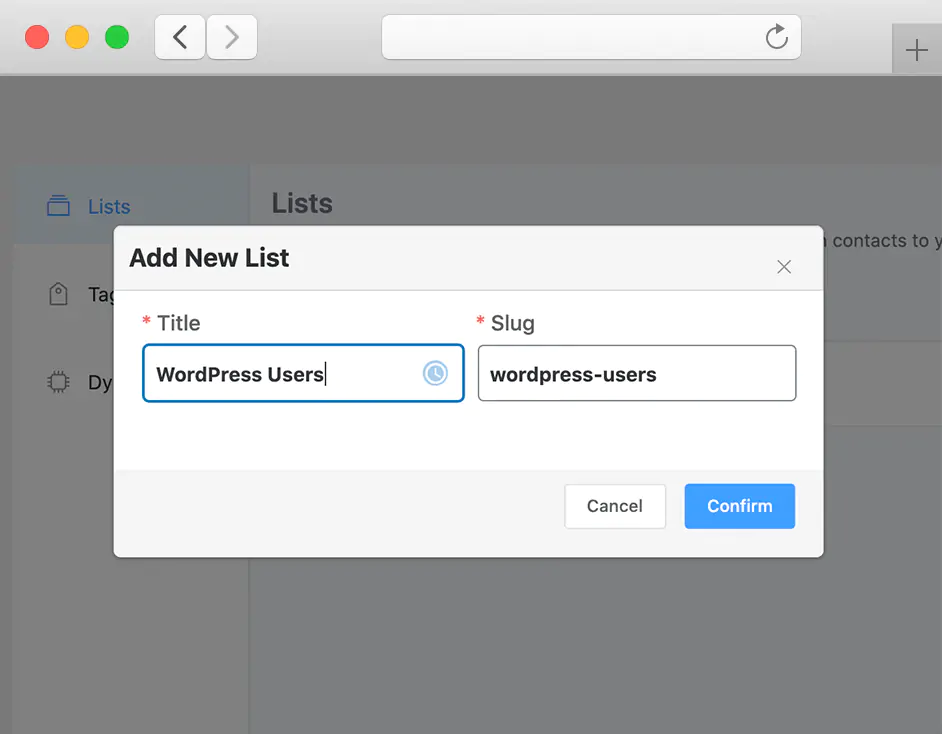
1. Create contacts list
Import your existing WordPress users or upload them as a CSV file. You can also create new lists and add users automatically. Select the trigger that will add a new user to a list. These triggers can be a simple WordPress signup, Easy Digital Downloads/WooCommerce purchases, an LMS subscription/course completion, or a simple newsletter signup via WordPress forms. Set the conditions, and FluentCRM will start adding users to the appropriate lists automatically.
2. Send emails
Sending mass emails has never been easier! Create an email campaign, draft a new one, or select one of your saved templates. You may want to A/B test your subject lines or play with the pre-header; FluentCRM has got you covered! Compose the body of the email. The shortcodes and layout templates will come in handy. Set up UTM parameters for additional tracking if you need it. Send emails to a list of recipients; exclude some if you need to; and don’t forget to send a test email and preview the settings before sending or scheduling the campaign!
3. Set Automated Funnels and Sequenced Emails
Manually sending out emails every day or week can be a tedious task. Why go through the hassle when you can set up an automated email funnel and focus on your other tasks? With FluentCRM, you can send bulk emails to your users automatically based on their actions (newsletter subscription, form submission, EDD/WooCommerce purchase, LMS subscription, course completion, etc.). Once set, FluentCRM will keep sending out bulk emails based on the actions, conditions, and intervals you set.
4. Turn Leads into Customers
When you are done with the automation setup, it’s time to get paid and make the funnel even more efficient. With FluentCRM’s in-depth reporting feature, you’ll be able to monitor how your different subject lines are performing in A/B testing, which links are getting better CTRs, and which ones are underperforming. Not just that, you can view which contacts aren’t opening your emails using the powerful “Dynamic Segments” option and send them more attractive offers to help them convert leads into paying customers.
5. Why Sell Once When You Can Upsell?
FluentCRM enables you to embark on a journey of a lifetime with your users. With the powerful features this tool offers, you can create multiple sales funnels, which will eventually help you sell more products, services, and courses to your already existing customers. Whenever a user or customer reaches the final stage of your sales funnels, you can use that signal as a trigger to add that user to another funnel. And that will help your users make informed decisions and purchase more from you!
In this guide, we will show you how to easily create a powerful contact form using the WP Fluent Forms plugin.
There are excellent reasons to use WP Fluent Forms: besides satisfying most of the requirements in its free version, it is flexible, easy, and powerful. In this article, we will review its strongest points, plus we are going to teach you how to create a form in WordPress step by step.
Installing a new plugin in your WordPress website
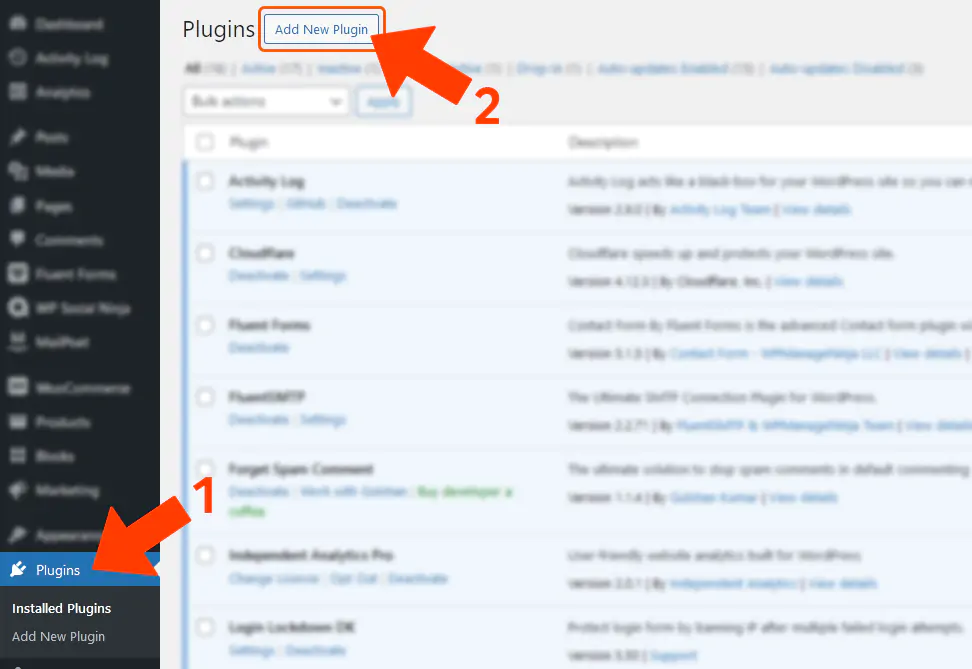
First step: please click on Plugins and then on Add new as shown in the screenshot below:
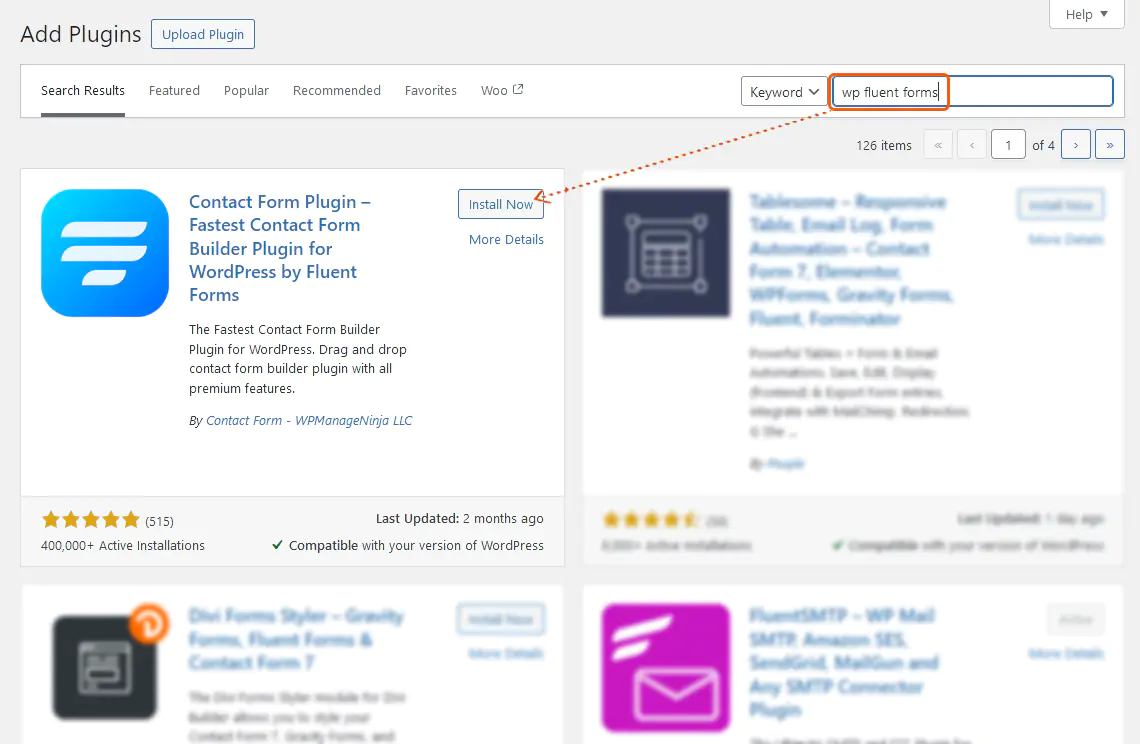
On the next screen, enter ‘wp fluent forms’ in the Search Plugins field and wait for WordPress to return the correct component. Afterwards, click on the Install Now button.
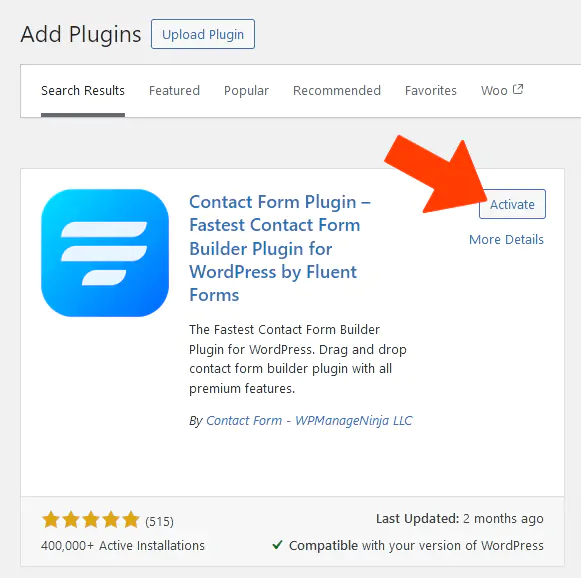
Once installed, click on the same button again (it will change from ‘Install now’ to ‘Activate’).
Note: It is not necessary to install the Fluent Form plugin if you have contracted our Maintenance Plans service (which includes the full PRO version).
Our first form
Once the plugin is activated, we can start creating our new form.
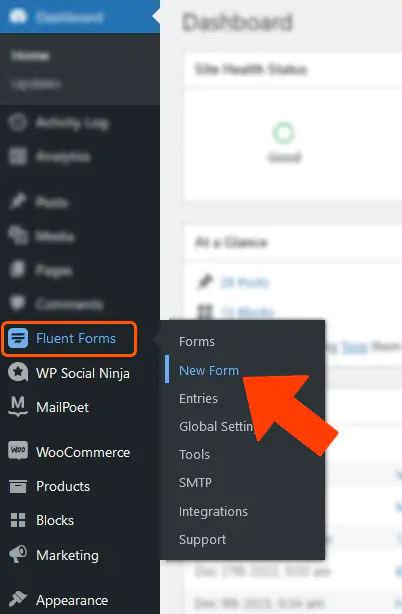
To accomplish this, click on the ‘New Form’ option in the corresponding section of your WordPress tools menu.
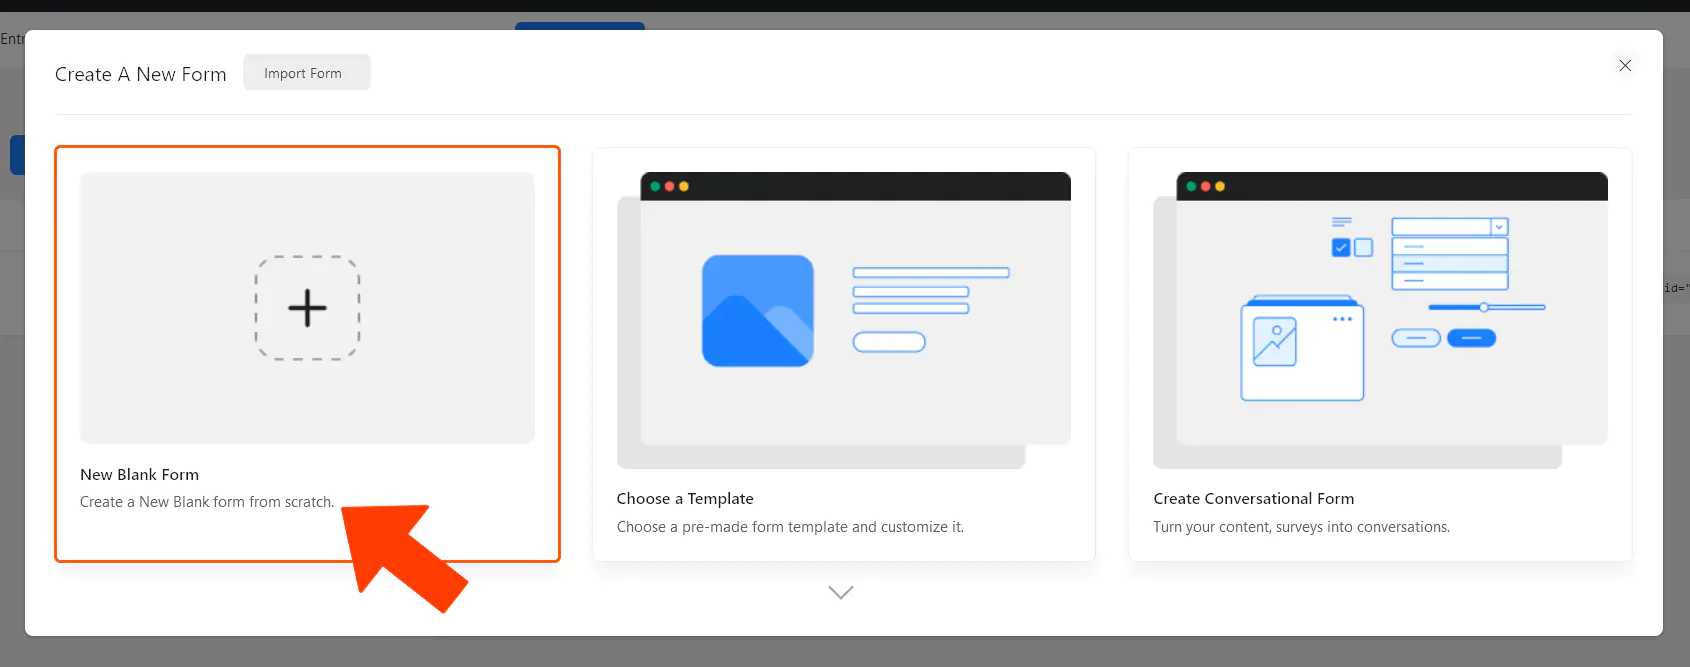
The first pop-up window we will see allows us to choose a template from a library. While this is useful and time-saving, the point of this guide is to learn how to make a form on our own. Creating a new one from scratch is the way to get familiar with the practice so that we can create as many forms as we need and in exactly the way we need them.
Therefore, we will click on ‘New Blank Form’.
After this step, we will meet the form editor.
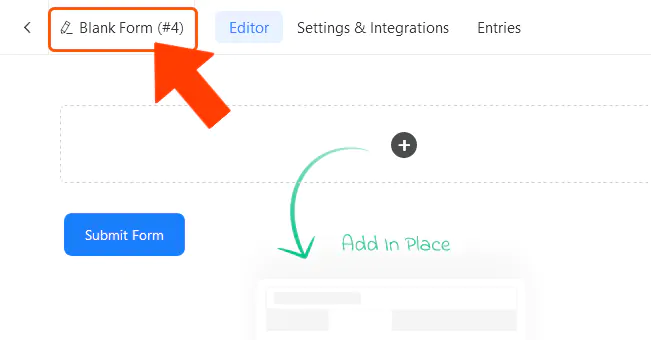
The first thing to do is give a name to our form in order to identify it from others that we may eventually create. It is also the name by which we will invoke it on our site.
Let’s click on the link here marked with orange:
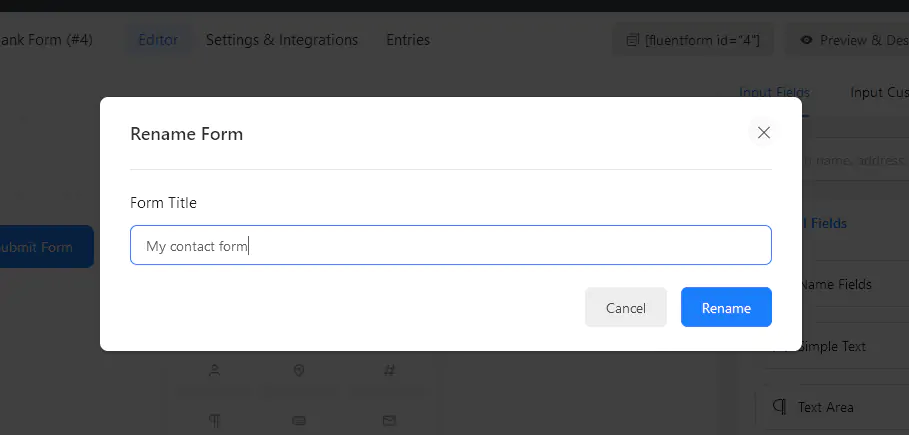
After clicking on the indicated area, a pop-up window will allow us to set the name we want. Don’t forget to click on the blue “Rename” button to save the changes.
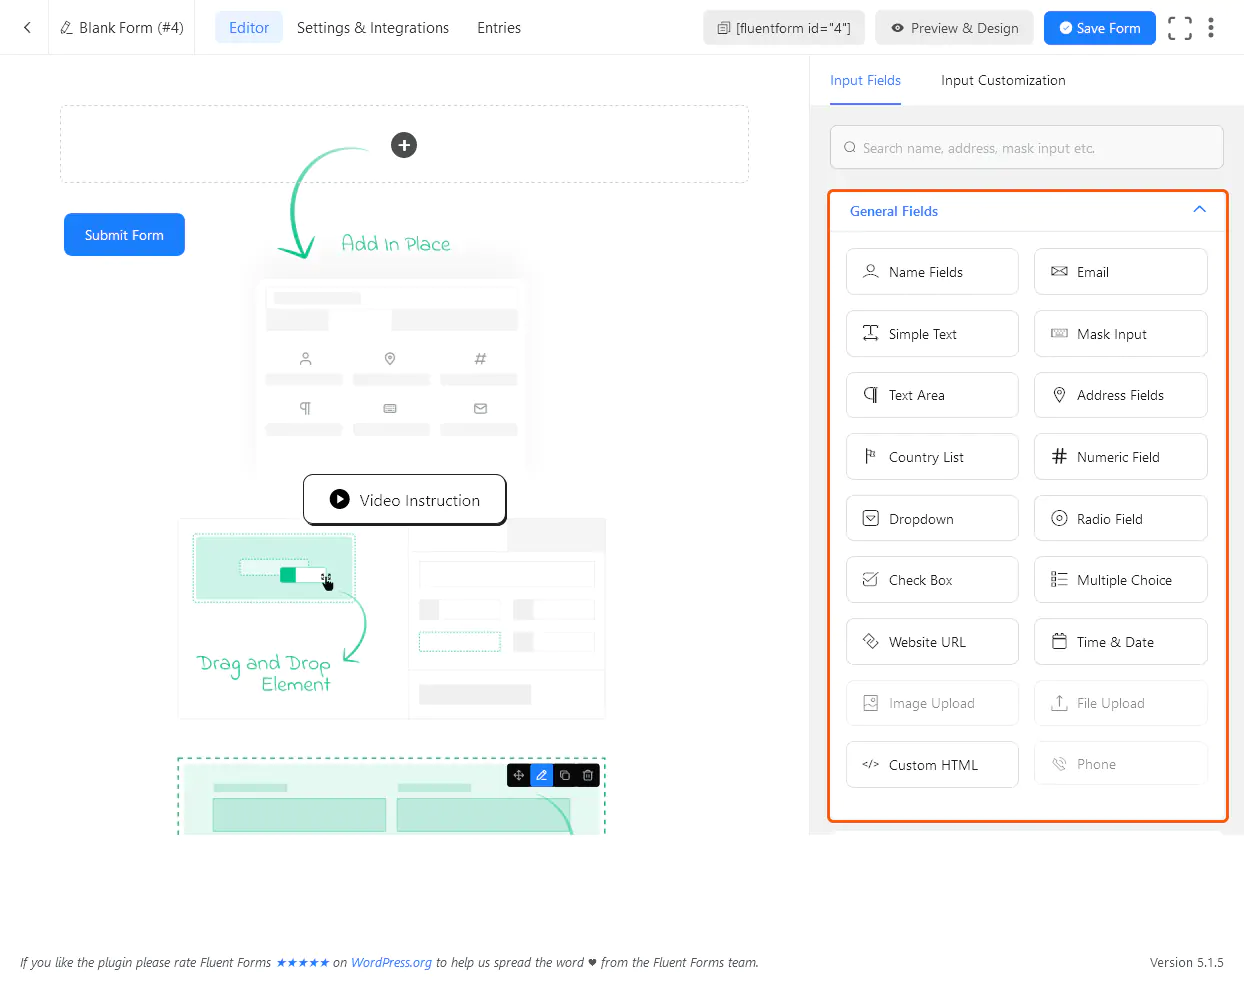
The green indications with their arrows are visual instructions that the plugin gives us: it is telling us that the way to create a form is by dragging and dropping elements (for those who are familiar with Elementor, Gutenberg, or similar: this works the same way). What elements will we use? Well, those that we mark with an orange rectangle in the screencap below.
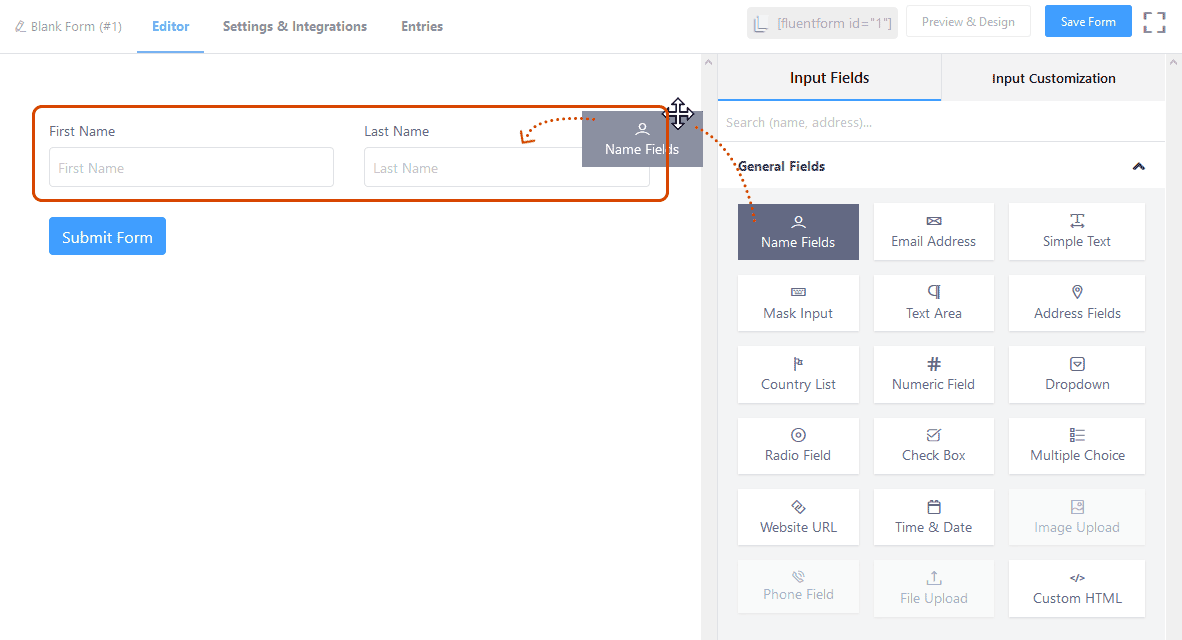
The elements marked in orange make up what in Fluent Forms are considered general elements (the most used ones, typical of a form). For example, a field to enter Name, Email, or a simple text (like a comment that our visitors want to send us or a specification). We can also see that there are other more advanced options, but let’s start from the beginning: let’s drag and drop our first element, Name Fields (field for First Name and Last Name).
Like this:
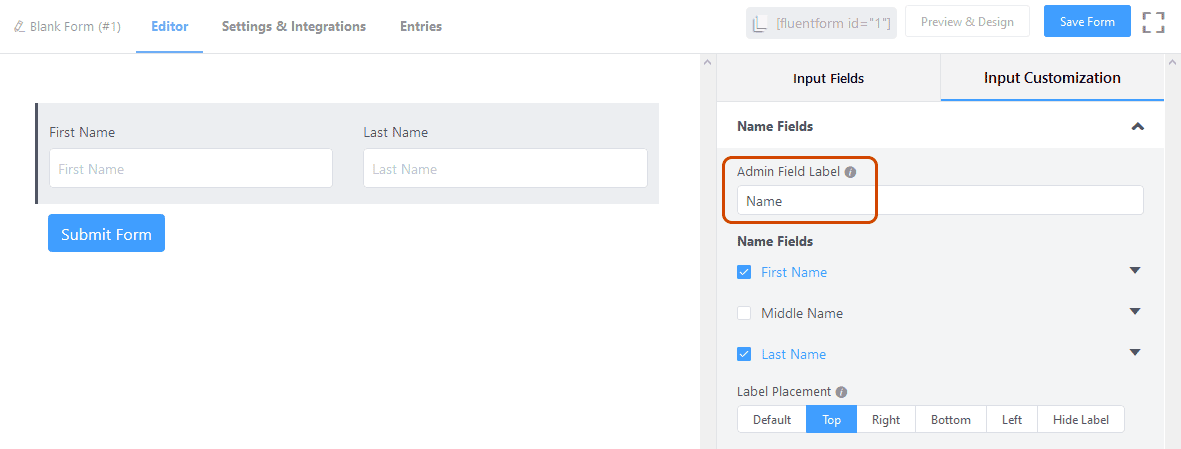
After releasing the element, we will see that our fields for First Name and Last Name have been added to the template (until recently empty) of our new form.
In addition to that, a window is enabled to better configure our form. For example, it is possible to change the identification of this section, which is currently called ‘Name’, to ‘First Name’ by retyping in the field below.
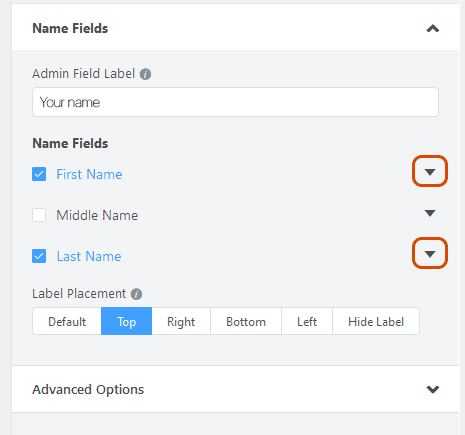
It may prove important to customize the fields that our visitors will eventually fill in. Let’s deploy the corresponding options as shown in orange in the screenshot below.
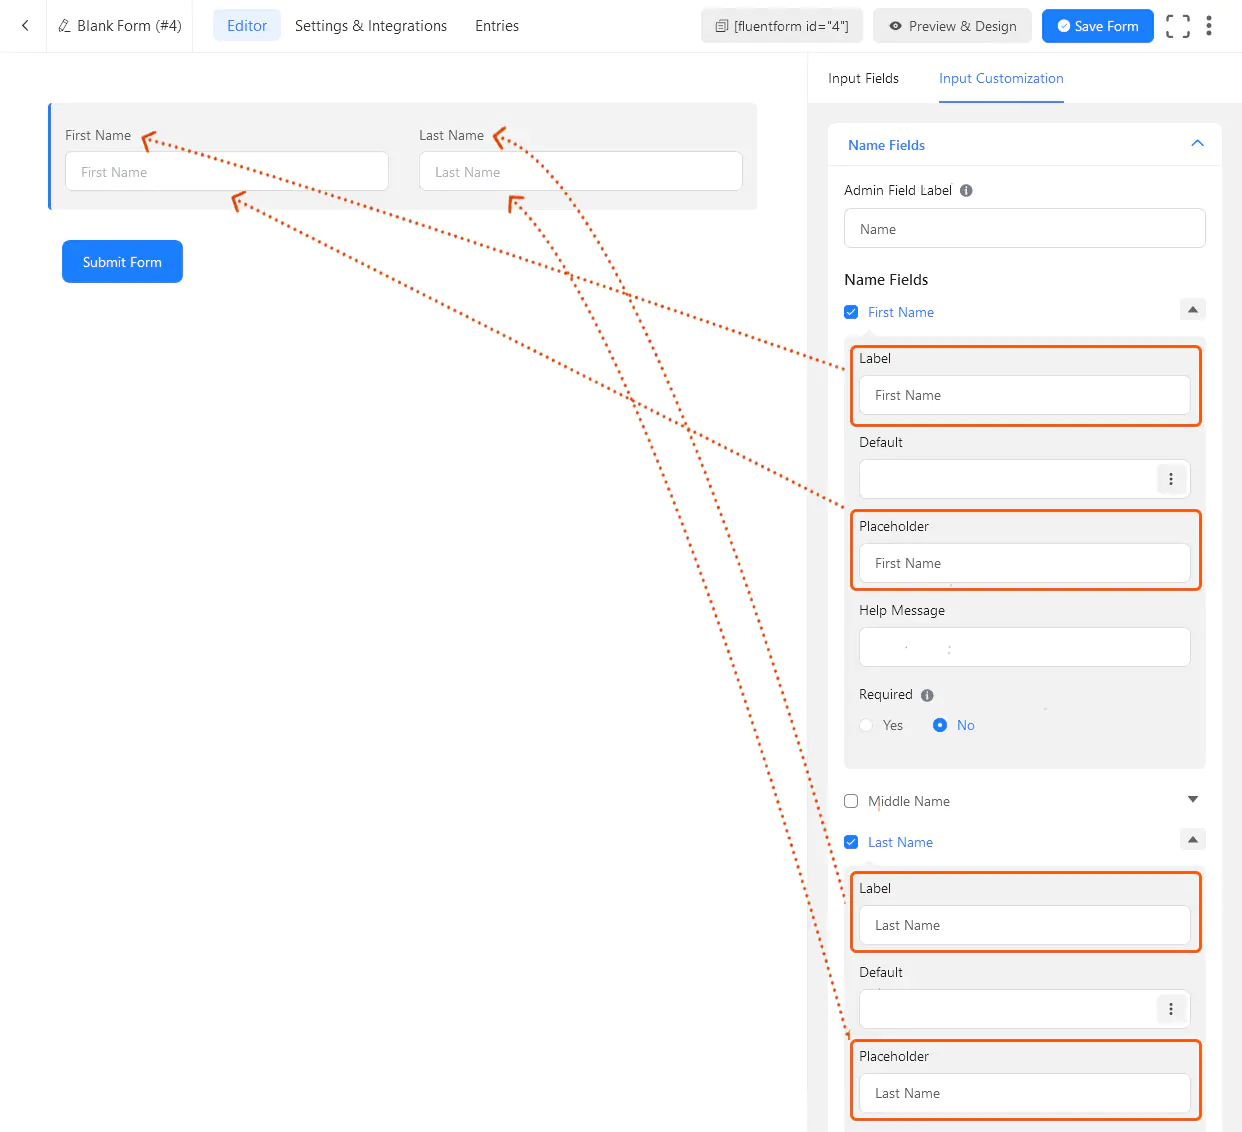
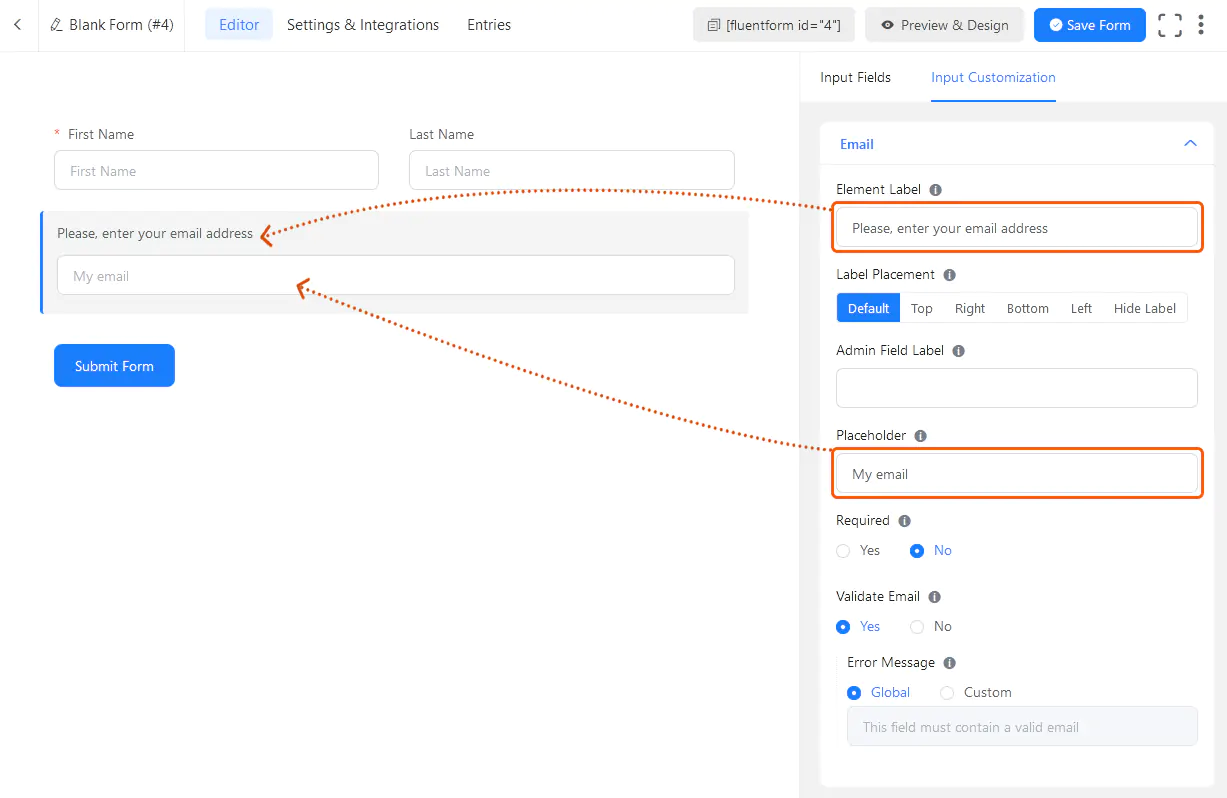
Once these options are displayed, we will be able to modify the description of the fields that our visitors will see when they enter the form to contact us. In the following screenshot, we mark the fields and their corresponding influences in our form.
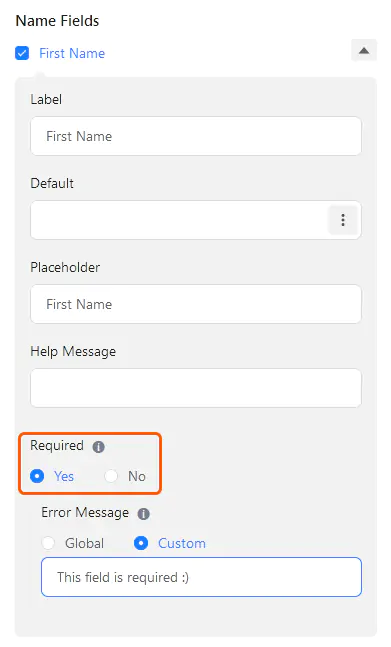
We consider the First Name and Last Name fields to be required. Whenever we check an option as ‘Required’, we will prevent the form submission when our eventual user does not complete that field.
We can decide which fields are required or not by simply checking yes or no next to the ‘Required’ option.
In the ‘Error Message’ field, we can write a custom message, the same message that the person who intends to submit the form without having completed that field will receive. In the example, it is enough to inform him/her that this information is required (‘required field’).
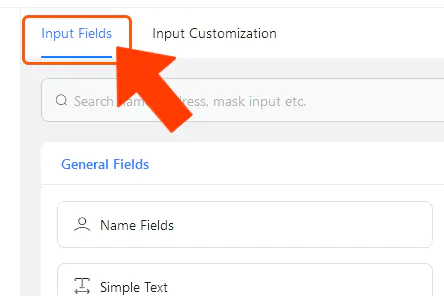
After this step, let’s go back to the tools available to continue adding fields by clicking on the link below:
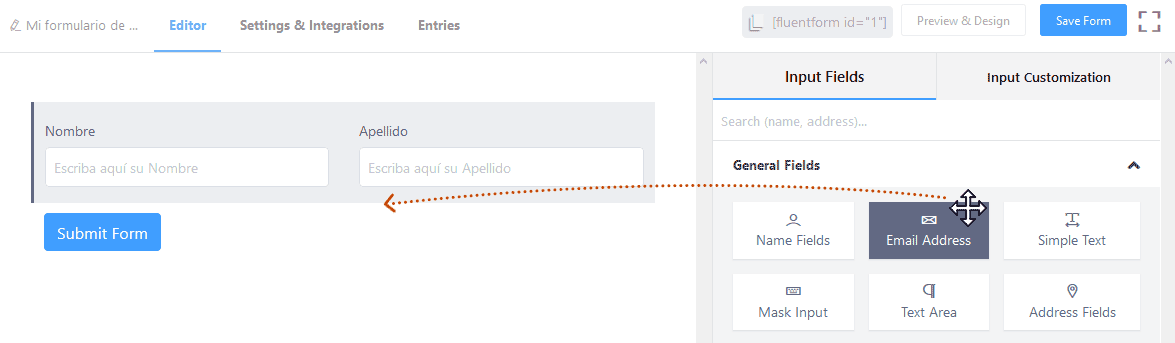
Do you wish to add a field for your visitors to enter their email address? Of course, that’s a necessity. We’ll do it by dragging and dropping again.
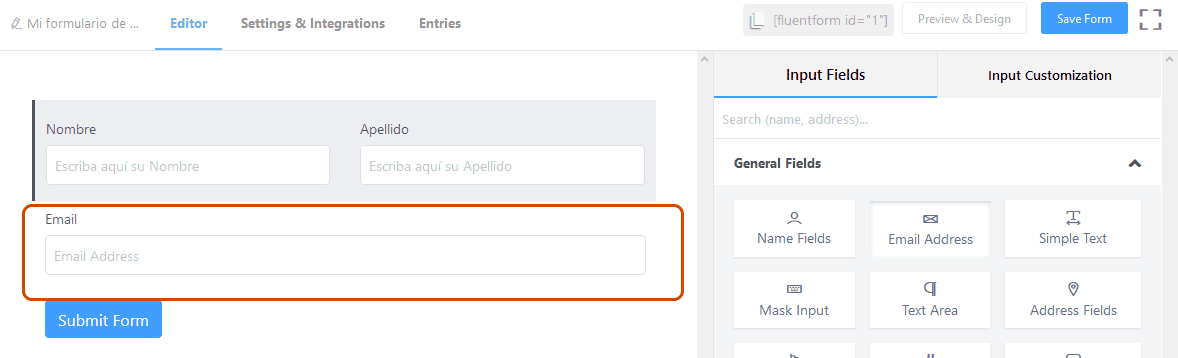
By dropping the ‘Email Address’ element below the First Name and Last Name fields, the result will be as follows:
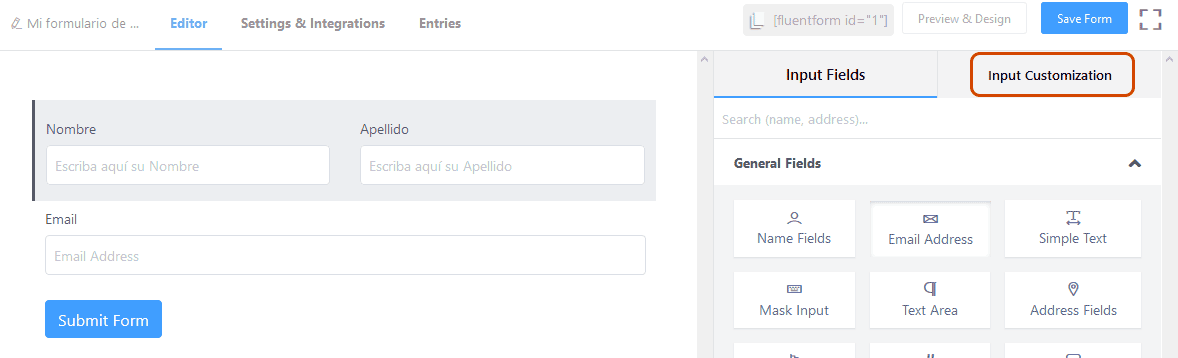
Let’s customize this field by clicking here:
We will then type as we see fit:
By repeating these operations, we will be adding additional fields and customizing them as we wish.
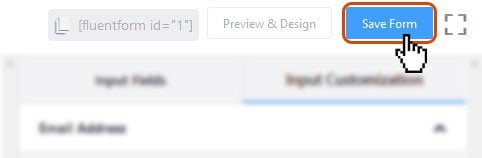
When we are satisfied with our form, having all the fields we need our users to fill in, we click on the ‘Save form‘ button.
Important note: It can be tempting to fill out a very long form in order to collect as much data as possible about our users and customers. However, there is an indirect relationship between the number of users who complete a form and the length of the form. That is to say, the more data we request from our visitors, the greater the probability that they will not complete the information. This is called ‘bounce’, and it is, of course, undesirable. Therefore, we recommend that you really think about what the real essential data is needed for a customer database, for a registration, or for a mere comment on our site. Less can always be more.
Let’s continue:
All forms created will be assigned an identification code, which is called a’shortcode’. The shortcode (or’shortcode’) is the way WordPress allows us to ‘invoke’ some element anywhere on our site (in this case, the element is the created form).
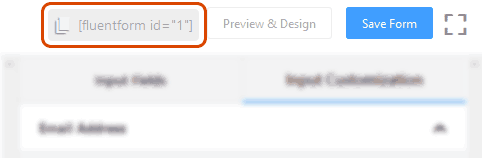
Let’s locate the shortcode of our form:
Clicking on the indicated area in the above screenshot will automatically copy the shortcode –i.e.,
X being the correct form number– to the clipboard of our operating system.
Thanks to this shortcode, we will be able to ‘paste’ our form wherever we need it (either inside an HTML element in Gutenberg, Elementor, in a Post or in the HTML code itself).
If you have any questions, please do not hesitate to write them in the comments. We are here to help you.
Remember that the Fluent Form plugin in its PRO version is included in our Maintenance Plans.
We hope you enjoyed the guide and learned from it, so you can make your own forms from now on. Thanks for reading, and good luck!